Configuration
Overview
Sentec EMS allows companies to customize all features available in the software according to their needs.
NOTE
Only for users with "Setup" write mode permission
Property
On this page, users can complete company data, create document templates for contracts, and set reminders.
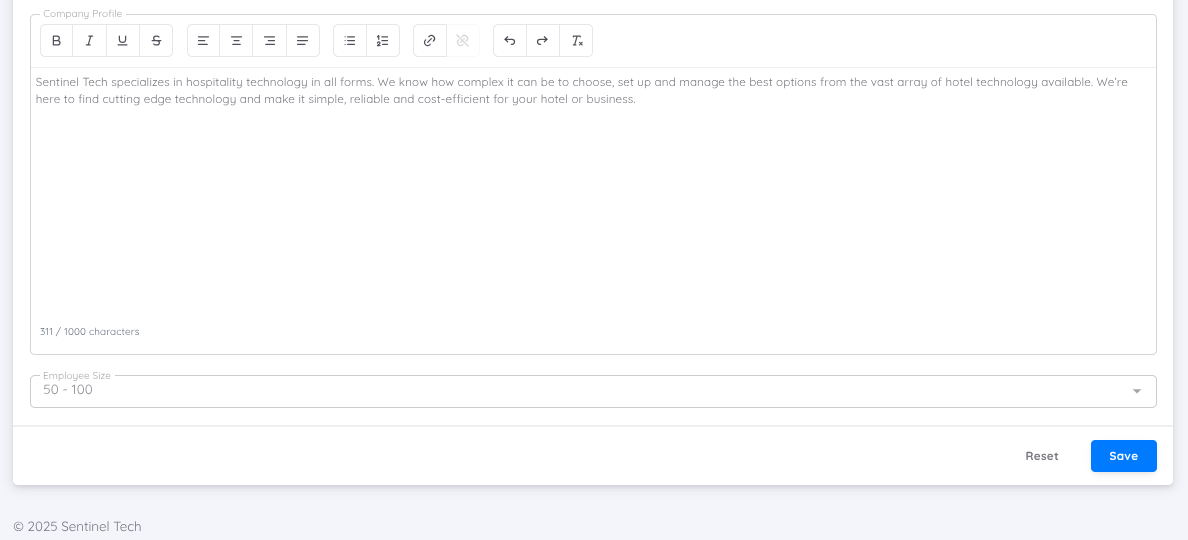
Property data
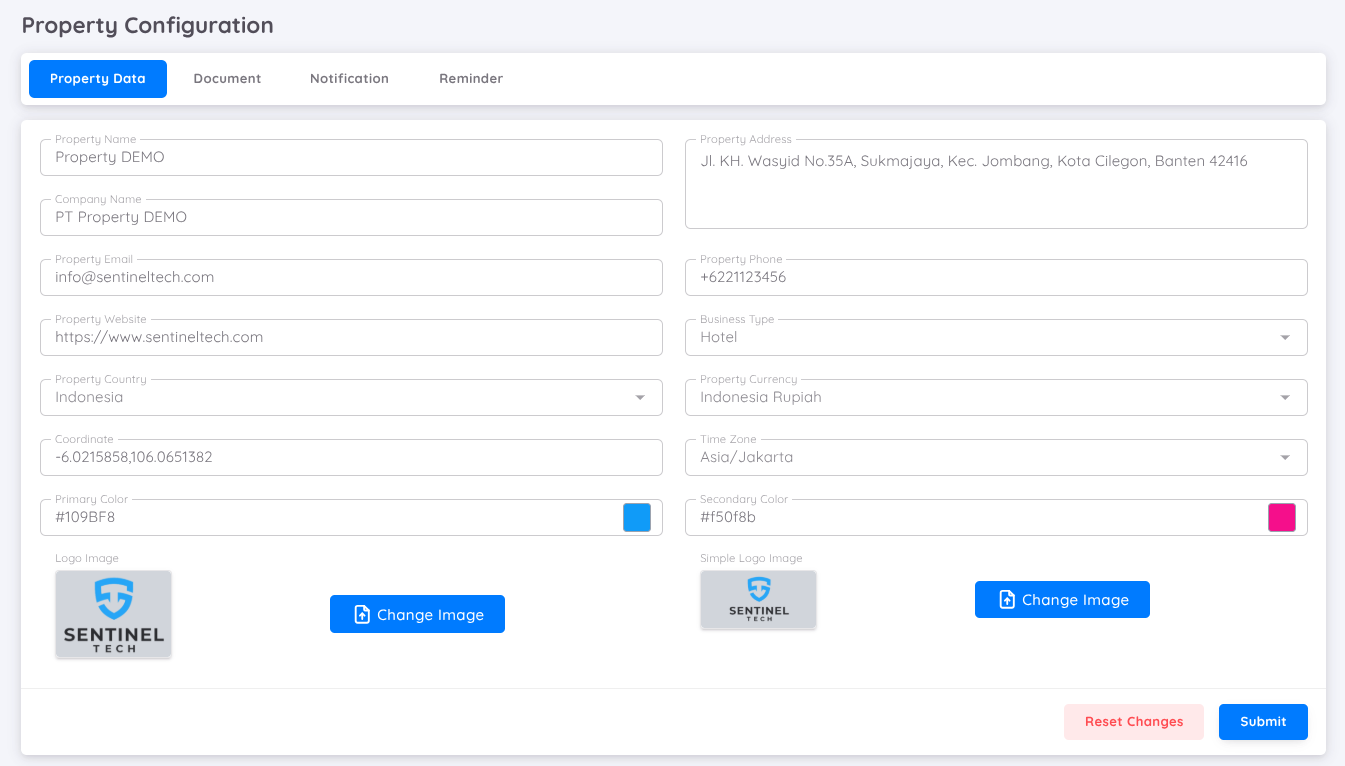
Complete the company data according to the available fields.
Primary Color and Secondary Color will be used as colors in email notifications. The Logo will be displayed on all pages within the application, while the Simple logo will be used in email notifications, checklist documents, and salary slips.
NOTE
The logo size should be adjusted according to the upload form requirements to achieve good precision.
Document
On this page, you can create templates for Document Checklists and Employee Documents.
Document Checklist
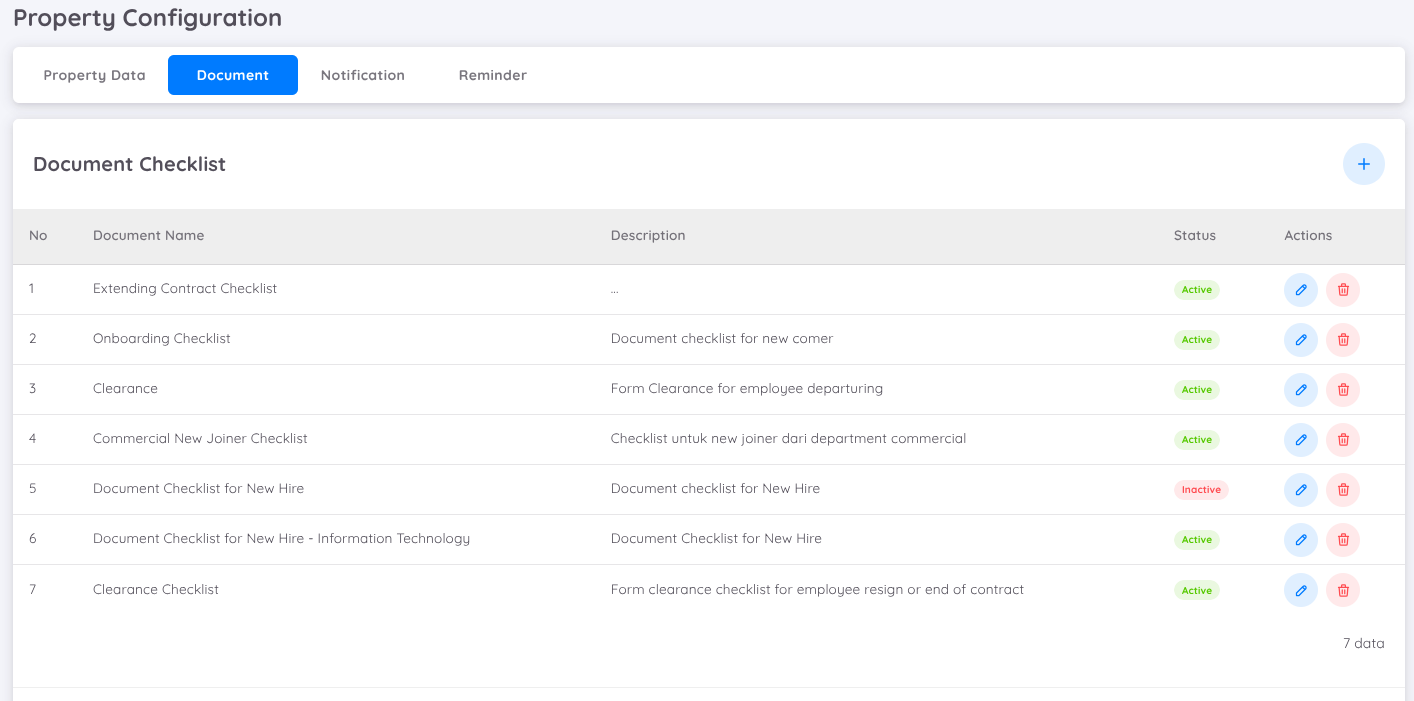
A Document Checklist serves as a supporting document within an employee’s contract. It is integrated into the Contract History, where for each addition or change to a contract, one Document Checklist can be created or assigned as needed.
You can create checklist templates for various purposes, such as:
- New employees
- Resignations
- Promotions
- And many more
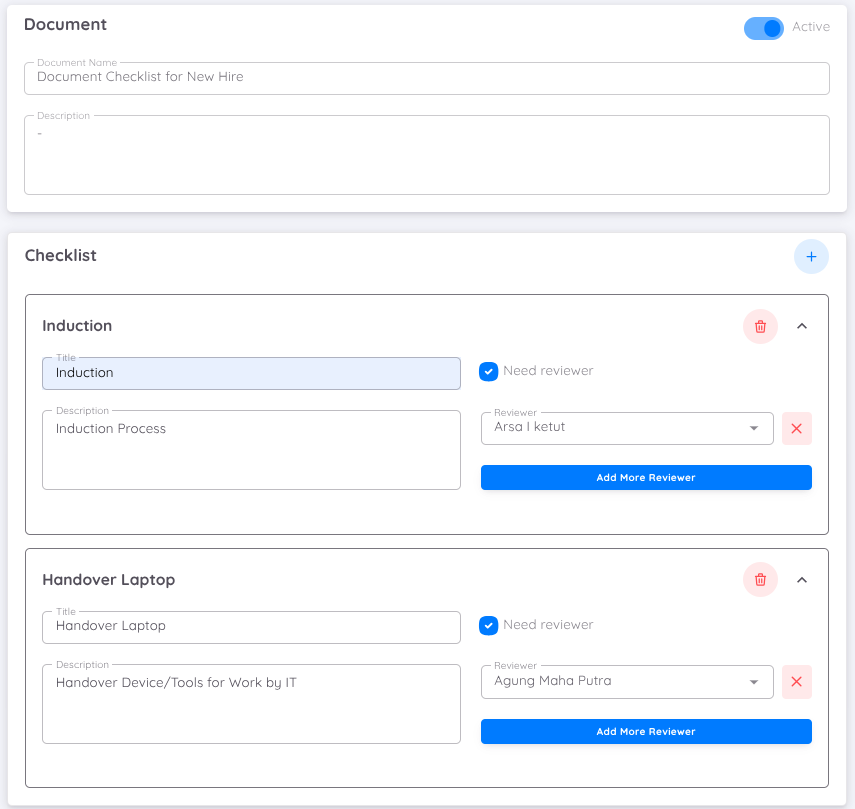
Each checklist created can be assigned to employees responsible for verification. You may assign more than one employee to handle a checklist; however, the verification process will only be completed by one person.
NOTE
The approval process for the assigned employee is carried out from the Employee page.
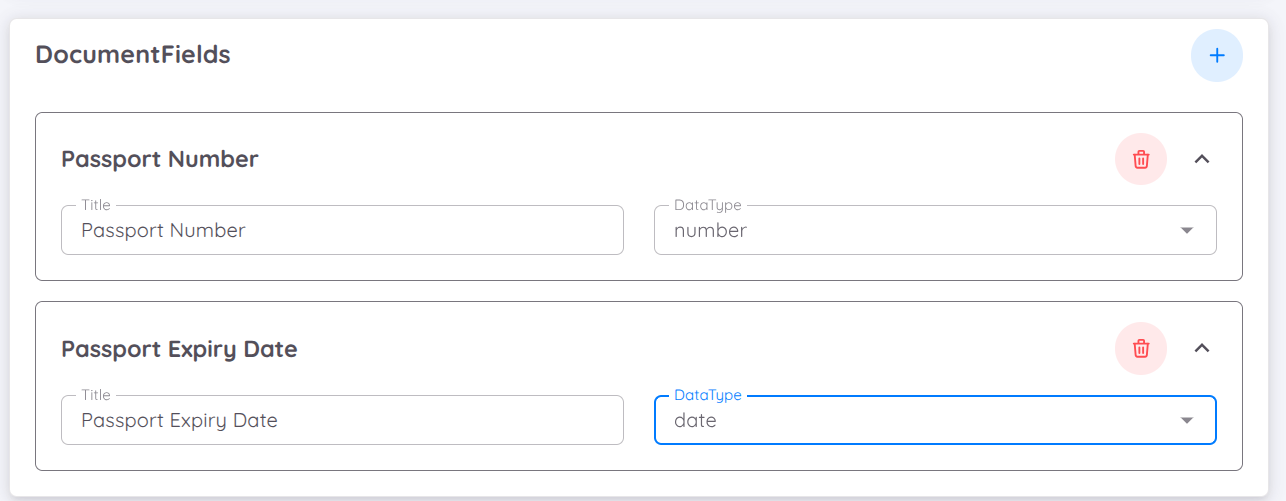
Employee Document
An Employee Document functions as a template or container for storing an employee’s personal data. These documents can be created and customized according to the type of data and records you wish to store as part of the employee’s history.
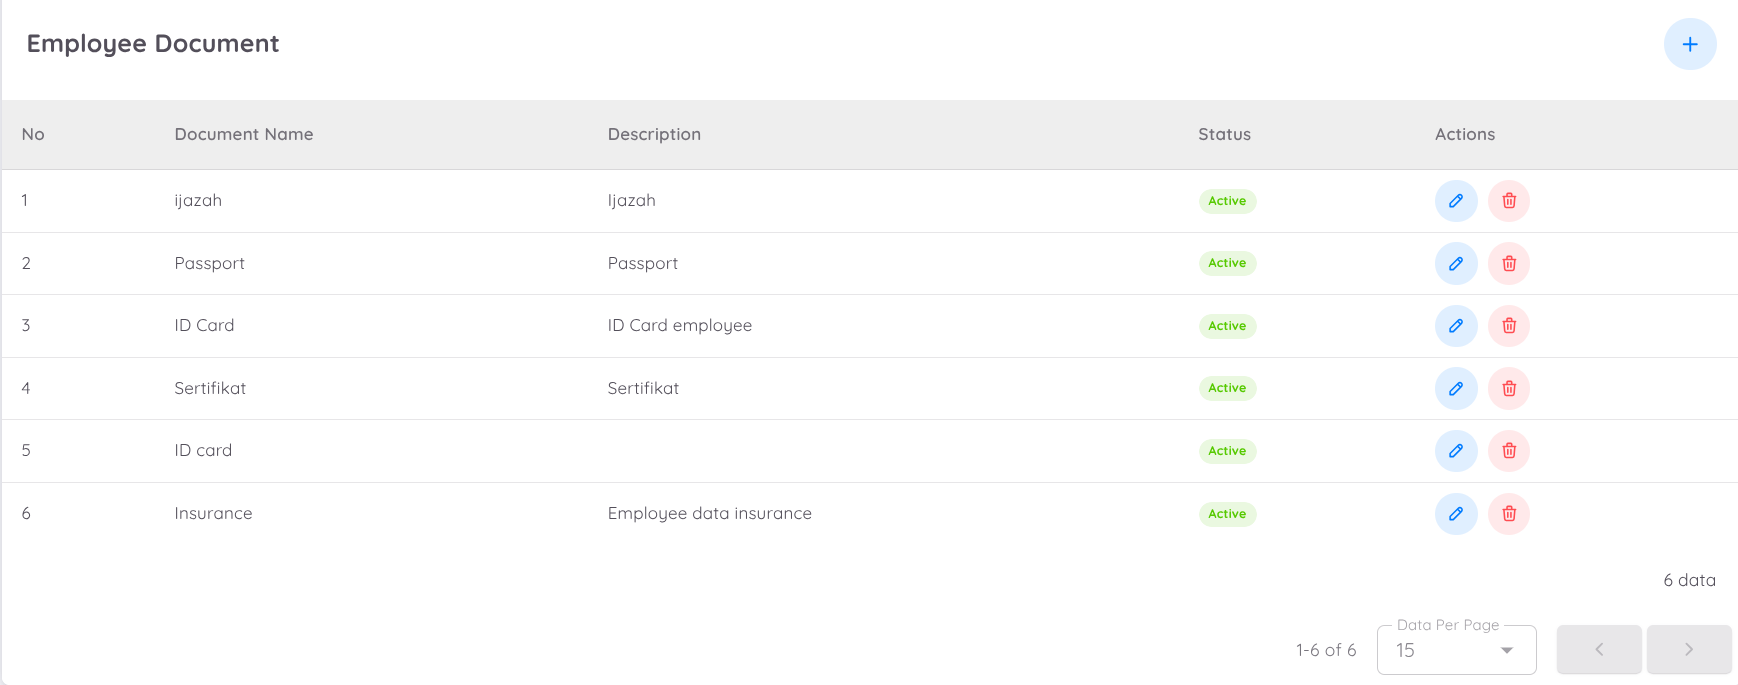
Management can add as many employee documents as needed. Each document can be configured to allow employees to upload files and input information directly in the Employee Folder by enabling the Allow Employee to Upload toggle.

Additional information fields can also be added to accommodate the details required in each document. Management can define the type of data to be collected based on the information needed. The available input types include text, number, option, and date.
NOTE
Employee documents can be uploaded by authorized users on the Employee Profile page. Once available, employees can download the documents through the Folder tab on their Personal Profile page. If the Allow Employee to Upload option is enabled, employees can also upload documents and input the required information directly.
Notification
In the Notification menu under the property management section of Sentec EMS, users can activate various notification features that automatically send email alerts. There are three main features available for activation:
- New Staff Onboarding Feature : Sends an automatic notification whenever a new employee joins the unit.
- Leave Notification : Allows employees whose email addresses are registered to receive notifications for leave approval from the Administrative Superior.
- Extra Leave Request : Sends notifications to relevant employees when an additional leave request is submitted.
- The Recruitment feature allows users with 'Write' access to configure notifications for the recruitment process. Email addresses can be added to receive updates regarding recruitment activities and candidate status.
- Promotion Notification : A newly added feature similar to Employee Onboarding, which sends notifications whenever an employee receives a promotion.
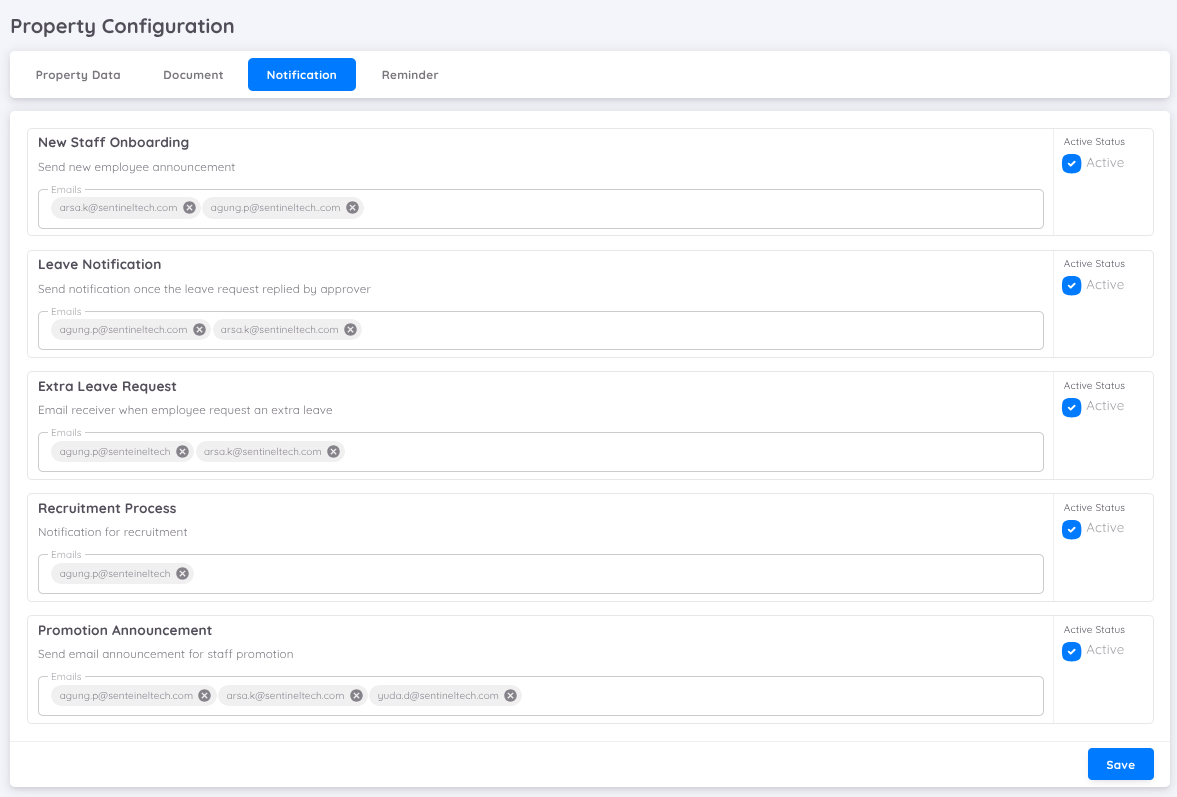
To activate each feature, simply click "Active" and enter the email addresses of the employees who will receive the notifications. There is no limit to the number of email addresses that can be registered.
Reminder
Users can configure reminders themselves. Currently, there are four types of reminders available.
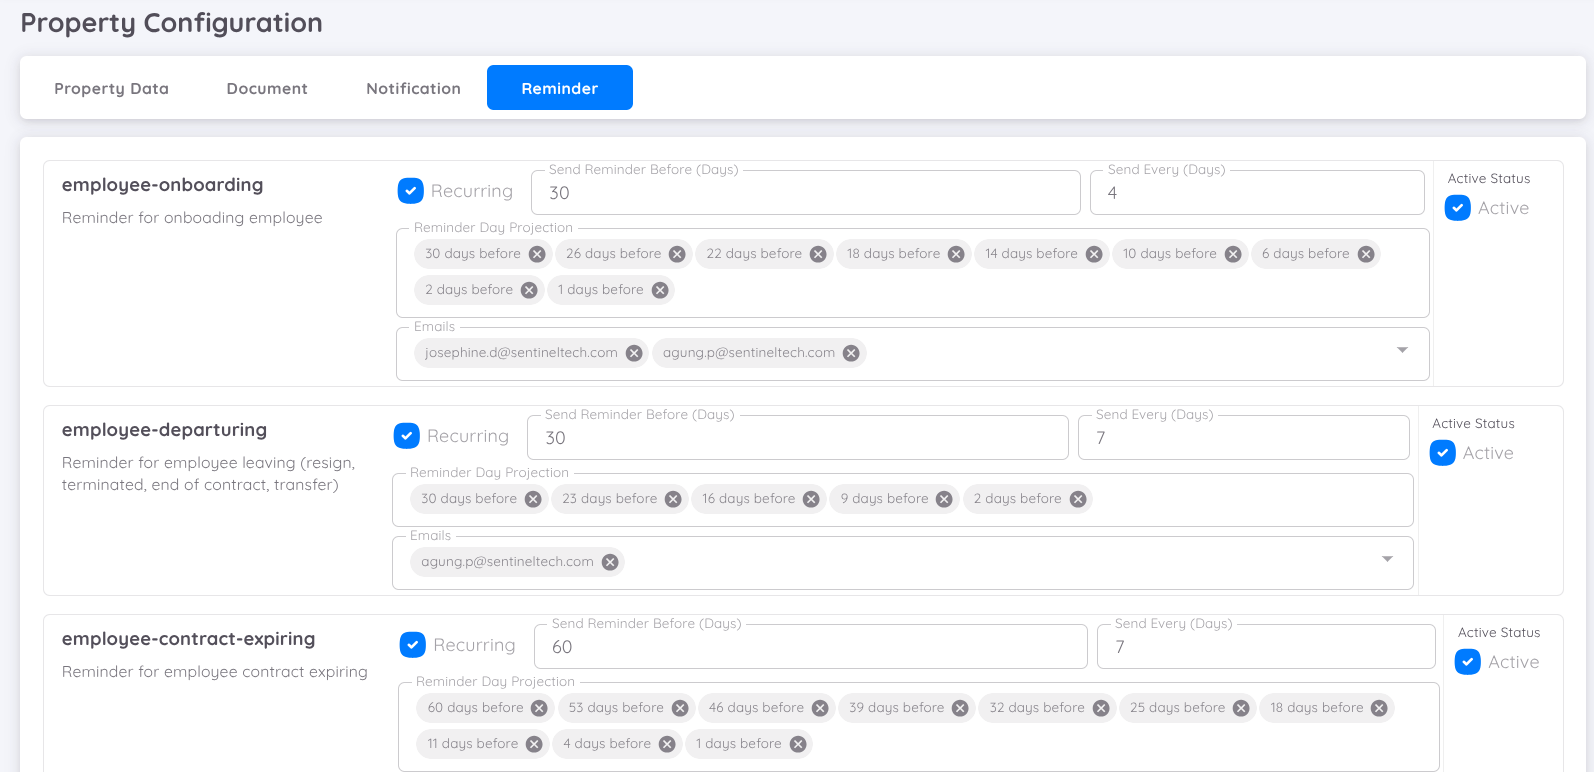
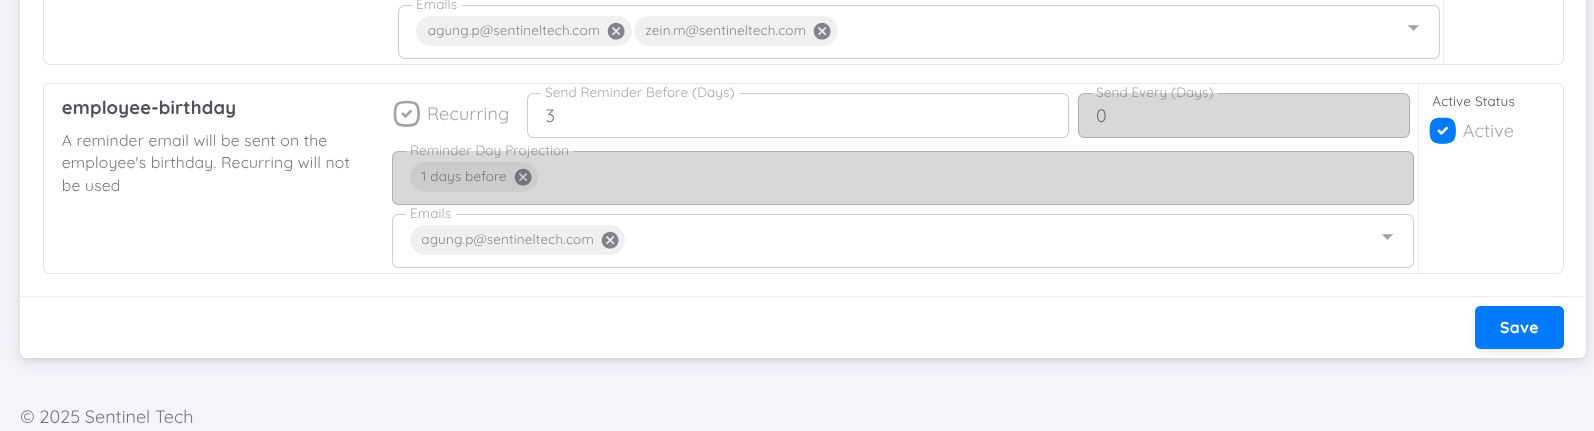
In the reminder tab, you can fill in the following fields:
- Send Reminder Before: Start sending reminders from the effective date.
- Number of Reminder: Days for recurring reminder delivery, with recurring options enabled.
- Reminder Day Projection: Reminder delivery schedule based on the above settings, but editable by the user.
- Emails: Recipient email addresses for reminders, separated by commas if more than one email.
NOTE
Birthday reminders do not adhere to the reminder settings. Birthday reminders are sent to the recipient's email if an employee has a birthday today.
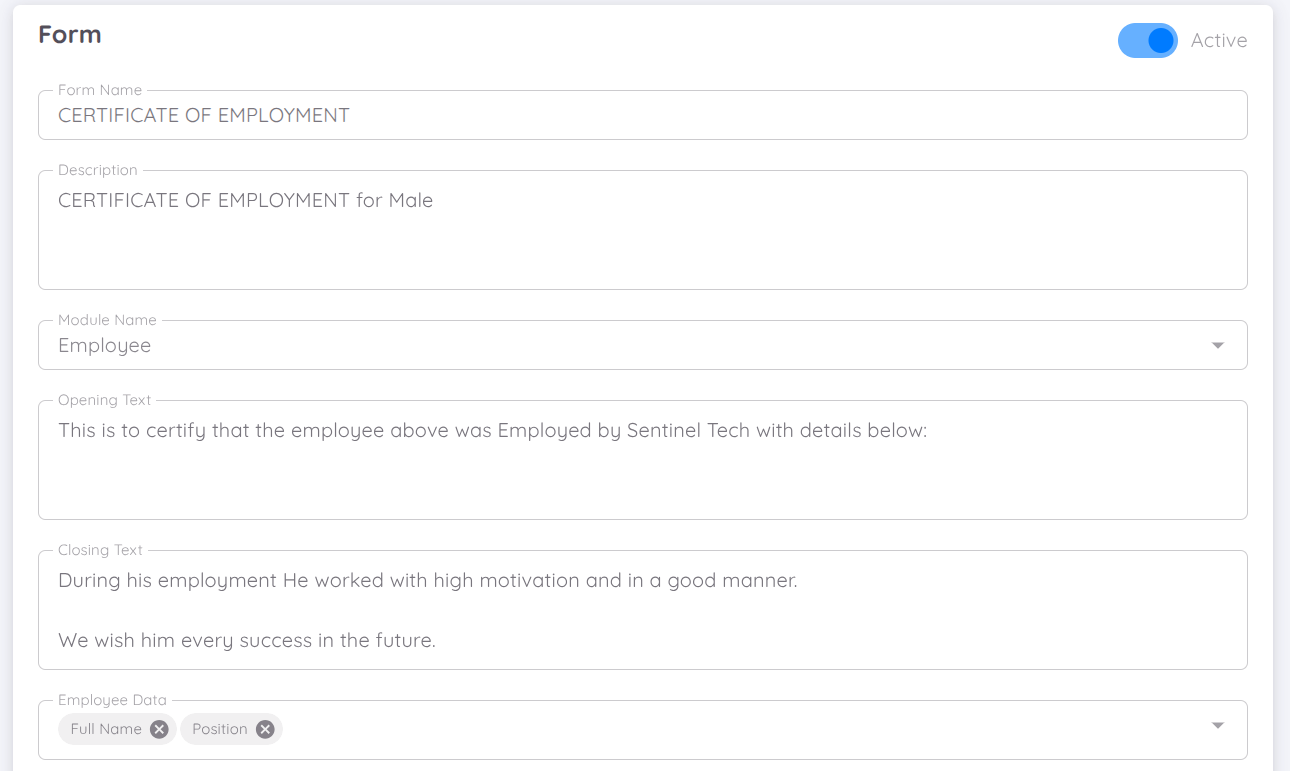
Form
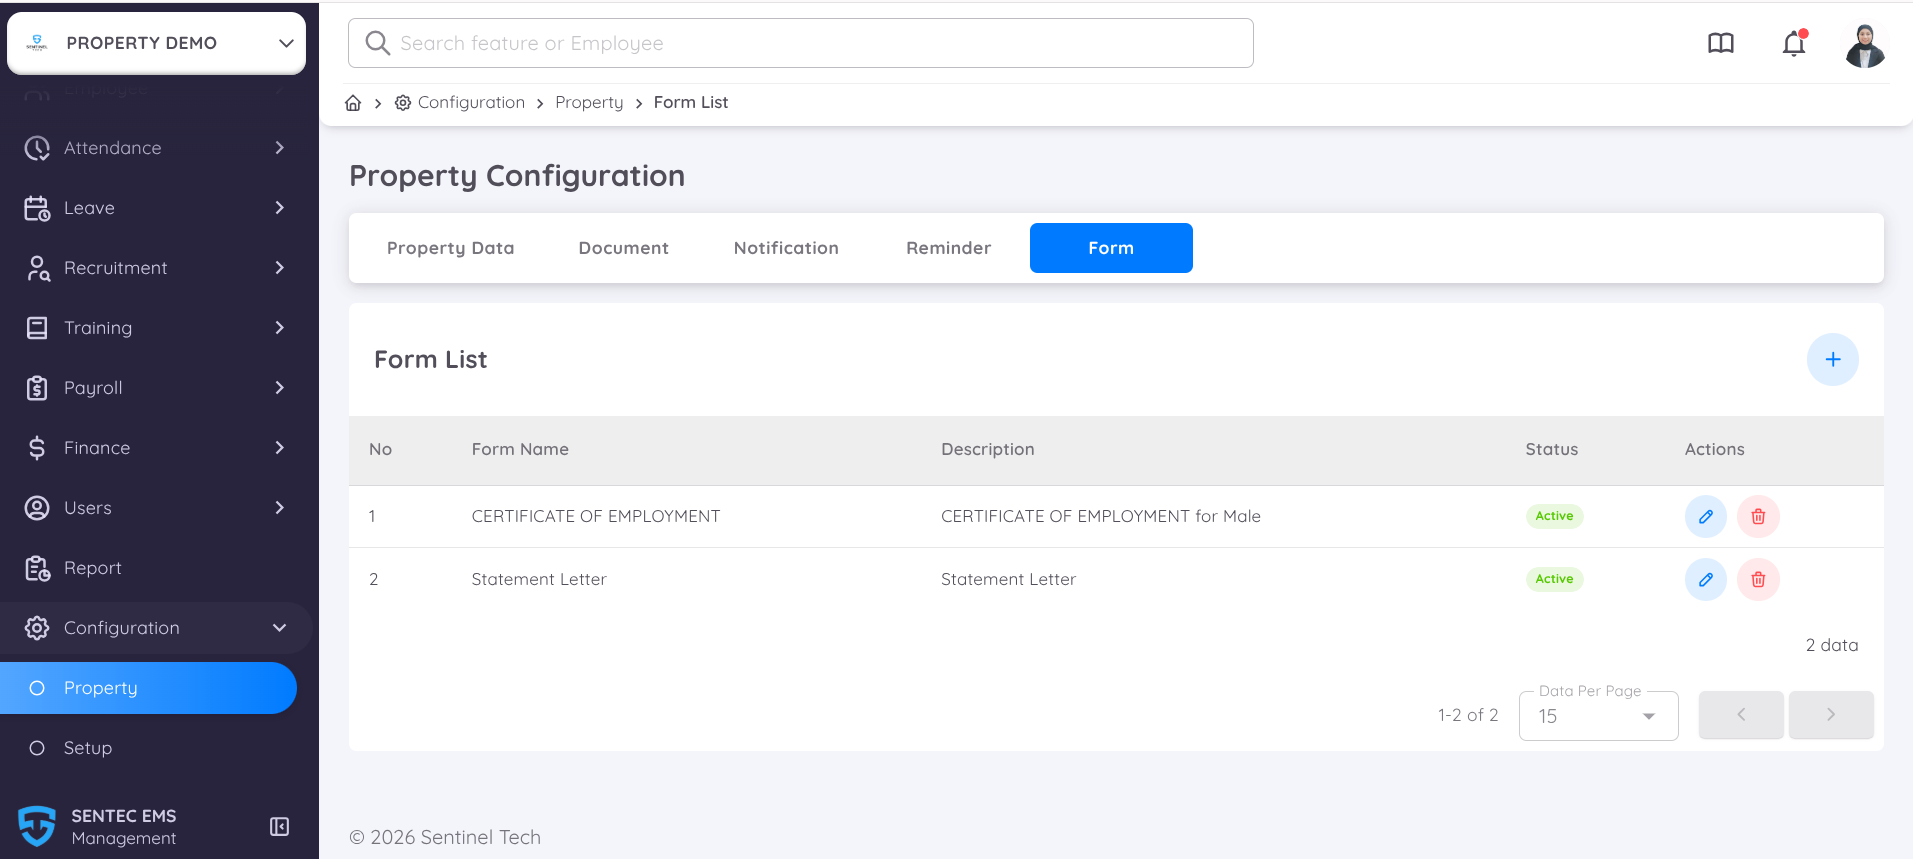
A Custom Form can be configured and customized according to each company’s specific requirements. This feature enables the centralized creation, management, and administration of various employee letters within the system.
To add a form template that can be used by employees, users may create multiple letter formats that are accessible to all employees.
In the Form Profile, all mandatory fields must be completed.
These include:
Form Name
The official name of the form or letter. This name is used to identify the form within the system and should clearly reflect the purpose of the document (e.g., Employment Certificate, Salary Statement).Description
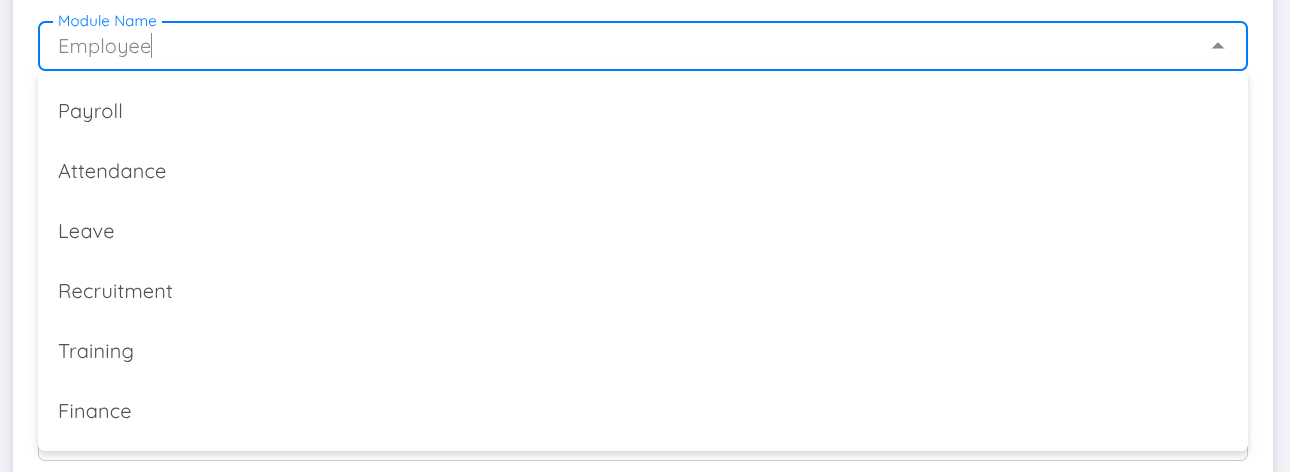
A brief explanation of the form’s purpose and usage. This helps administrators and users understand when and how the form should be used.Module Selection
Determines the module to which the form is related, such as Employment, Payroll, or other relevant modules. This selection is important as it defines the context of the letter and controls which data fields are available.
Users can configure the following content:
- Opening Text and Closing Text for the letter
- Selection of Employee Data to be included in the letter
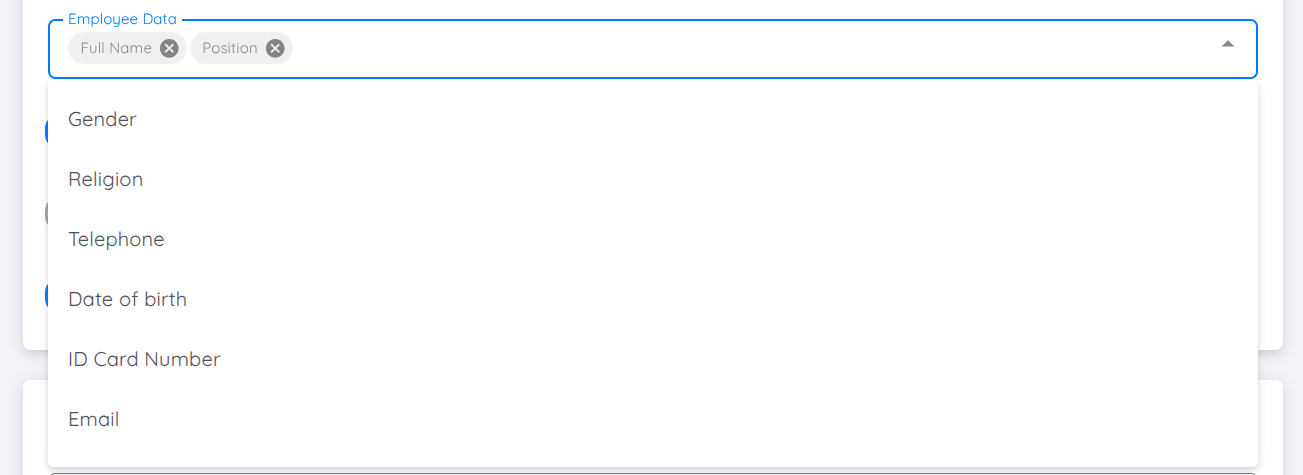
such as:
- Employee full name
- Position
- Identification card number
- Other relevant details as required
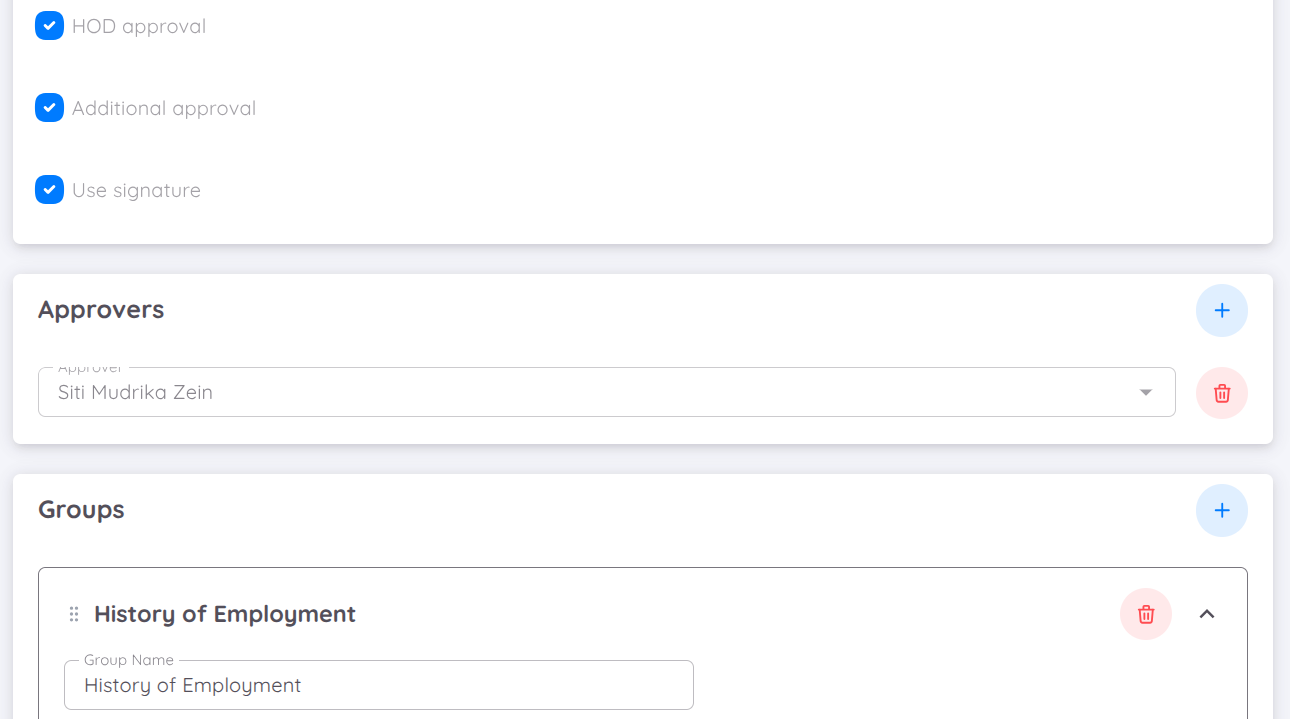
You can define the approval and authorization settings for the form, including:
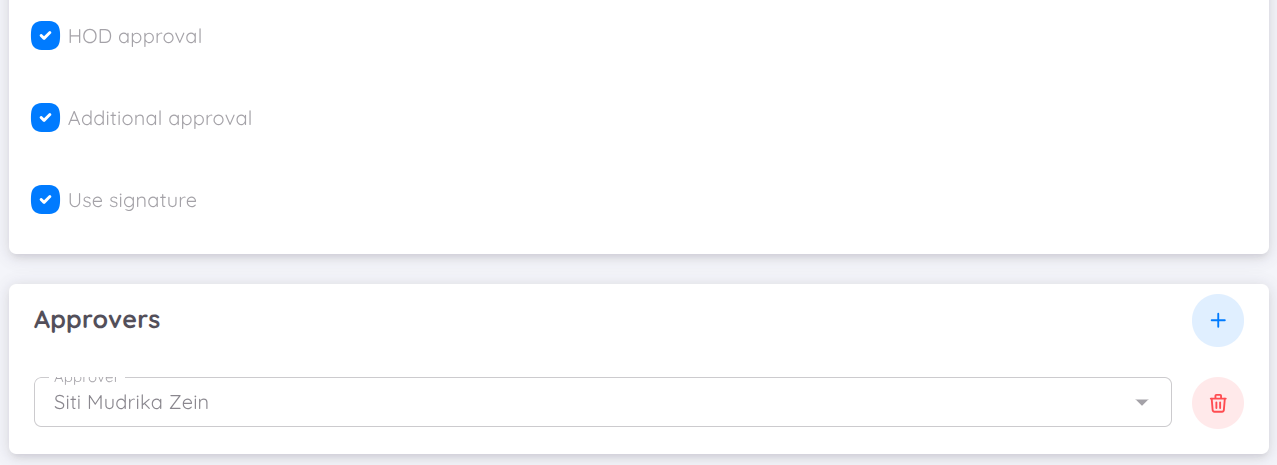
- Specify whether the form requires an Approver
- Display the Approver’s Name in the letter
- Enable an Additional Approver if further approval is required
- Enable Signature if a digital signature is needed
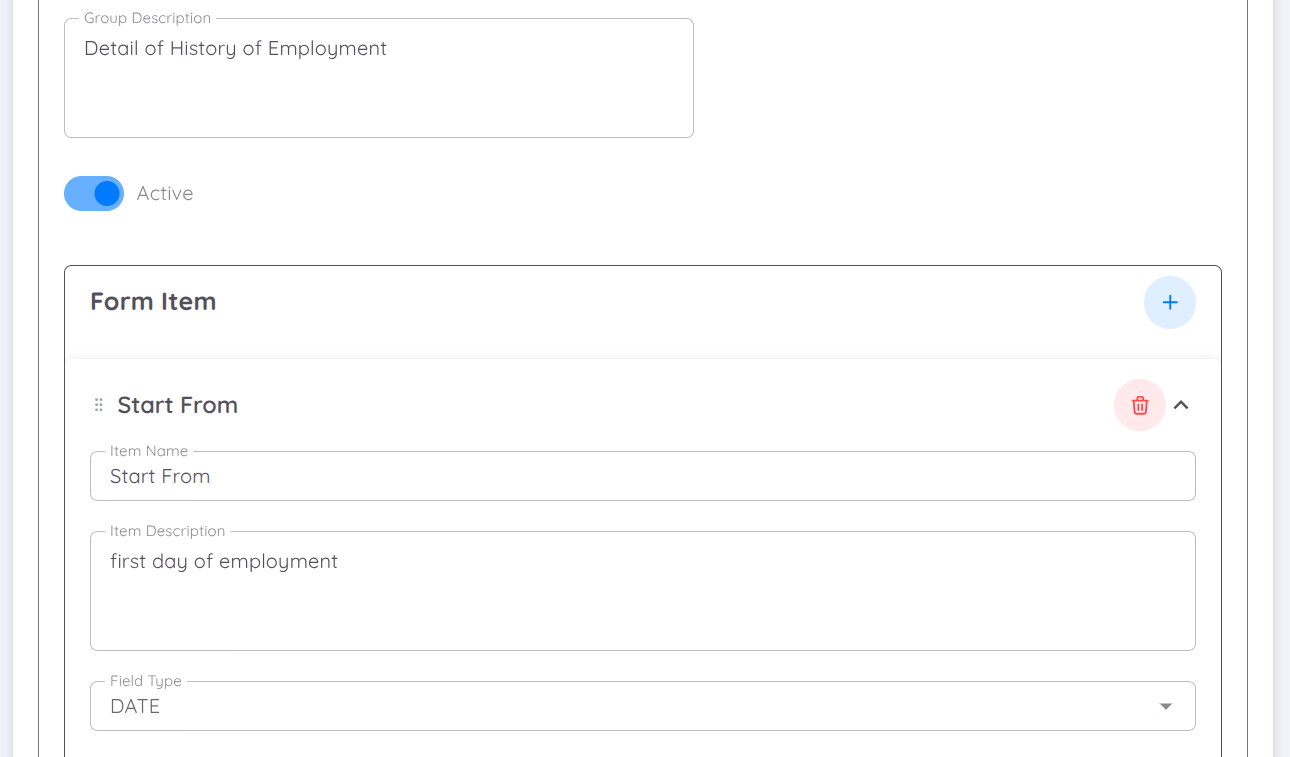
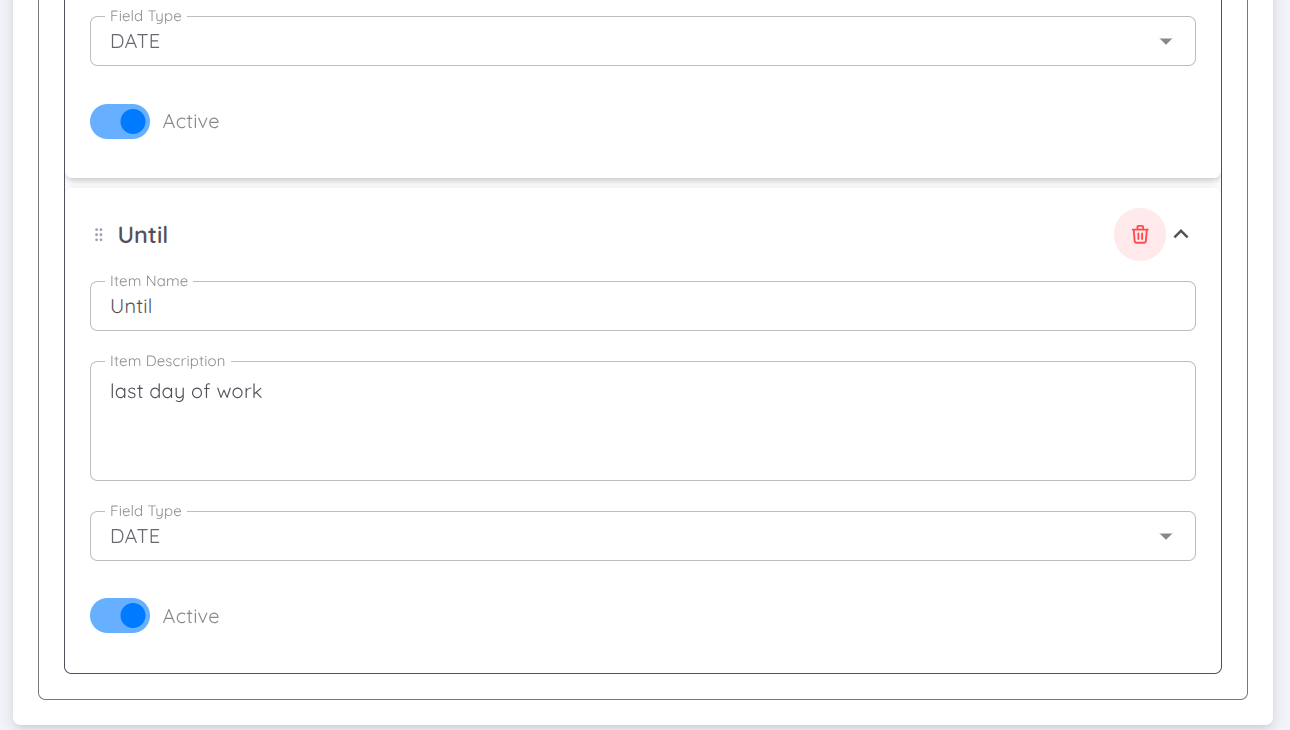
Lastly, you can add detailed content between the opening and closing text.
This content is managed through Group Items, which allow you to include structured information such as:
- Duration of employment
- Other relevant details based on the purpose of the letter

Each form item will later be filled in by the employee. You can define the field type for each item, such as:
- Text
- Number
- Date
- Time
- Option
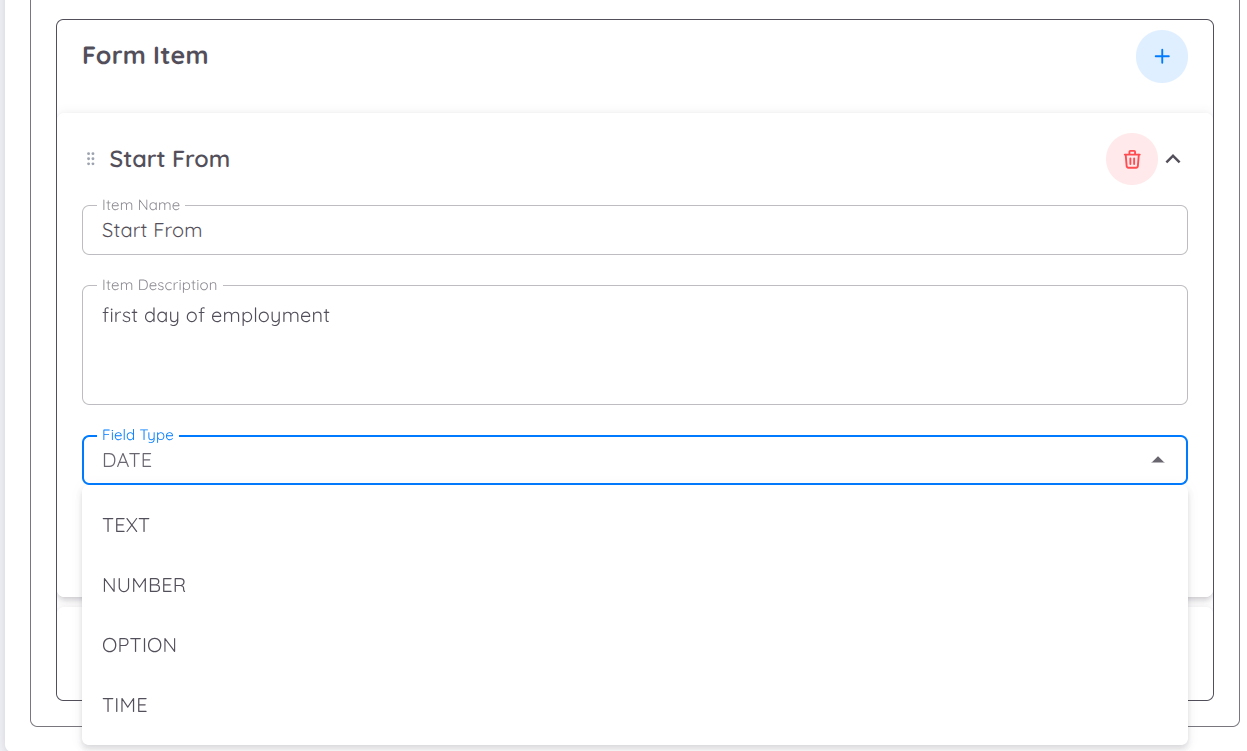
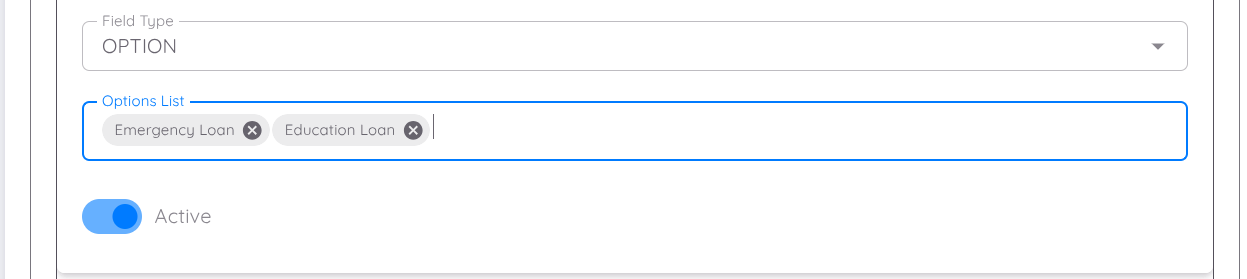
If the selected field type is Option, you must define the option list.
Press Enter after adding each option to include it in the list.
Note
You can create as many Group Items and Form Items as required to support the purpose of the form template.
For reference, the form will follow the structure shown below:
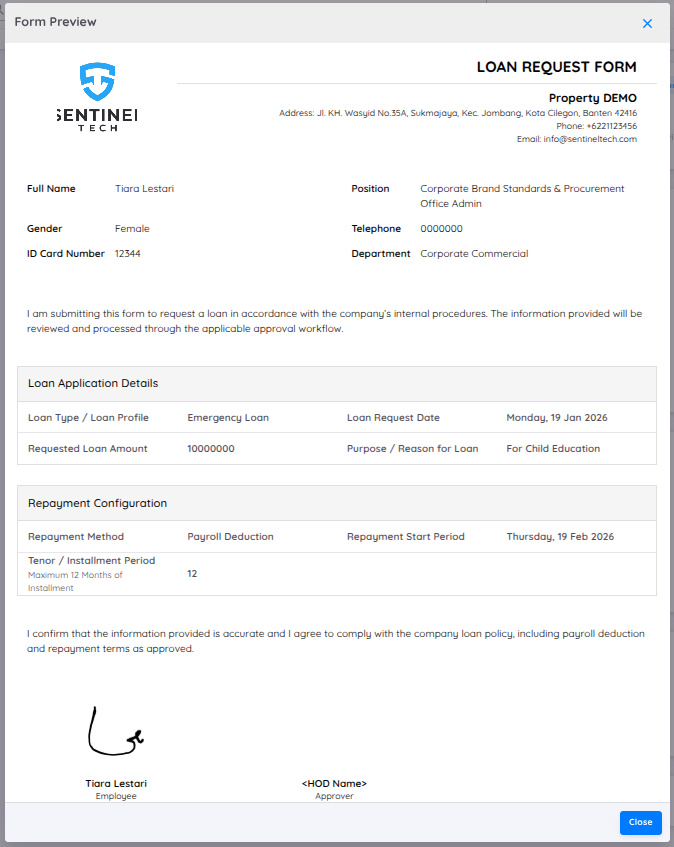
| Section | Area Name | Description |
|---|---|---|
| Section One | Form Name | Displays the name of the form as defined in the form template, allowing users to easily identify the type of request being submitted. |
| Section Two | Logo and Property Details | Displays the company logo and property information configured in Property Configuration, such as company name, address, phone number, and email. |
| Section Three | Employee Data | Shows the employee’s personal and employment information, including full name, gender, ID card number, position, department, and contact details. |
| Section Four | Opening Text | Displays the opening statement of the form, providing context and explaining the purpose of the submission. |
| Section Five | Group Item 1 | Displays the first group of form items based on employee input, such as loan application details or other related information. |
| Section Six | Group Item 2 | Displays the second group of form items, such as repayment configuration or additional form-specific details, depending on the form setup. |
| Section Seven | Closing Text | Displays the closing statement of the form, usually containing confirmations or acknowledgements from the employee. |
| Section Eight | Requester and Approver Name & Signature | Displays the requester’s and approver’s names along with their signatures, if required by the form approval and signature configuration. |
For a detailed configuration guide, please refer to the video tutorial below.
Setup
Each feature in Sentec EMS can be customized according to the company's needs.
Employee
Allow Edit
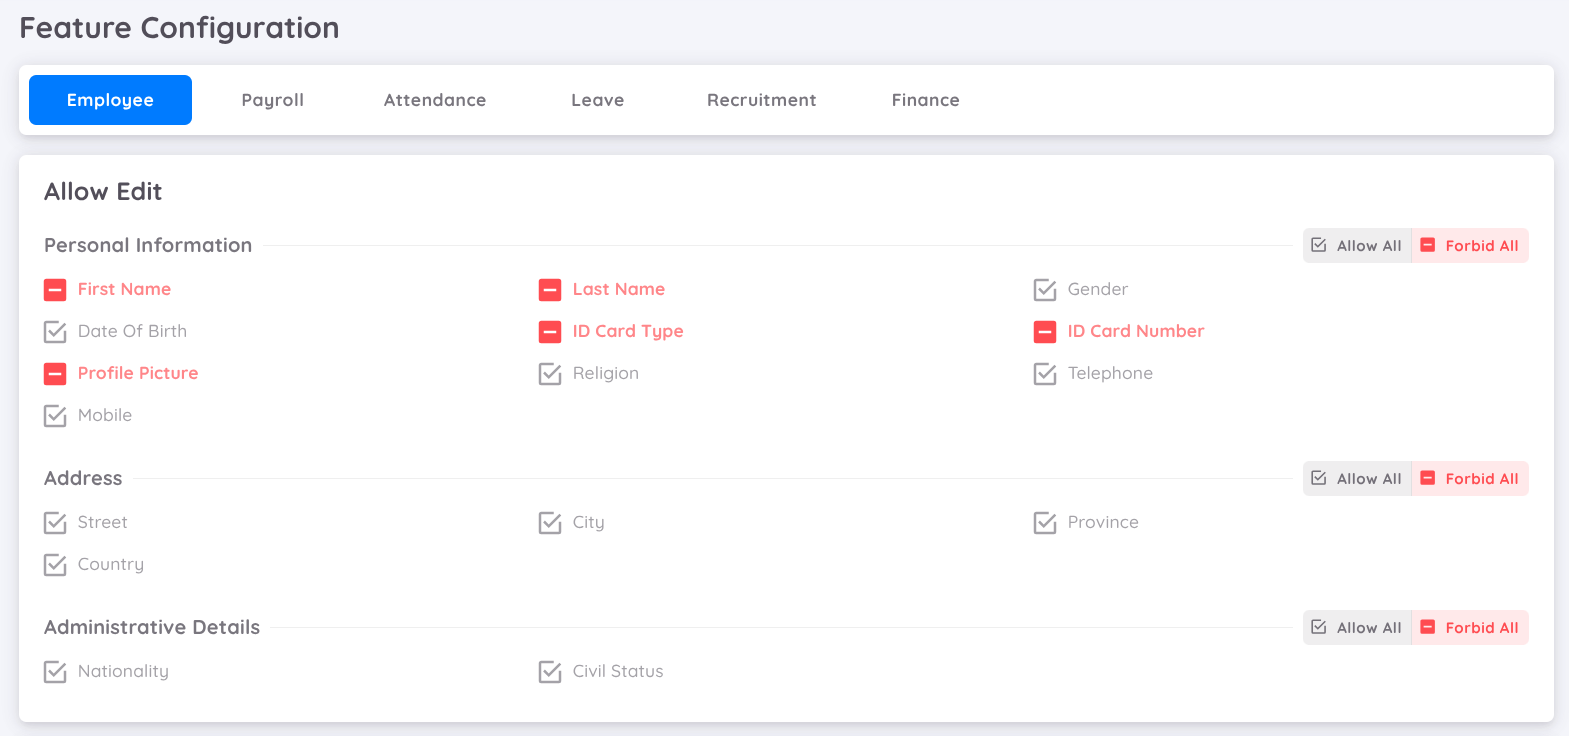
In the latest update, Sentec EMS introduces enhanched flexibility for managing employee data permissions in the User Management section. Administrator can now control edit access for three key data categories :
- Personal information : Includes essential employee details such as name, date of birth, and contact information.
- Address : Covers the employee's residential address details.
- Administrative Details : Comprises information such as marital status, citizenship, and other administrative records.
Using the Allow All option, administrator can grant complete edit access to all fields in any of these categories. Conversely, the Forbid All option resctrict all editing capabilities. For more specific needs, access can also be customized or partially granted to match organizational requirements. This new feature provides greater control and ensures that data access is aligned with company policies.
Custom Field
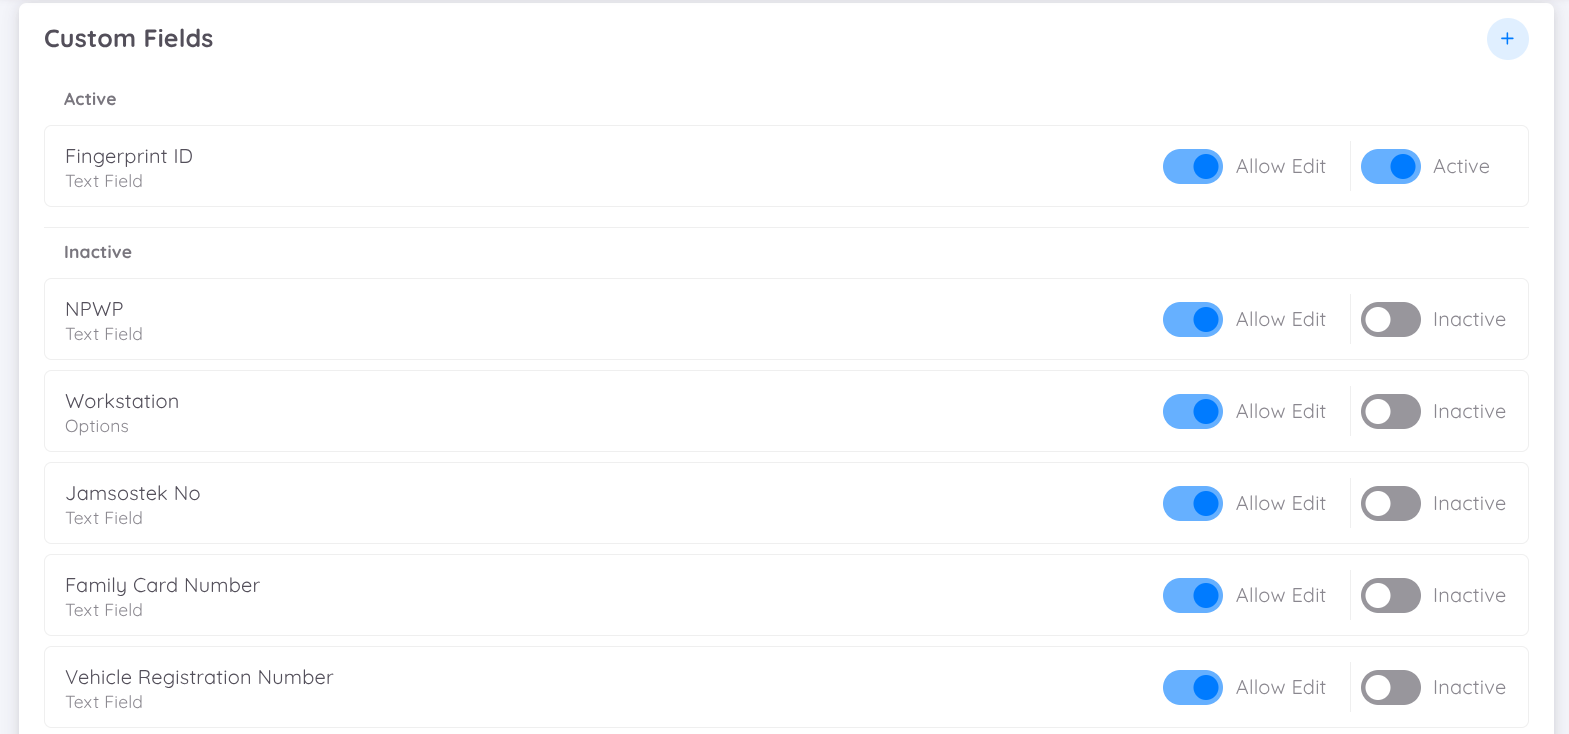
Users can add new data to supplement employee information (beyond basic information). The added data can be in the form of selections or text inputs. These custom fields will appear under additional information on the employee profile page. Some custom fields provided by Sentec EMS include fingerprint ID, NPWP (tax number), blood type, BPJS JP (social security for old age), BPJS Kesehatan (social security for health), and last education. There is a toggle to prohibit or allow editing of additional information from the Management or Employee application.
Tags
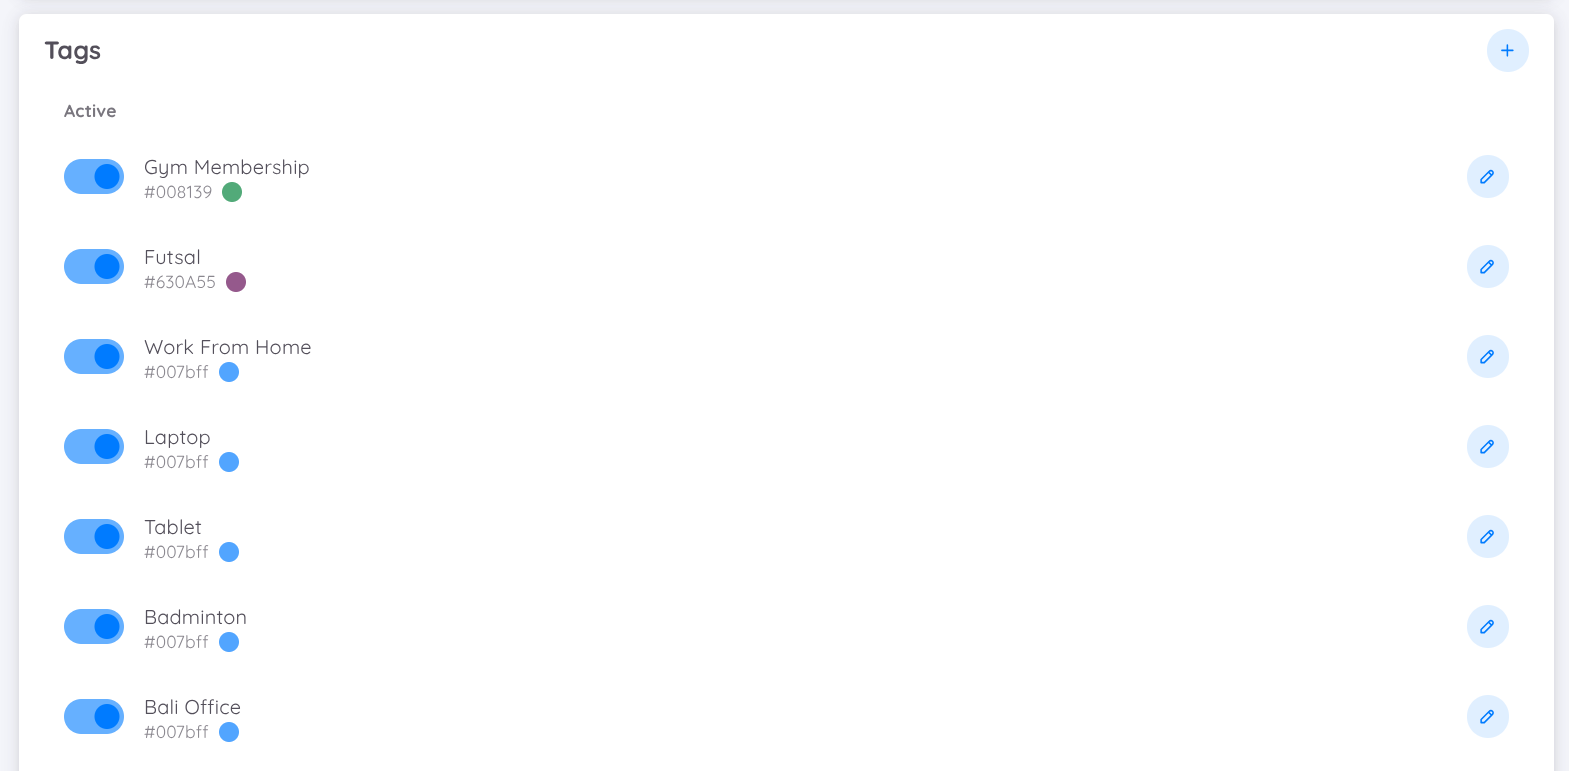
Tagging is used to group employees based on specific attributes not included in basic information or contract attributes. For example, you can create groups of employees based on sports activities they participate in or their floor number at work.
Employment Level
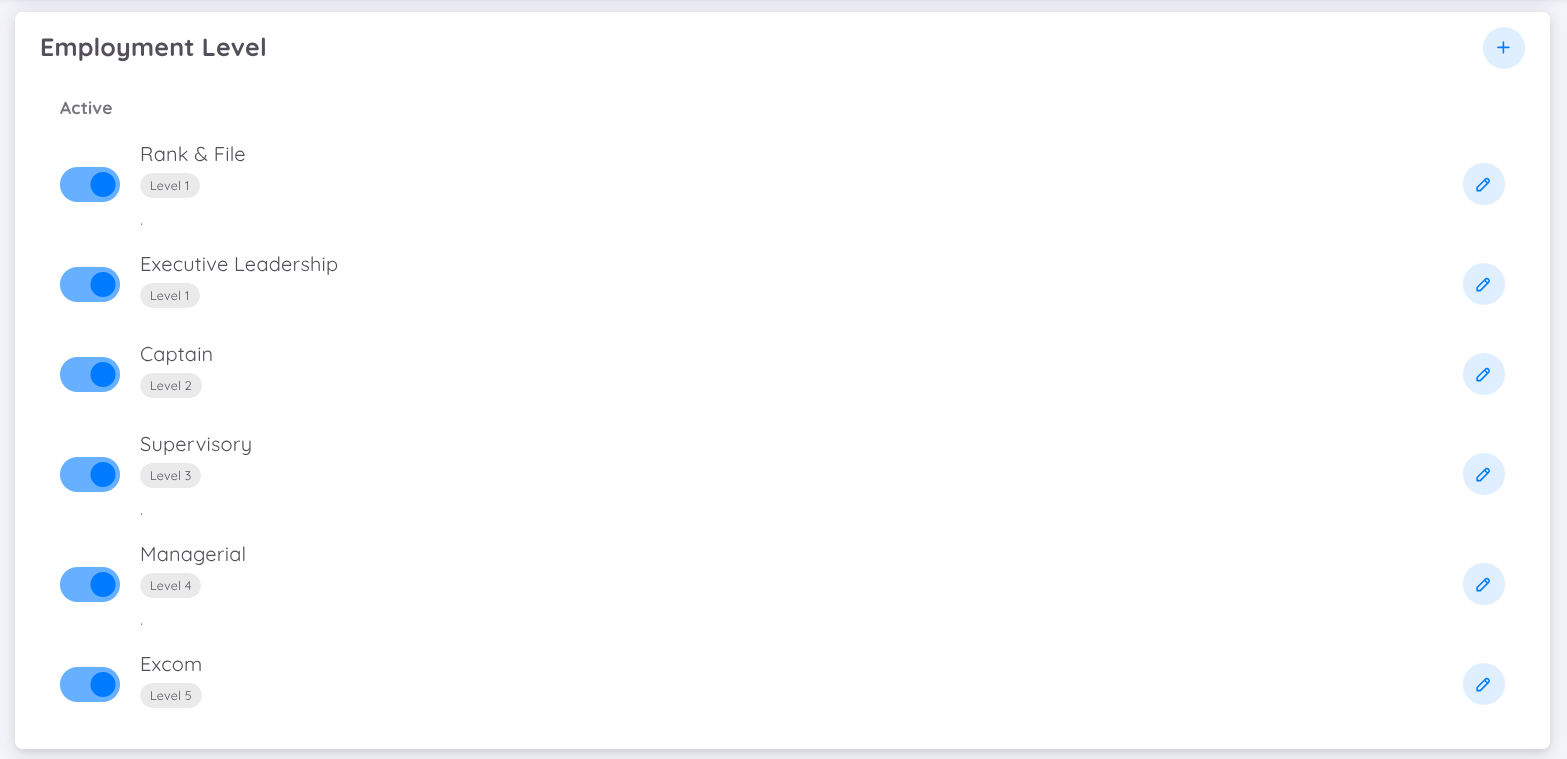
Attributes in contracts are used to determine the level or grade of employees.
NOTE
Please contact the EMS Team support to add any employment level that is not yet available in the list.
Department
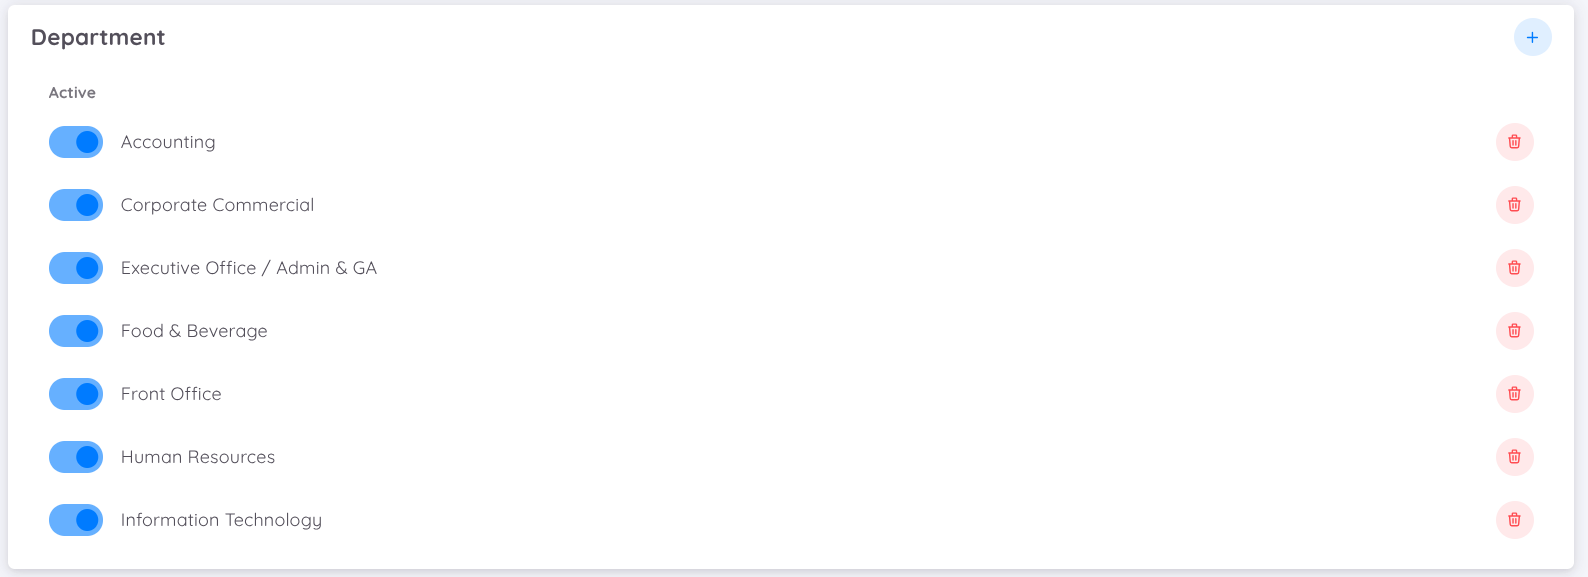
You can set up and assign departments according to those available in your property. By configuring departments, the system will automatically classify and display only the departments associated with your property.
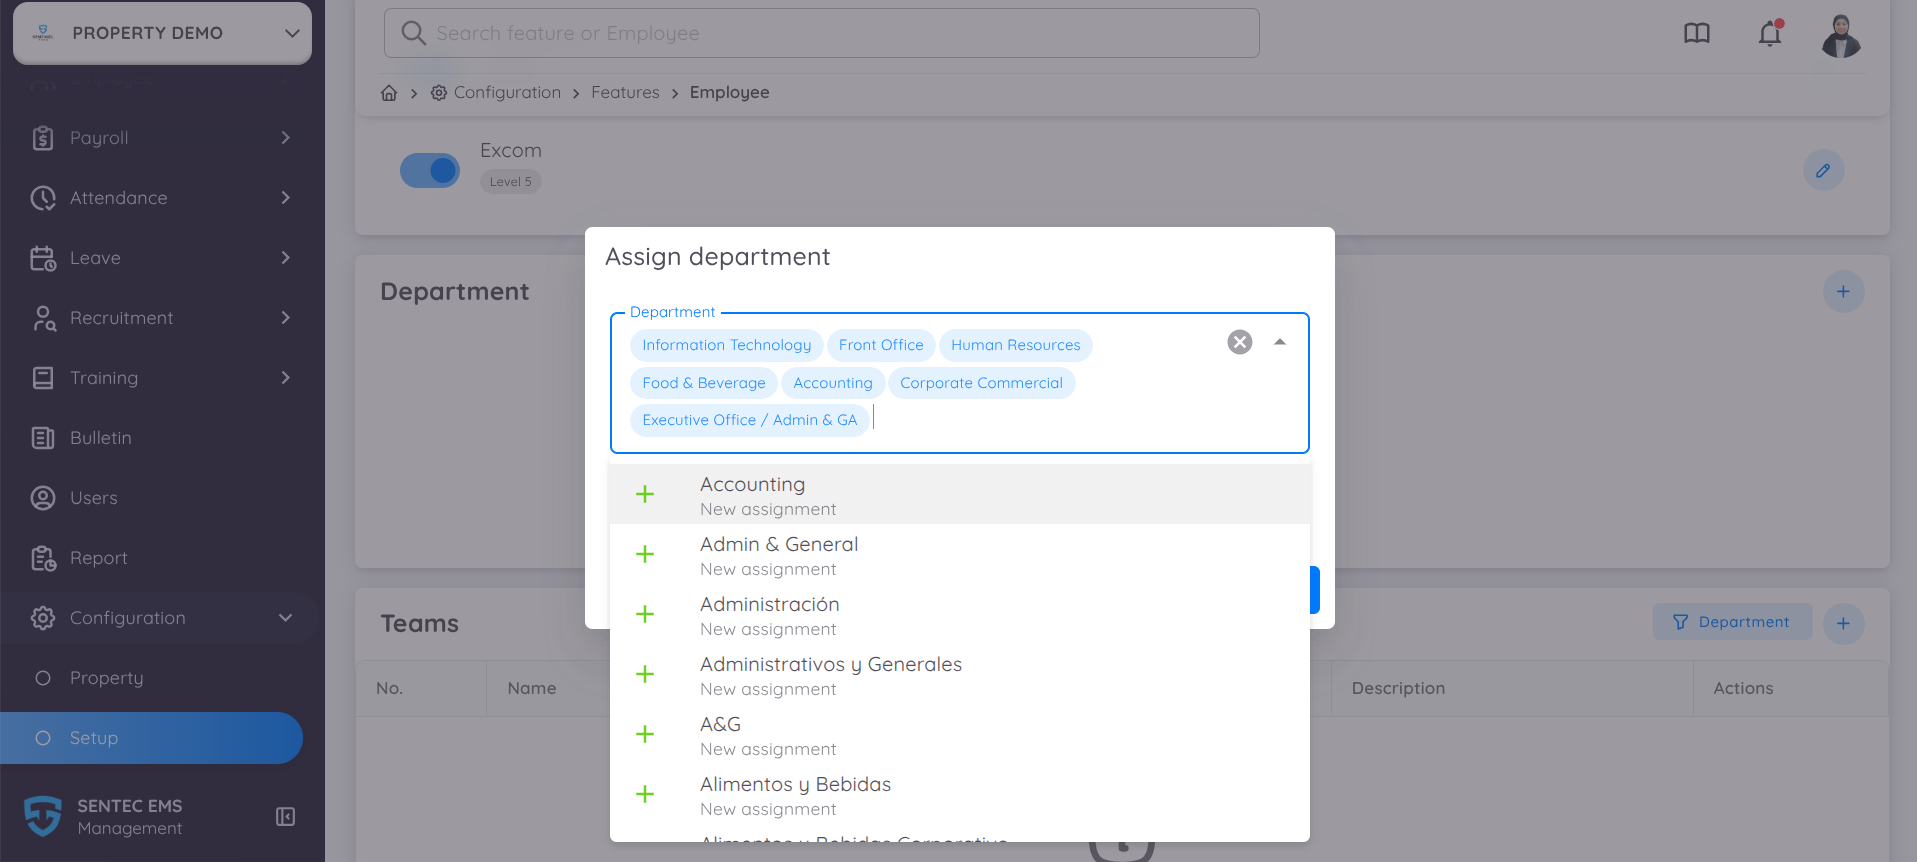
You can add, assign, or modify departments based on your property’s structure. Once departments are configured, any feature that requires department selection will display only the departments you’ve defined for your property
Teams
Sentec EMS introduces a new feature for creating and managing employee groupings through the Teams feature.
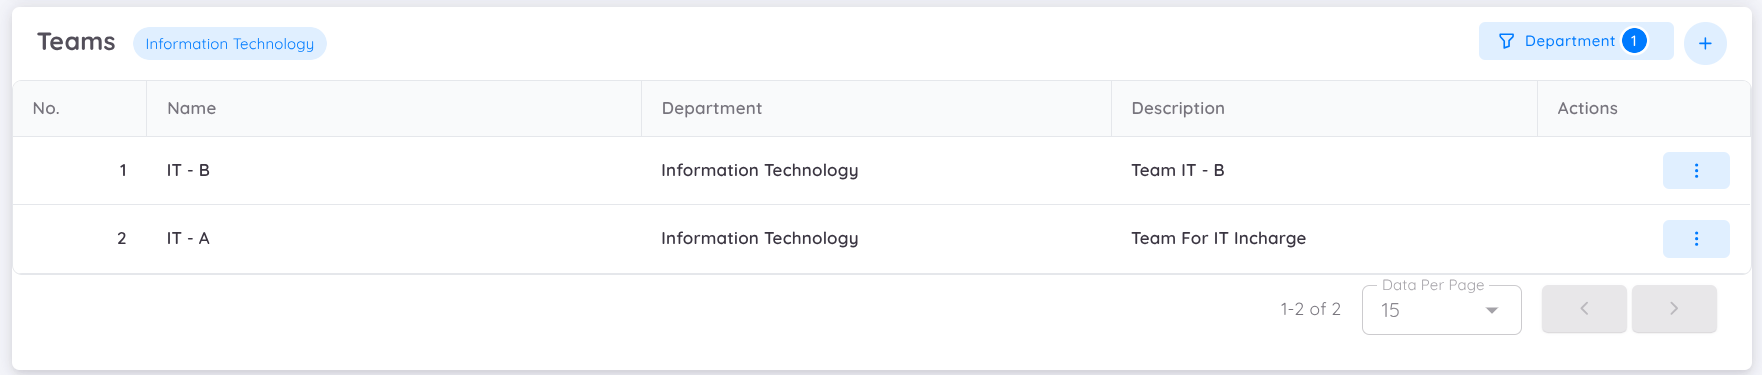
By default, employees are grouped according to their departmental hierarchy. However, this feature allows users to manually regroup employees into more specific groups as needed.
This feature is particularly useful for organizing employees who work in shifts, making schedule management more efficient.
Payroll

Before creating a payroll report, a payroll profile must be defined. Users can change the payroll profile at any time, but these changes will not affect previously created payroll reports.
When configuring payroll, you can also enable the Prorate calculation.
When the Prorate toggle is enabled, the system will automatically calculate employee salaries using the prorated calculation method based on the configured payroll period.
Prorating salary means adjusting an employee's pay proportionally according to the duration of their employment contract within a payroll period.

This feature helps to:
- Ensure consistent payroll calculation methods within a payroll period
- Prevent calculation conflicts caused by multiple rate methods being applied simultaneously
- Improve payroll accuracy for employees who join, resign, or have incomplete working periods
- Simplify payroll configuration by allowing only one active calculation approach
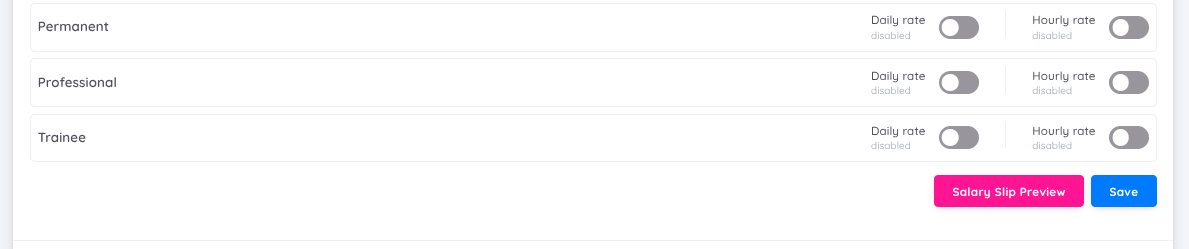
In addition to Prorate, you can also configure the Rate Configuration, which includes both Daily Rate and Hourly Rate options. These options provide flexibility in determining which rate will be used when generating payroll.
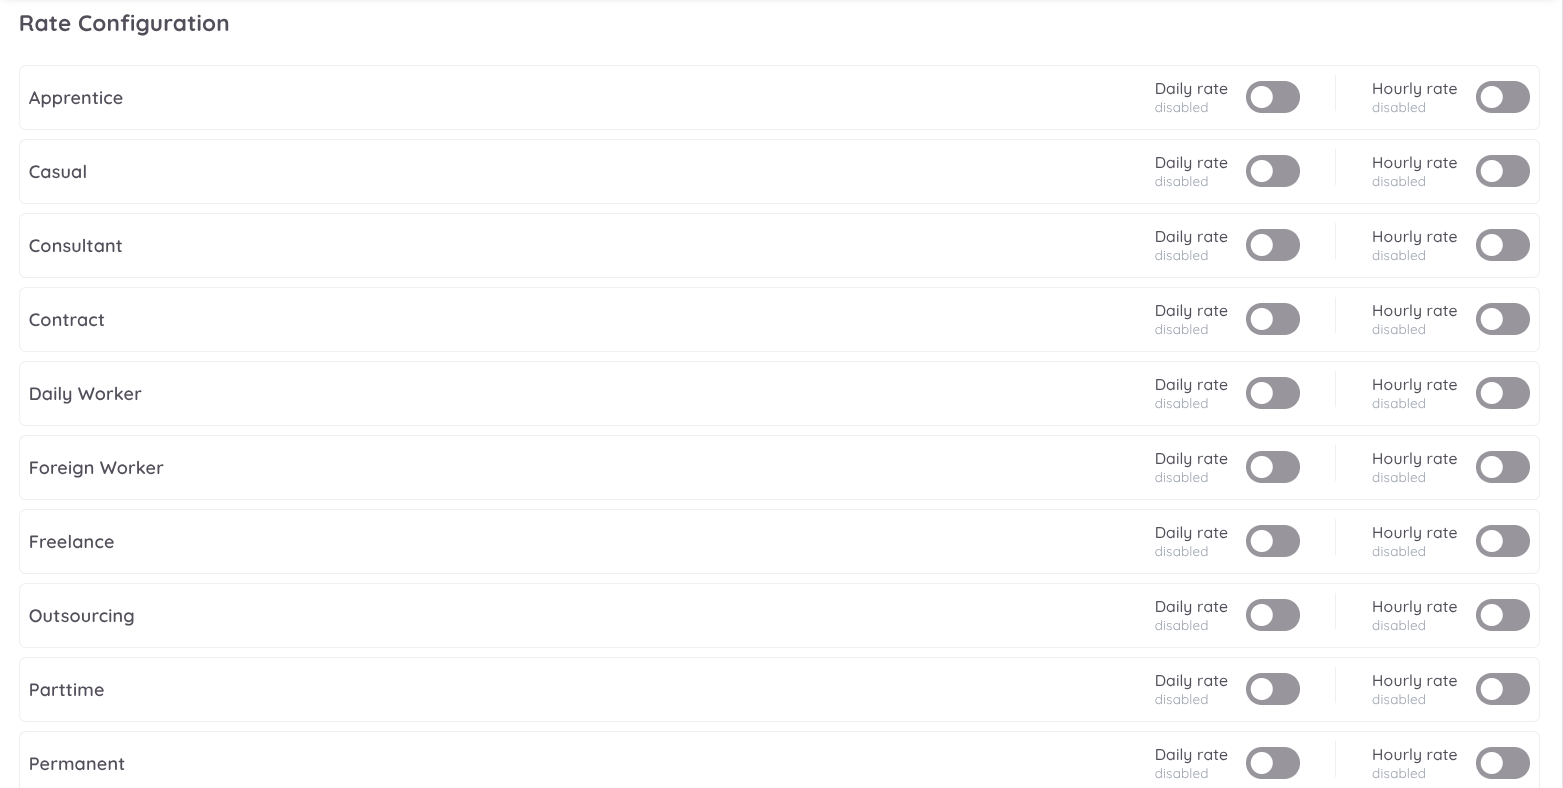
Payroll can be calculated using the Daily Rate, the Hourly Rate, or both. Simply activate the desired option based on the working status used in your company to include it in the payroll calculation.
However, when Prorate is enabled, the Daily Rate and Hourly Rate configuration options will be automatically disabled. In this case, users can only apply one calculation method, either Prorate or Daily/Hourly Rate.
NOTE
- The Hourly Rate calculation includes both hours and minutes.
- If Prorate and Daily Rate are both enabled, the system will apply the Prorate calculation only.
- If Prorate is disabled and both the Daily Rate and Hourly Rate are enabled, the system will automatically apply the Hourly Rate calculation.
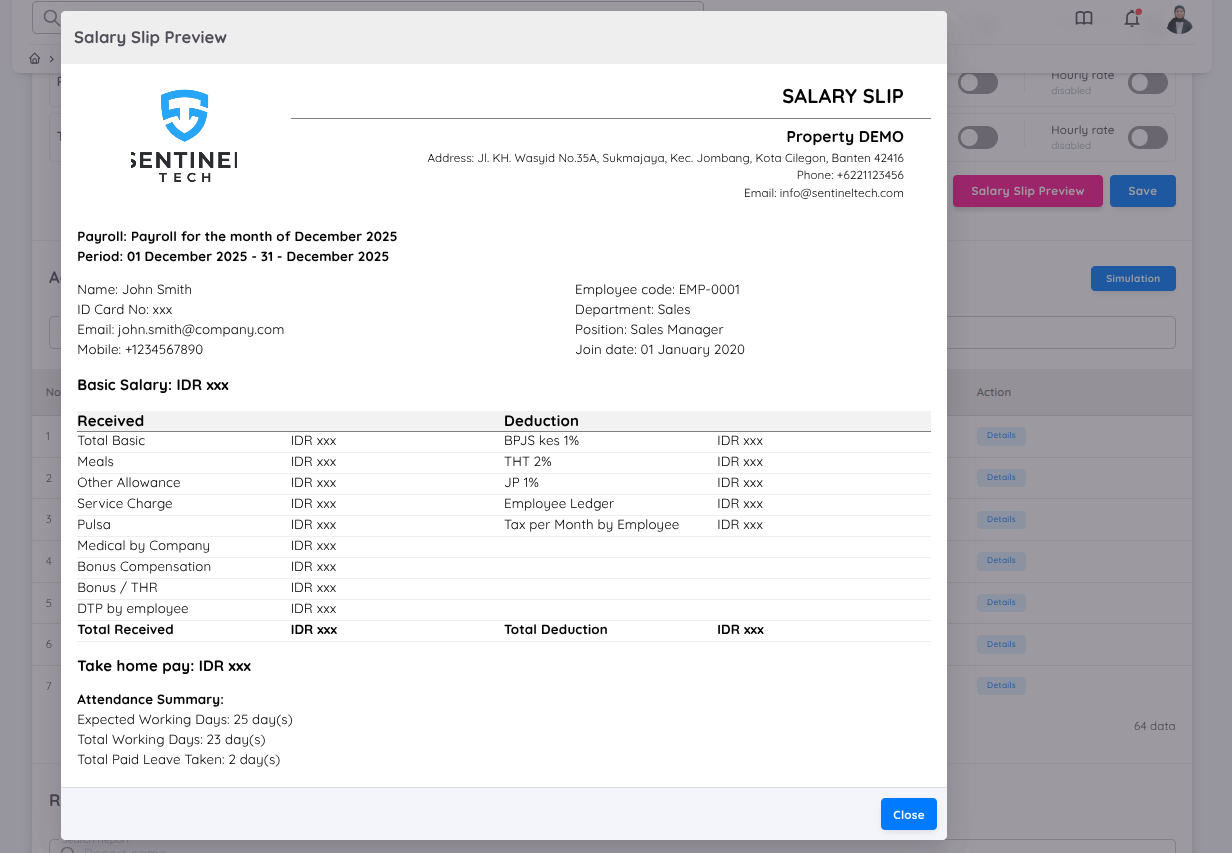
Additionally, in the Setup Payroll menu, users with access to setup and configuration can view a salary slip preview after selecting the desired payroll profile. This feature allows users to review the details of the salary slip before the payroll report is generated, ensuring the accuracy of the data to be reported.
To ensure the selected payroll profile is correct, you can use the Simulation feature within the Payroll Setup.
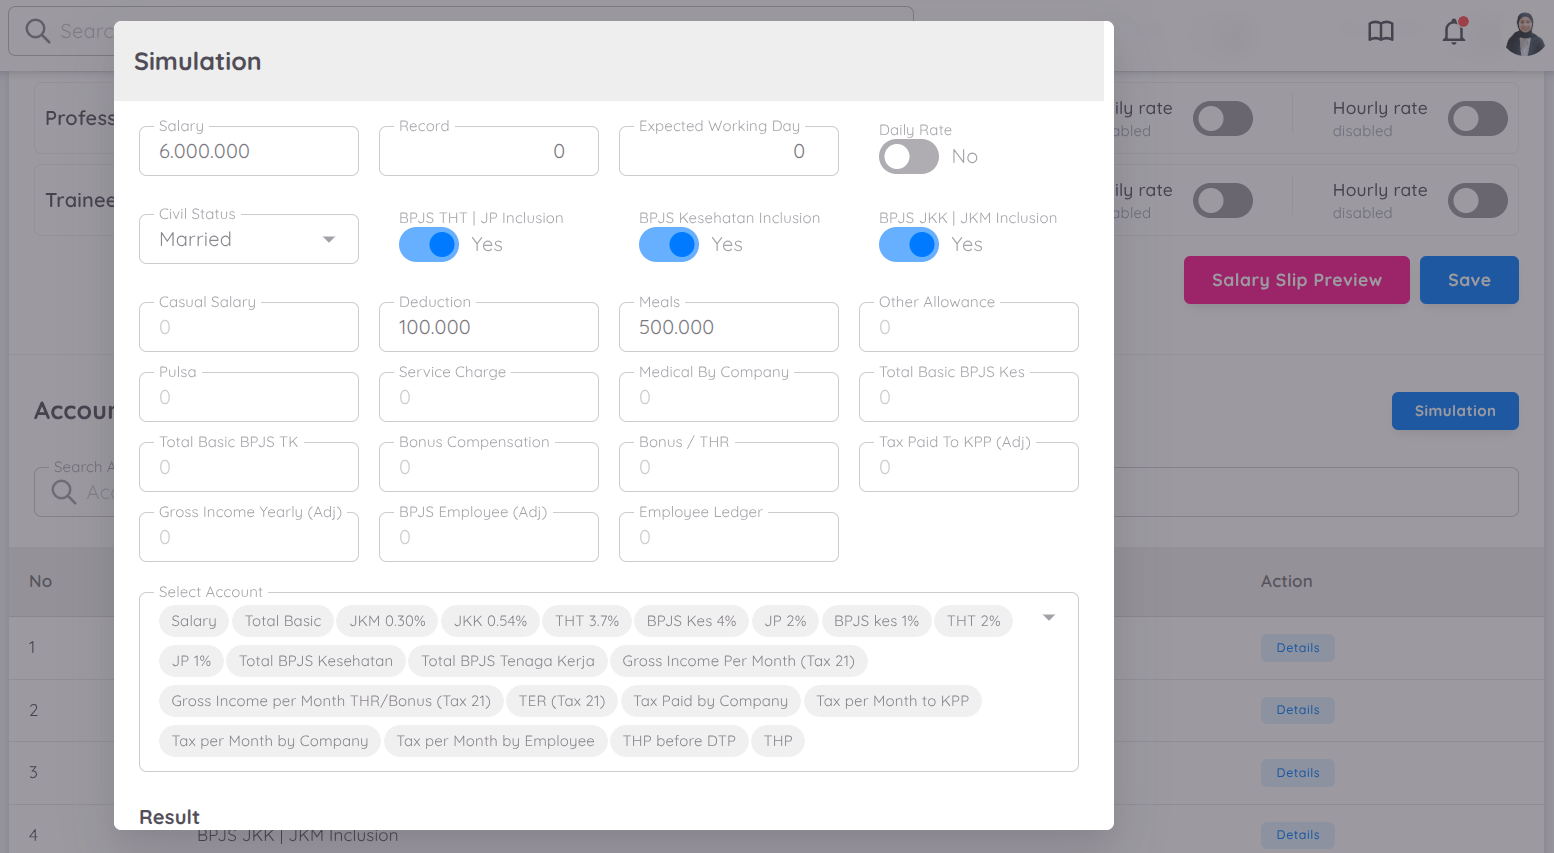
The Simulation feature allows users to simulate payroll based on predefined payroll profiles.
It also supports simulations for prorated salary and hourly rate calculations, enabling users to estimate compensation based on actual working days or hours worked.
With this feature, users can preview salary calculations before finalizing payroll. This is especially useful for scenarios such as:
- Partial-month employment
- Mid-period onboarding or resignation
- Employees with hourly-based pay schemes
By providing a way to review and validate payroll results in advance, the Simulation feature helps minimize errors and ensures more accurate compensation processing.
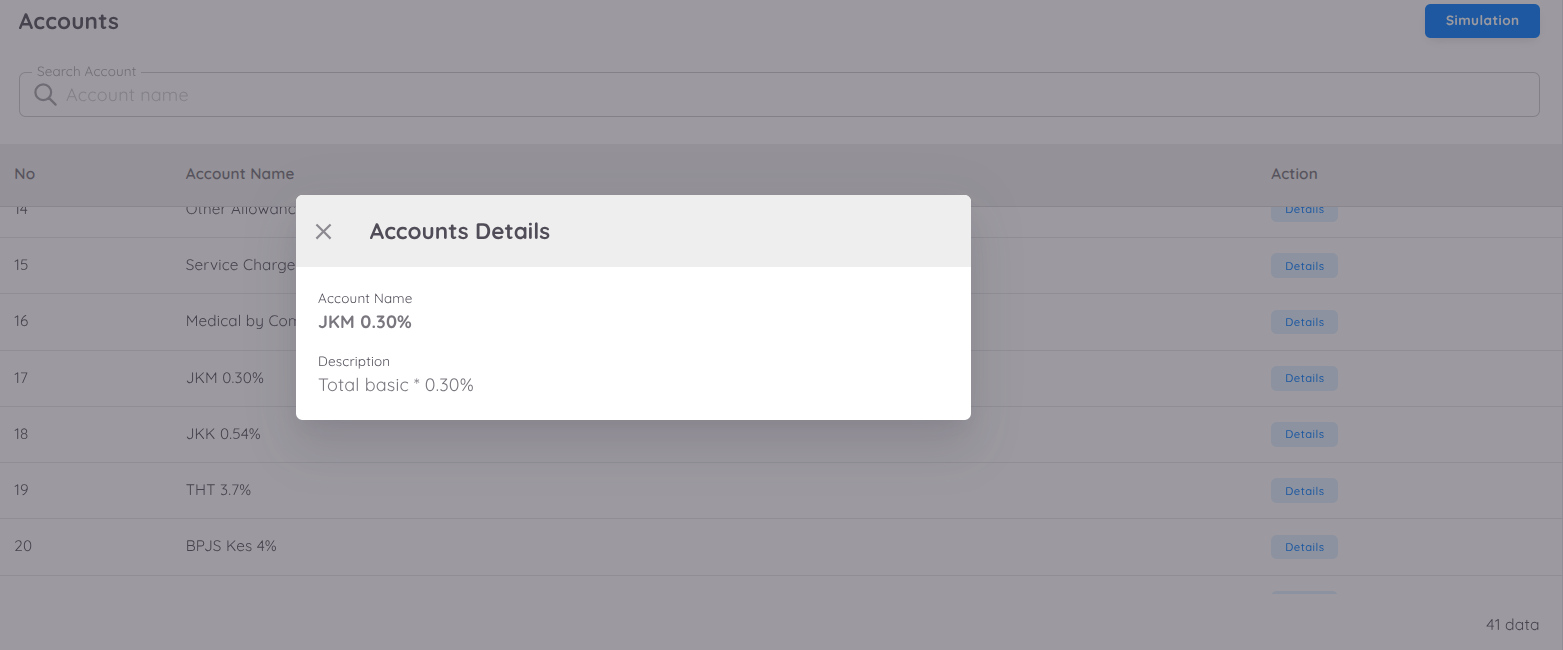
Within Payroll Setup, users can also access the Accounts menu. In this menu, users can view the list of accounts available in the selected profile, along with their descriptions and formulas.
NOTE
The payroll profile will be created by the EMS team according to the company's needs. If there is a need for a new report template, please contact the EMS team.
Payroll report templates are also available to ensure that all tax data is complete to support accurate tax reporting.
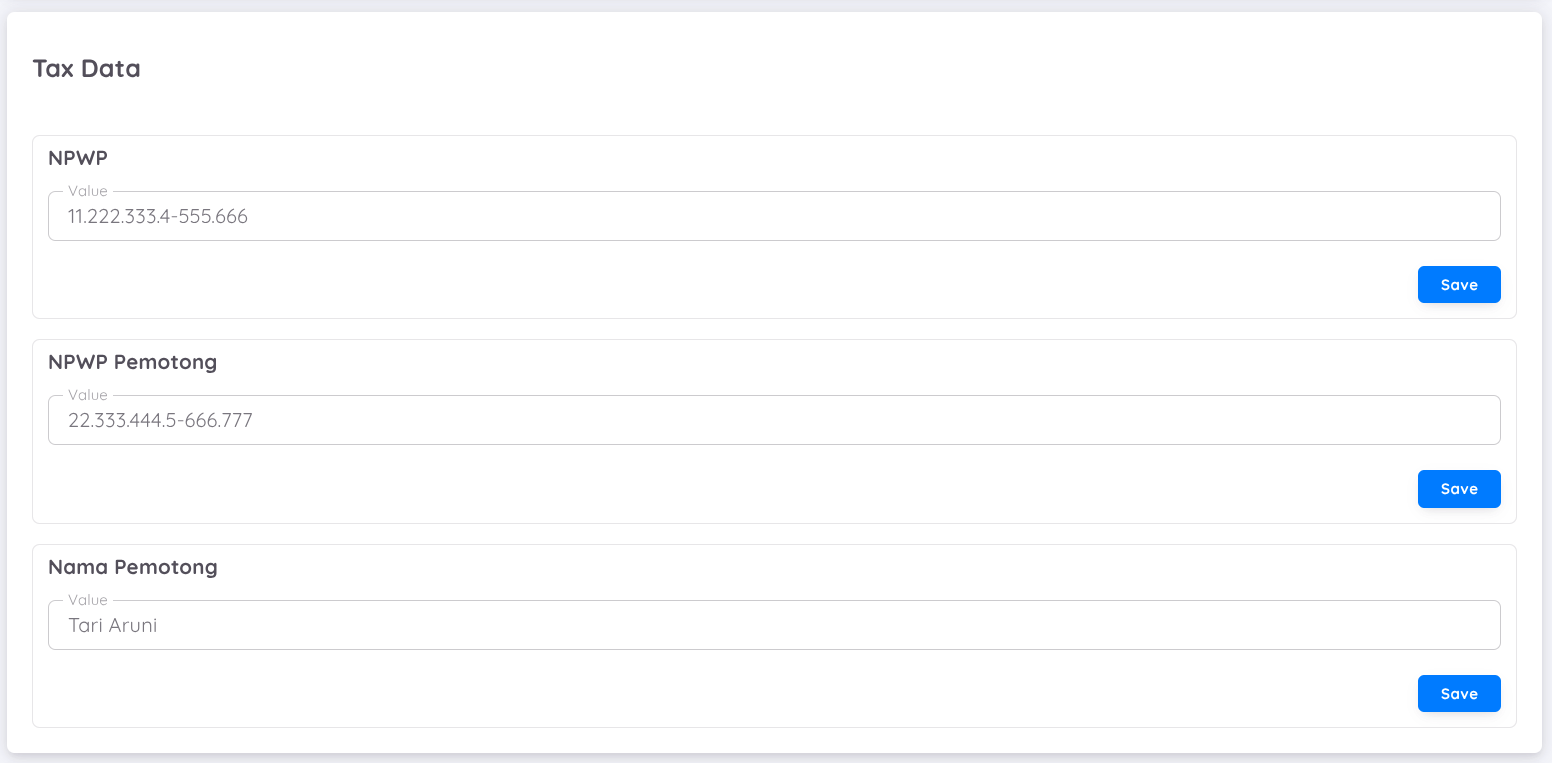
Tax Data Setup (Indonesia Tax Withholding)
For Indonesian tax withholding, tax data must be configured in the Payroll Setup.
This setup is mandatory because the information will be used as the tax withholder identity in official tax documents, such as Form 1721-A1.
If the tax data is incomplete or invalid, the system will not be able to generate the tax withholding slip correctly.
The required tax data includes the following:
NPWP
The company’s NPWP serial number used for tax withholding purposes.
This NPWP will appear as the withholder’s NPWP in the tax withholding slip.NPWP Holder
The name of the person responsible for tax withholding.
This is usually the General Manager (GM), Finance Controller (FC), or Tax Leader, depending on the company’s internal structure.Nama Pemotong
The official name of the tax withholder as registered for Indonesian tax reporting.
This name will be displayed on the Tax Withholding Slip (Form 1721-A1).
NOTES
- All tax data must follow the official NPWP format and Indonesian tax regulations.
- The configured tax data is automatically applied to:
- Annual Recap
- Tax Withholding Slip (Form 1721-A1)
- If any tax data is updated, the changes will be reflected in newly generated tax documents.
Ensure that this information is reviewed and validated before generating any tax withholding slips to avoid errors in official tax reporting.
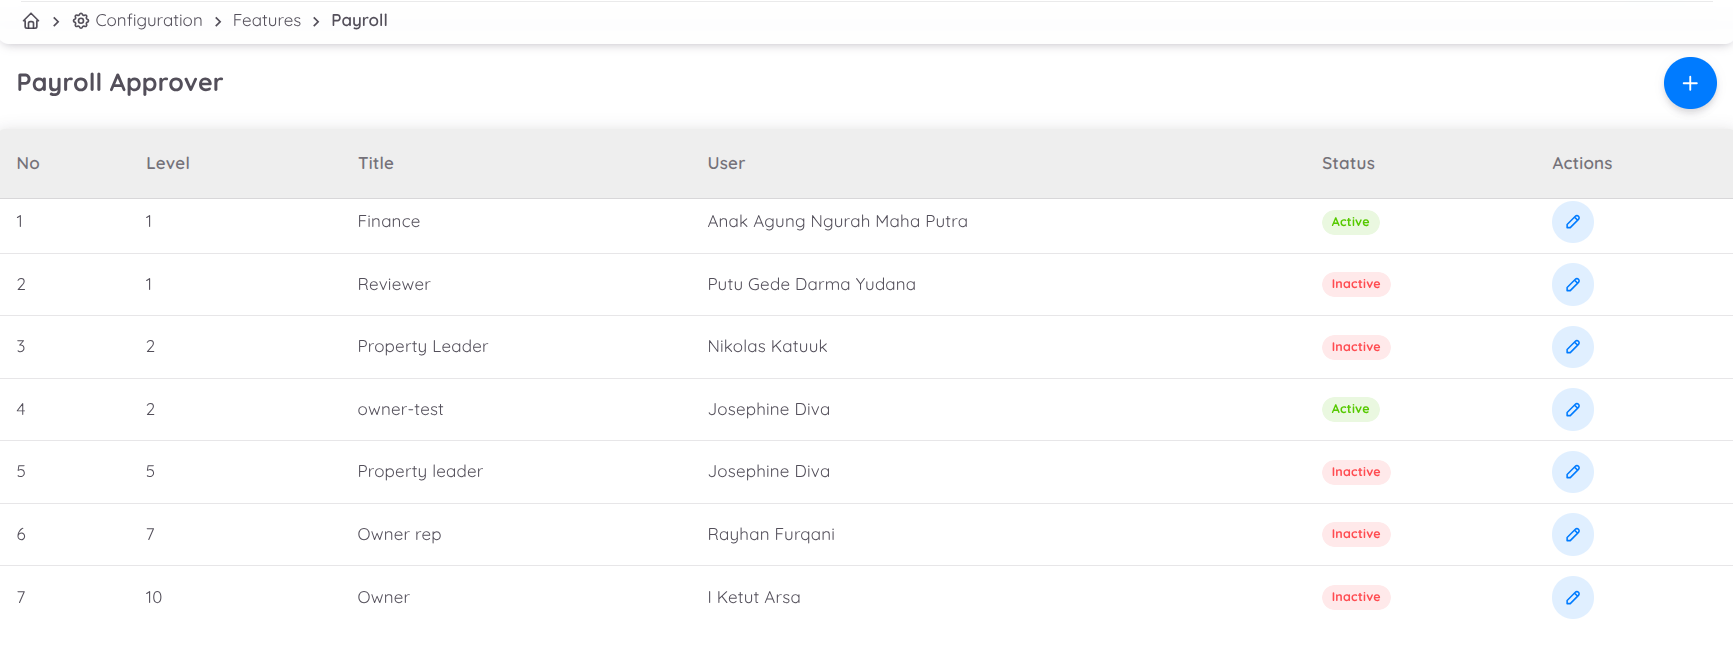
Payroll Approver
In the Setup Payroll menu, users can not only configure payroll components but also enable and manage the verification feature. Through this feature, users can define the required approval layers as needed.
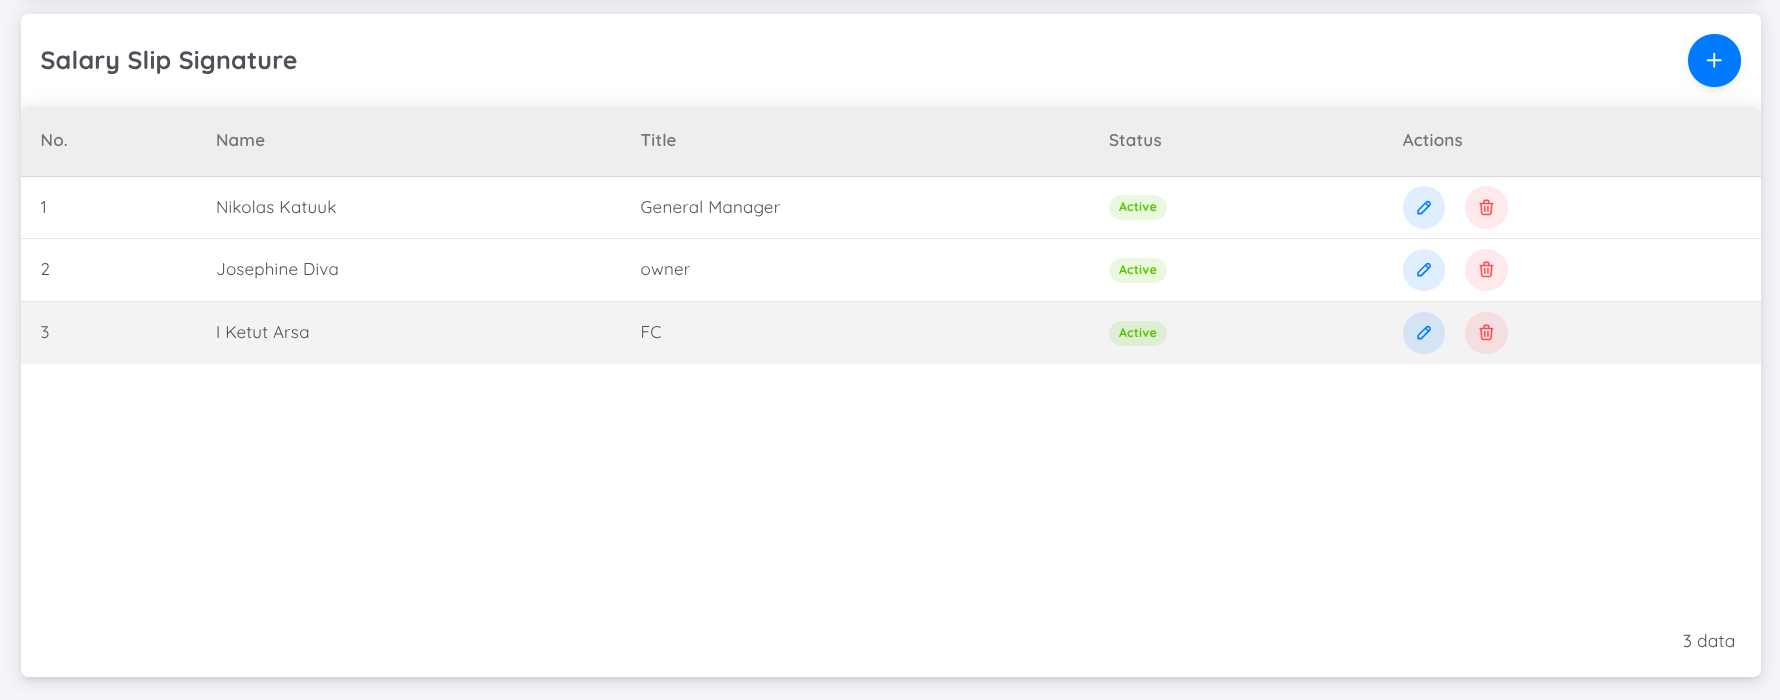
Salary Slip Signature
In addition, as an extra feature, users may also add a signature that will be automatically generated on the payslip.
Attendance
Record Method
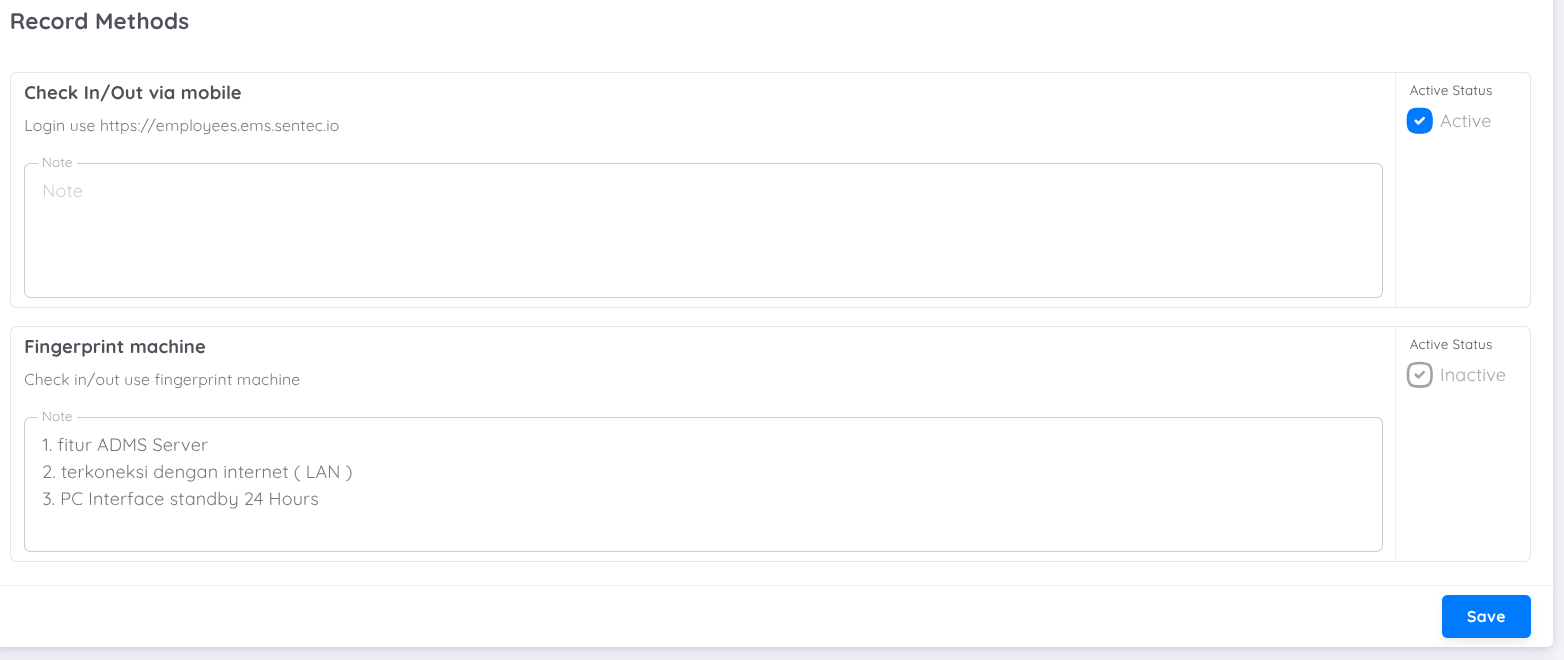
Sentec EMS supports various attendance recording methods for employees. Currently, there are few options available:
- Using employees’ personal devices (check-in/out via mobile)
- Integrated with a fingerprint machine (check if your company plans to integrate the fingerprint machine with Sentec EMS)
- QR Code Check in/out use QRcode and add tag for the record location
To integrate your fingerprint machine with the EMS system, please ensure that the device meets the following requirements:
- The machine must support the ADMS Server feature (you may confirm this with the device vendor).
- The machine must be connected to the Interner/LAN network.
- You must prepare a PC/VM that can run continuously (24/7) as the interface.
You can access the full documentation at:
Fingerprint Integration Documentation
Please check one or both options to activate them.
INFORMATION
Contact the Sentec EMS Team if your fingerprint machine meets all the required features and you want to integrate it with Sentec EMS.
Attendance setup
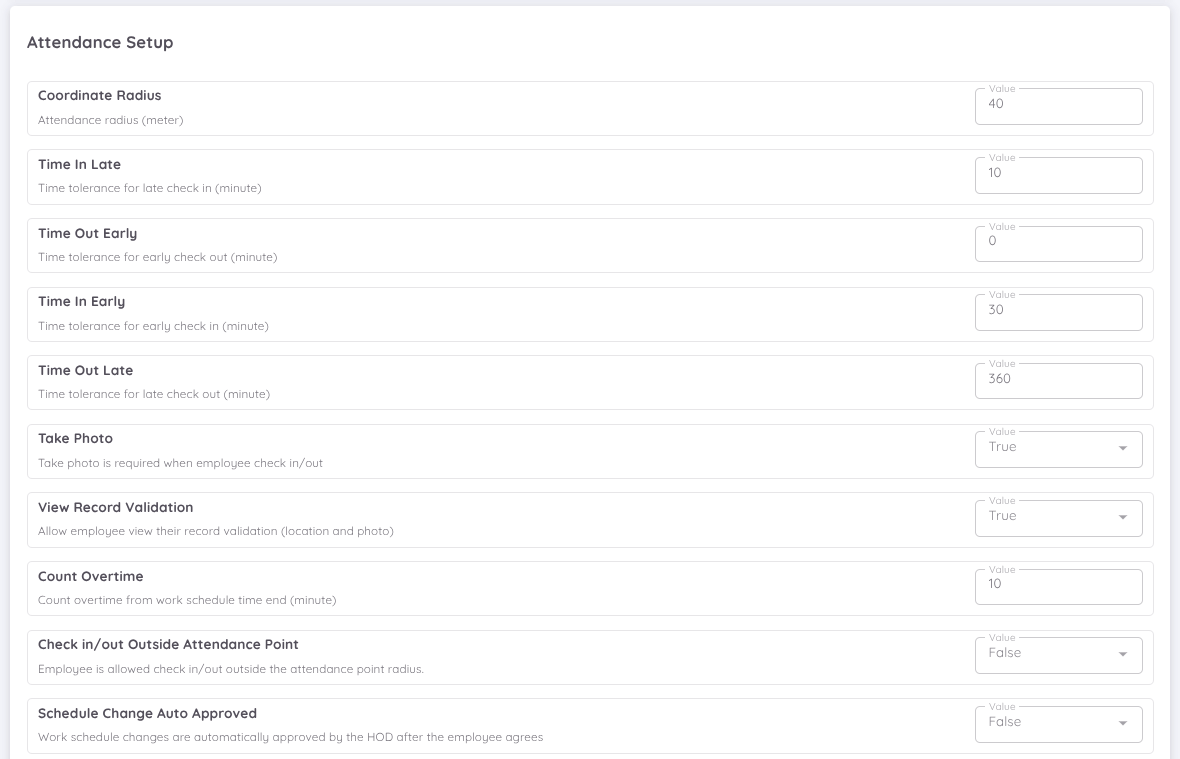
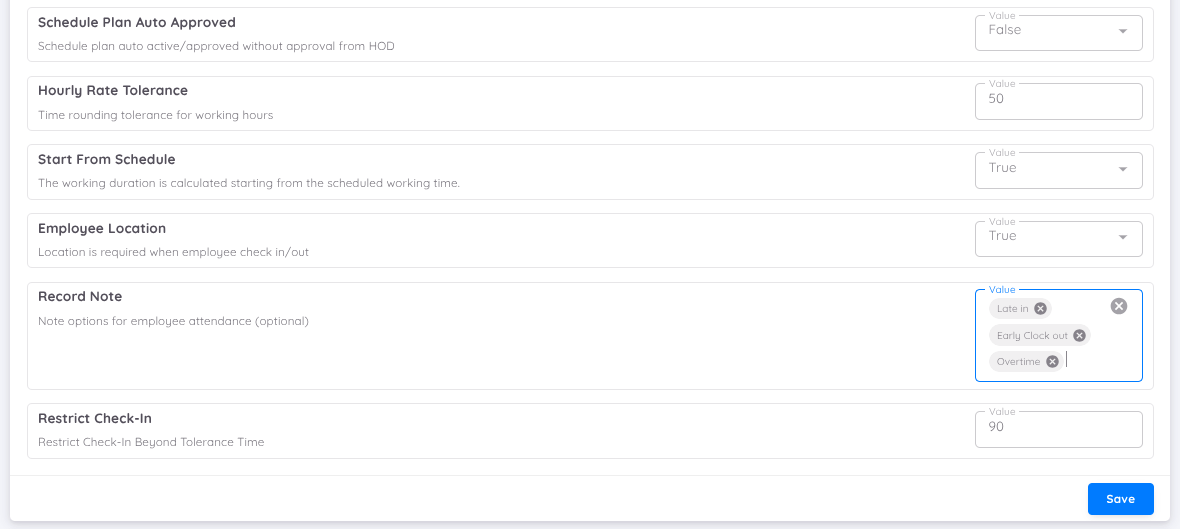
The following are the tolerance time settings and attendance point radius for employees:
Radius: Tolerance location for employee attendance from the specified attendance point, measured in meters.
Time In Late: Tolerance for employees arriving late from the scheduled work hours, measured in minutes.
Time Out Early: Tolerance for employees leaving early from the scheduled work hours, measured in minutes.
Time In Early: Tolerance for employees arriving early from the scheduled work hours, measured in minutes.
Time Out Late: Tolerance for employees leaving late from the scheduled work hours, measured in minutes.
Take Photo: Toggle to require or disable employee selfies during attendance. If set to False, the camera will not activate; if True, employees must take a selfie.
View Record Validation: This setting allows users (management) to show or hide location and photo validation during attendance. If set to True, the system will display the results of location and photo validation in the employee’s application when they perform attendance. Conversely, if set to False, the results of location and photo validation will not be displayed in the employee’s application during attendance.
Count Overtime: Setup that calculates the employee's working time exceeding the scheduled shift (check-out time). The value entered in this field is in minutes. If set to 0, the system will start calculating overtime from the scheduled shift end-time until the employee completes the check-out.
Check in/out Outside Attendance Point : Users can configure the Check In/Out Outside Attendance Point option to determine whether attendance outside the designated location is accepted (True) or rejected (False).
Schedule Change Auto Approved : Users can configure whether schedule change or swap requests submitted by employees are automatically approved. If set to True, the request will be automatically approved and become active.If set to False, the request must first be approved by the Head of Department before it becomes active and can be used by employees.
Schedule plan auto active/approved without approval from HOD : When this option is set to True, any schedule plan created by the Creator will automatically become active and available for employees to use, without requiring approval from the Head of Department (HOD). If set to False, the schedule plan must first be approved by the HOD before becoming active and accessible to employees.
Hourly Rate Tolerance: This configuration determines how employee working hours are rounded. The value is set in minutes.
- For example, if set to 25, working hours will be rounded up after 25 minutes.
- If set to 0, no rounding will be applied.
- For instance, if an employee works 1 hour and 45 minutes, it will still be counted as 1 hour when rounding is set to 0
Start From Schedule: If the true option is selected, the working duration will be calculated based on the predefined schedule. However, if the false option is selected, the working duration will be calculated based on the employee’s clock in and clock out times recorded during attendance.
Employee Location: If the employee location is set to True, the employee’s location is required when checking in or checking out.
Record Note: If predefined notes are configured here, employees can select one of these options as their attendance note when recording their schedule.
Restrict Clock-In: A feature that restricts employees from clocking in after exceeding the allowed time limit, with the following settings:
- Time In Late refers to the grace period.
- Restrict Check-In refers to the additional time allowed after the grace period.
Once the total allowed time has passed, the Check-In button will no longer be available.
Example:
- Time In Late: 10 minutes
- Restrict Check-In: 90 minutes
Employees can clock in for up to 100 minutes after the scheduled start time. After that, clock-in will no longer be allowed.
- Working Days Per Week Number of working days in a week. This will determine today’s attendance. You can set your schedule to either a 5-day or 6-day working pattern, and the system will automatically adjust attendance tracking accordingly.
Attendance Location
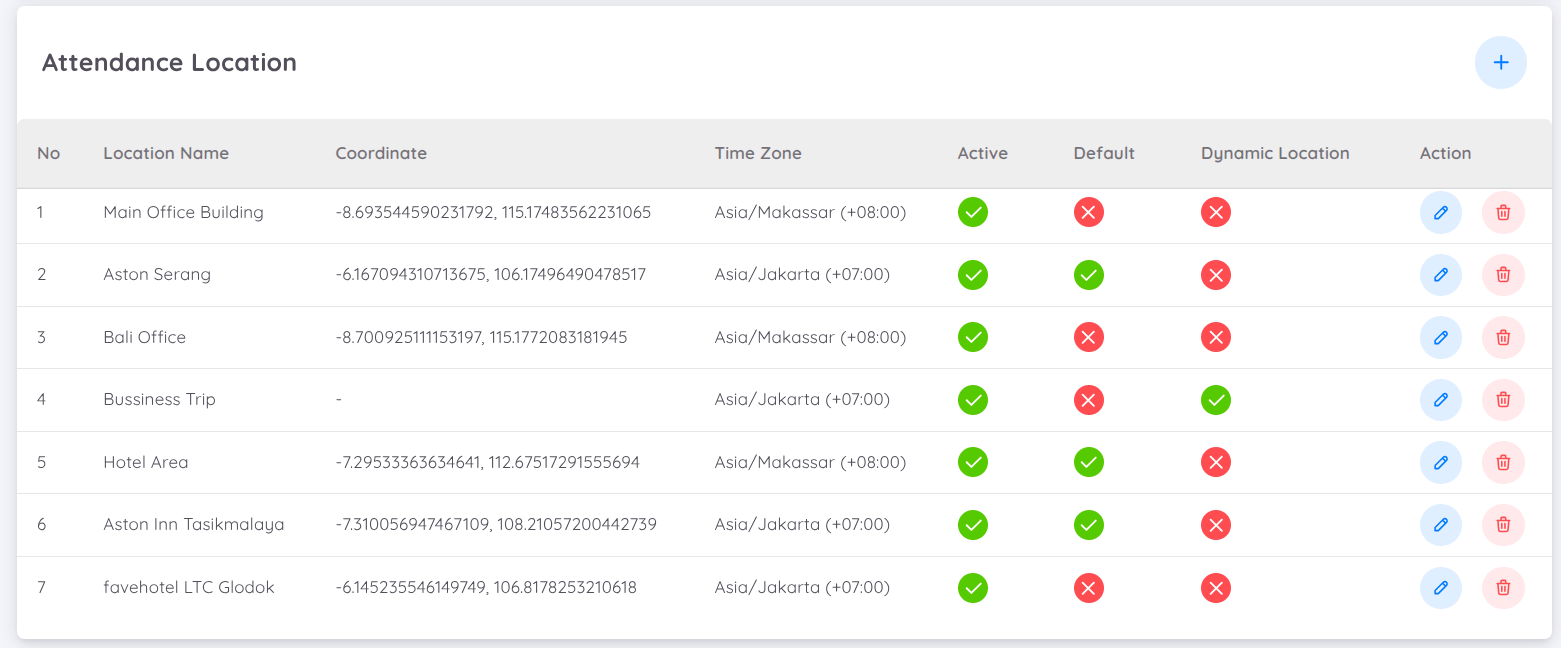
Companies can create more than one attendance point in Sentec EMS, ideal for companies with multiple buildings or offices. Sentec EMS supports time differences between these attendance points, and the attendance time used is the local time of each attendance point.
Each attendance location must specify its geographic coordinates and the time zone used. The company must also select one default location that will be used as the primary attendance point if there are multiple attendance points.
Dynamic Location
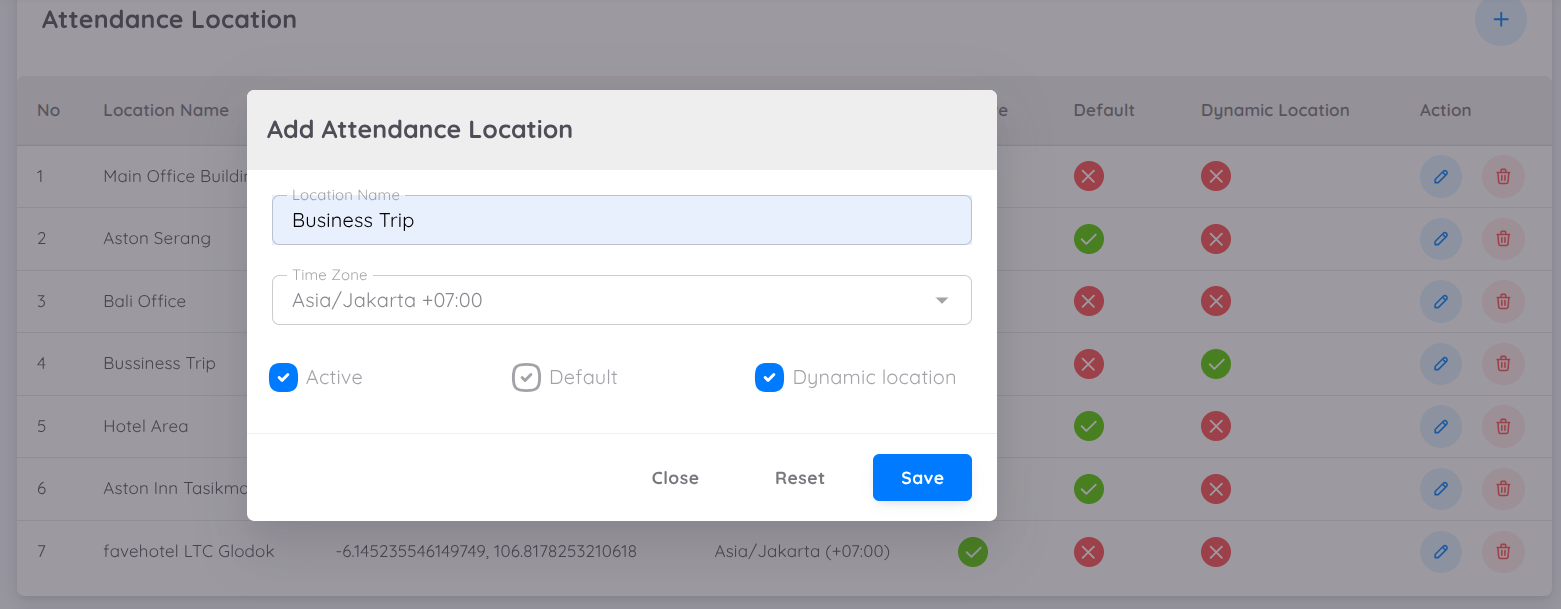
Sentec EMS also supports the configuration of dynamic locations for employees who are on a business trip or working from home (WFH). This dynamic location feature allows companies to add temporary attendance locations by selecting the Dynamic Location option. Once activated, companies can enter the location name and time zone that apply to the employee.
Attendance Approval

The approval setting is available and can be enabled for each assigned attendance location, allowing Management/HR to determine whether attendance submitted from a specific location requires approval.
This feature is especially beneficial for employees working in dynamic or non-fixed locations, as it helps to:
- Validate attendance submitted from different work locations
- Ensure attendance accuracy before the data is finalized
- Provide HR with better control to verify attendance legitimacy
- Reduce errors in payroll and attendance reporting
- Improve transparency through an approval workflow
Once the attendance approval is approved, the employee’s attendance will be recorded in the system.
NOTE
The approval process currently can only be performed through the management page.
Location Tag & QR Code
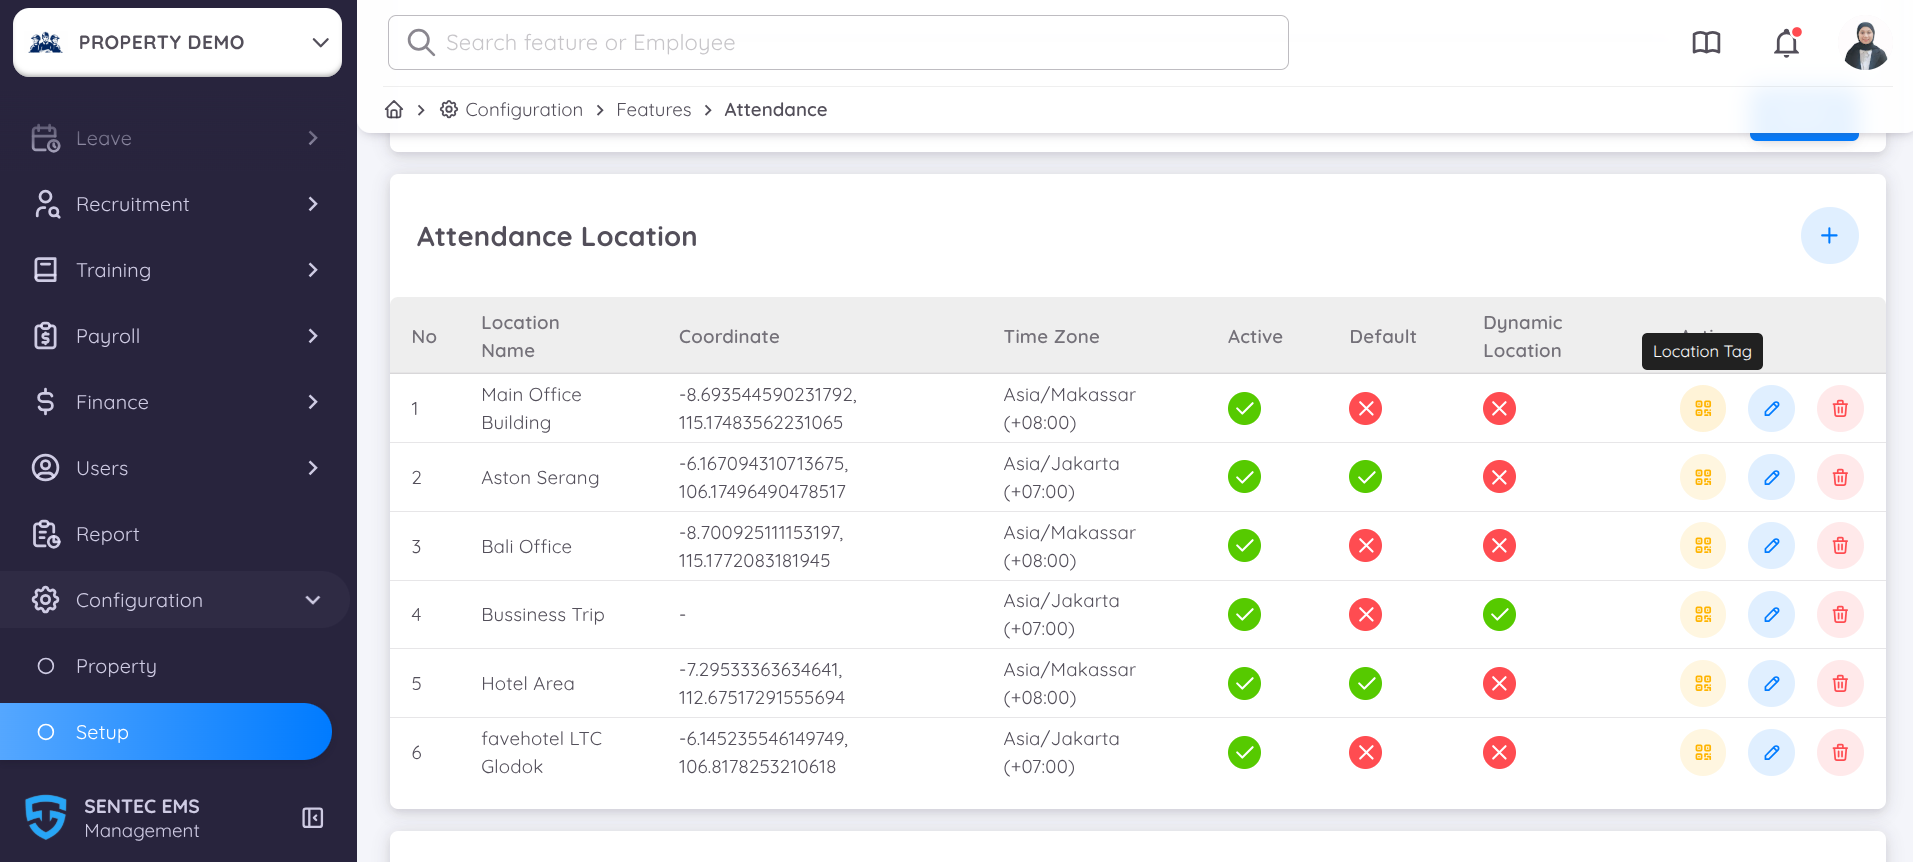
Sentec EMS now supports Location Tags, allowing employees to record their attendance by scanning a QR Code at a designated location.
Location Tags can be configured for each assigned attendance location. Each tag covers a specific area based on the configured location settings.
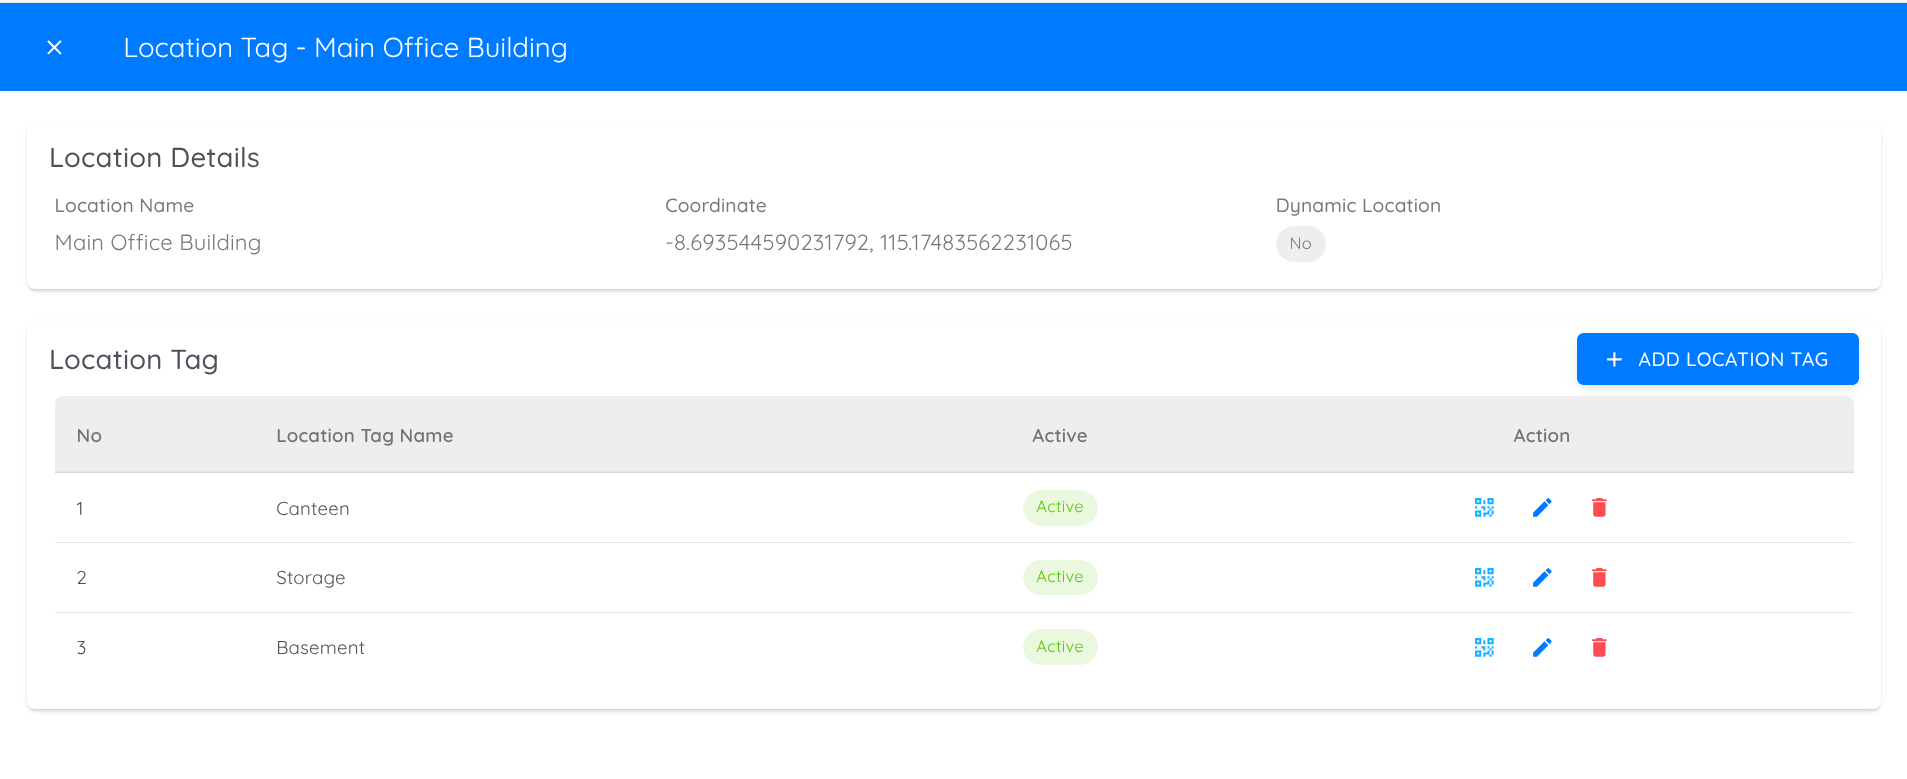
Each attendance location now includes a Location Tag option, enabling multiple tags to be added for different area locations.
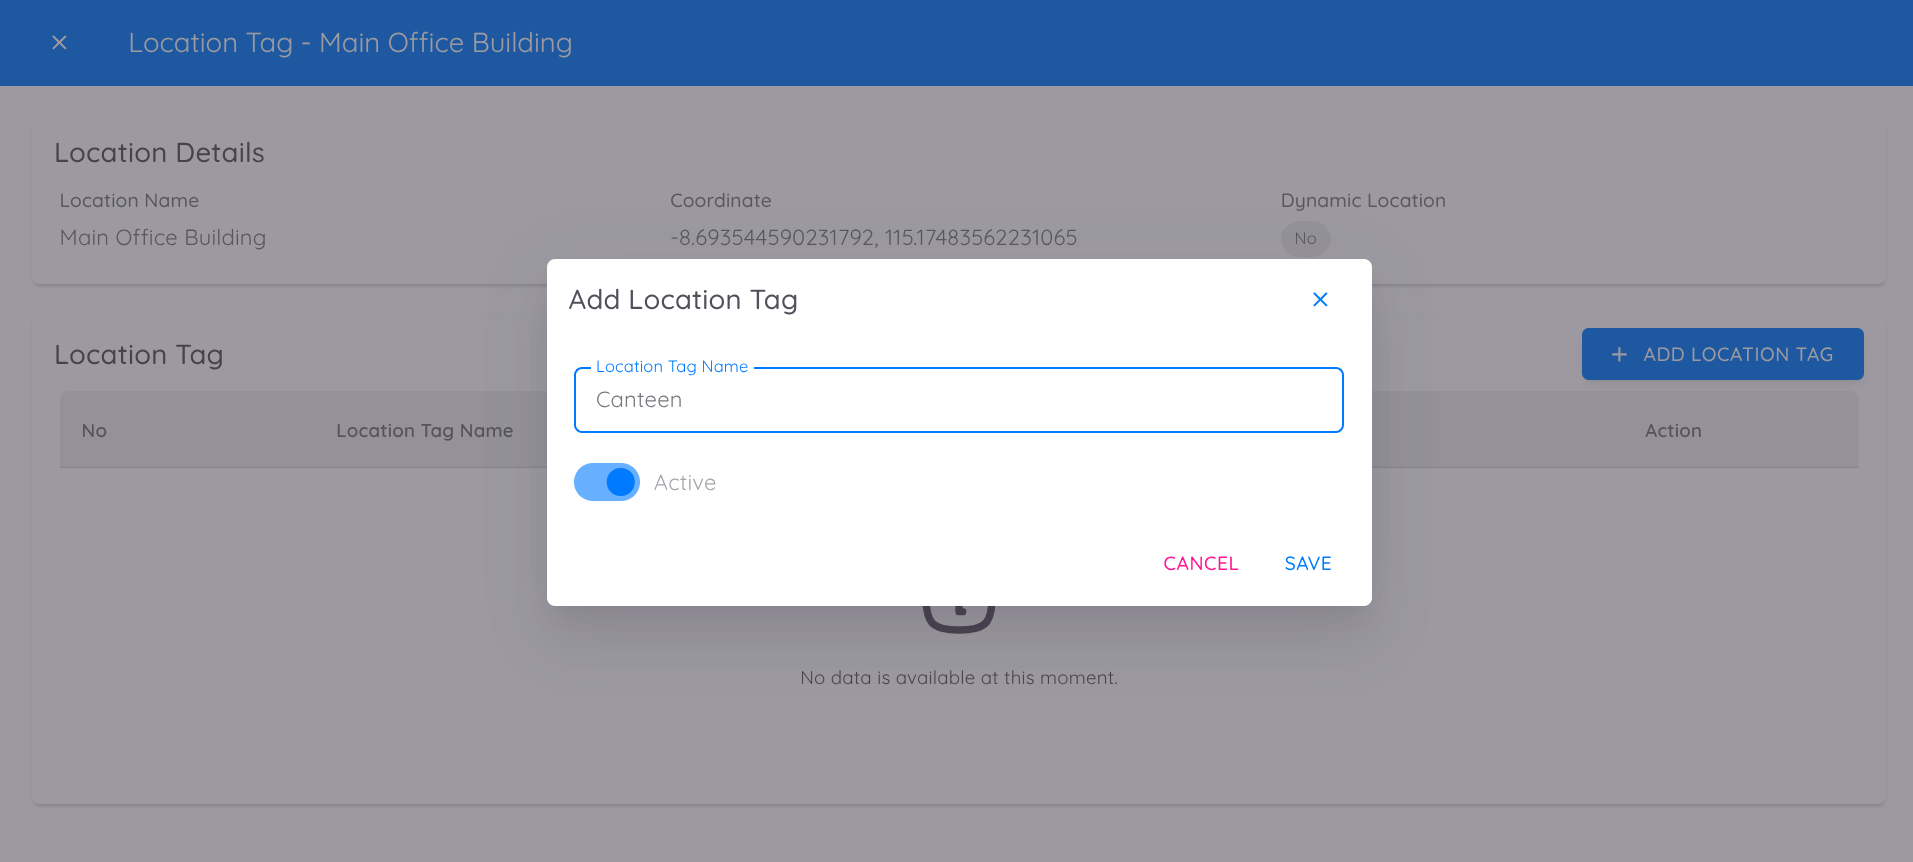
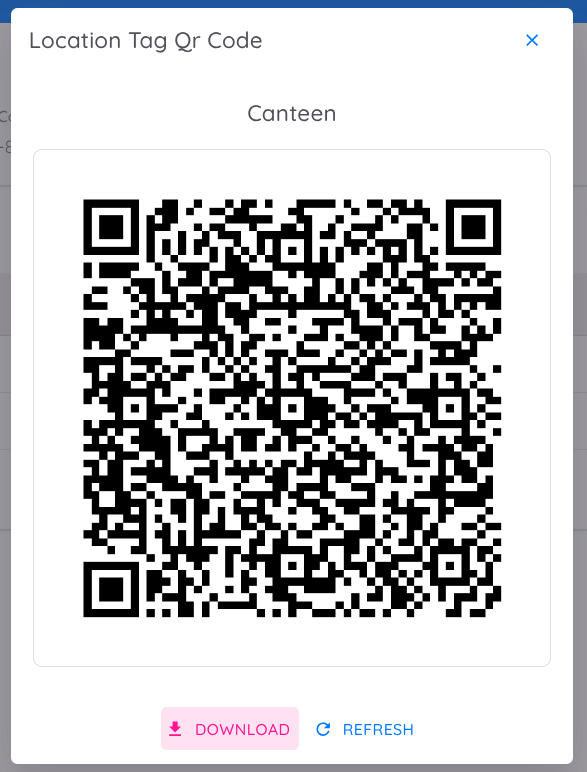
For each Location Tag:
- A unique QR Code is automatically generated
- By default, the coordinates will follow the main location. However, the coordinates can be modified and configured individually for each location tag.
- The QR Code can be placed at the corresponding physical location
- Employees are required to clock in by scanning the QR Code at the designated location
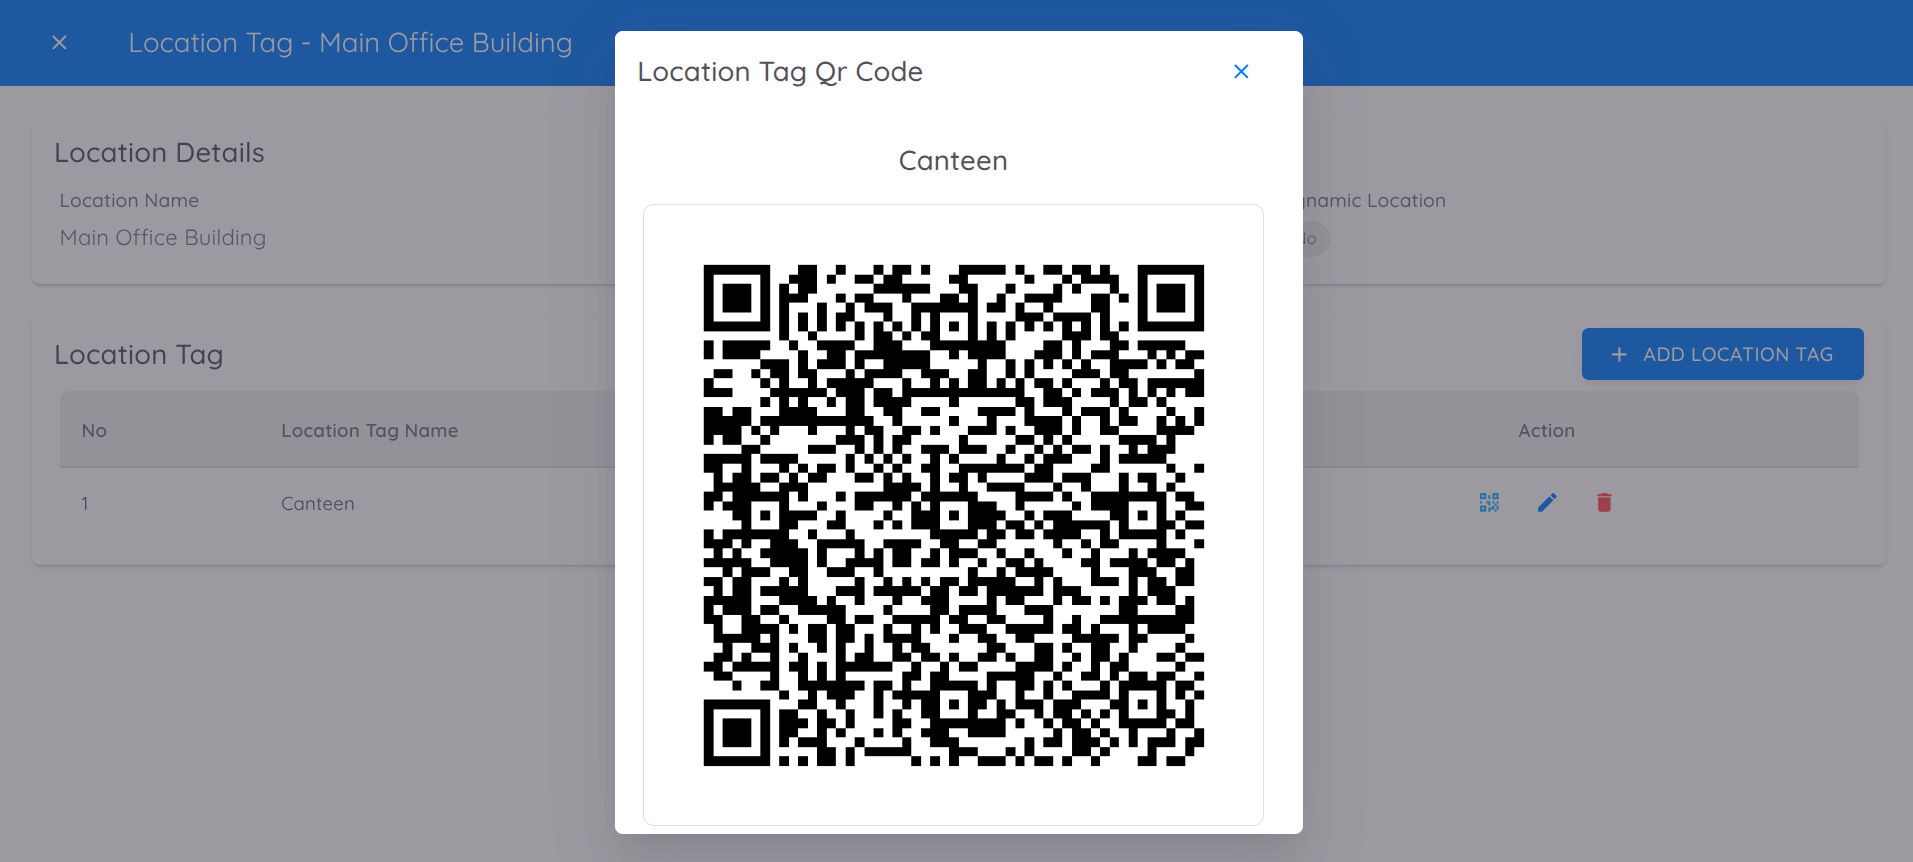
You can add as many Location Tags as needed. Each tag will automatically generate a unique QR Code that can be placed at its respective physical location. Employees must scan the QR Code at the designated location to record their attendance.
Location Tag Rules
- Location Tags define specific clock-in and clock-out points within a designated area.
- A QR Code is generated for each Location Tag and can be downloaded and placed at the assigned physical location.
- QR Codes can be refreshed to generate a new code while maintaining the same Location Tag.
- Employees must enable and allow location access on their device before scanning the QR Code.
- Employees must check in and check out using the same QR Code and Location Tag.
- If an employee checks in at multiple Location Tags, each activity will be recorded as a log.
- The first clock-in of the day is recorded as the official attendance start time.
- The last clock-out of the day is recorded as the official attendance end time.
- Manual attendance input for Location Tag records is currently not supported.
Work Schedule
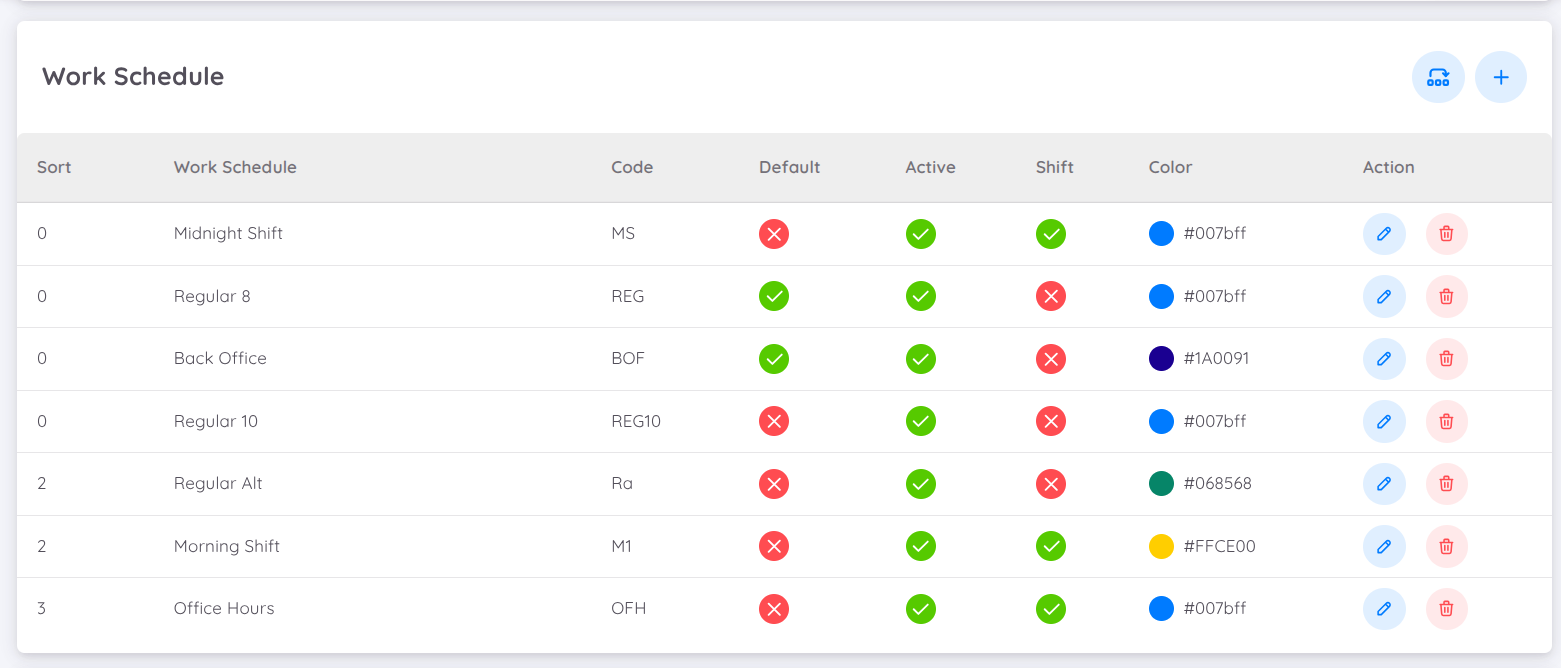
Sentec EMS supports customizable work schedules. Companies can create various work schedules as needed. There are two types of work schedules that can be created: for regular employees and shift employees.
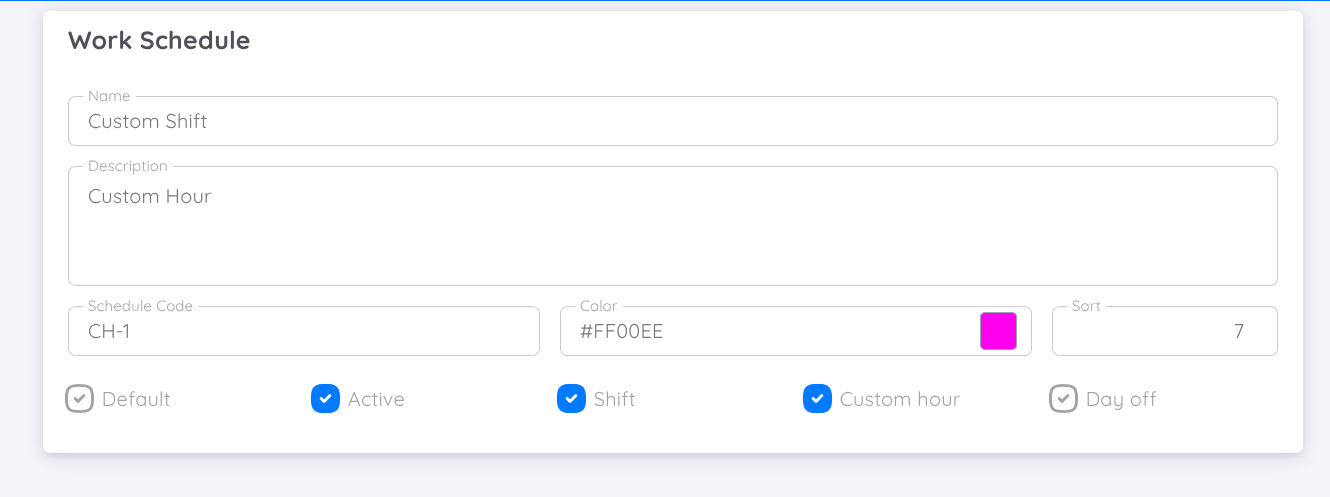
The features available for configuring work schedules are as follows:
- Schedule Code and Color: Used as a unique code for the work schedule. This code is also used in report generation. The schedule code is limited to a maximum of 5 characters. Please ensure that the code you create does not exceed this limit.
- Sort: Numeric value used to sort types of work schedules, from smallest to largest.
- Shift: Check if the schedule being created is a shift schedule.
- Custom Hour: Check if the work hours are specifically determined during the creation of the work schedule.
- Day Off: Check if this work schedule is a day off.
NOTE
The company must designate one schedule as the default option.
For a step-by-step visual guide, you can watch the video tutorial on how to add a new work schedule below :
Overtime Profiles
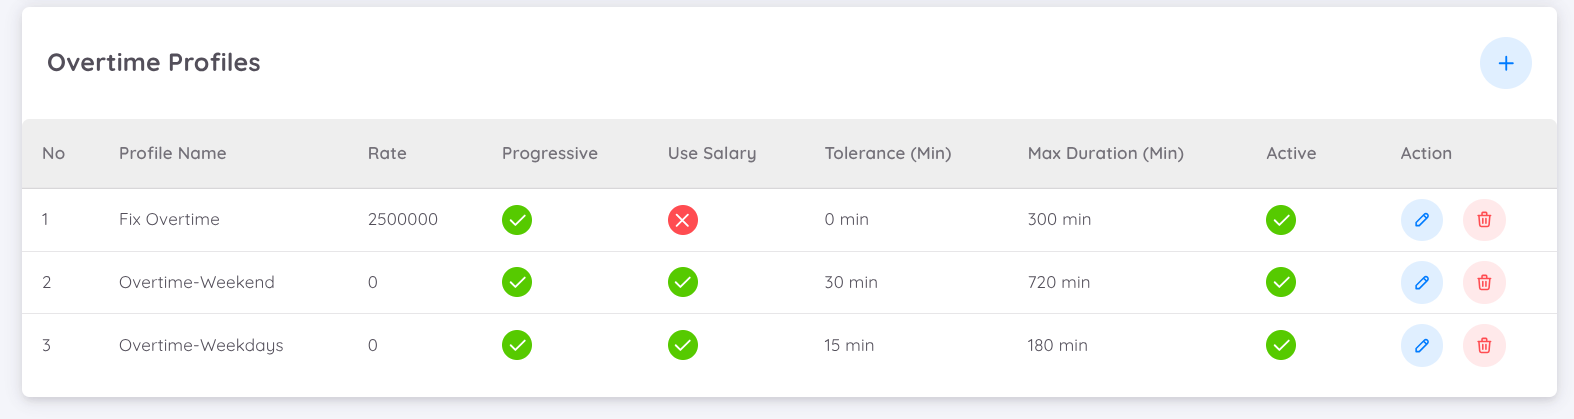
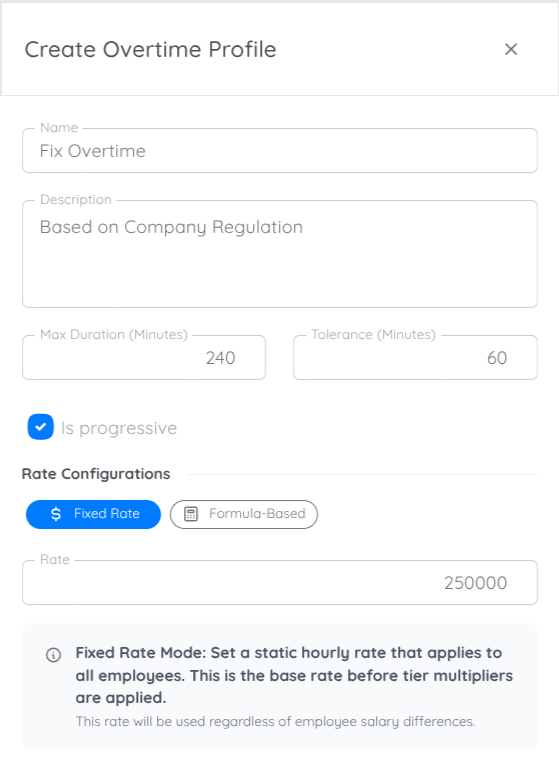
The Overtime Profiles feature in Sentec EMS allows companies to fully customize how overtime (OT) is calculated according to internal policies or labor law regulations.
With this feature, administrators can create different overtime profiles that define rules for calculating rates, time tolerances, progressive calculations, and duration limits, ensuring the system automatically follows the company’s overtime policy.
The features available for configuring Overtime Profiles are as follows:
Max Duration & Tolerance : Allows you to control the limits and grace period for overtime calculation

- Max Duration (Minutes): Determines the maximum amount of overtime allowed per day.
Example: Setting120means employees can record up to 2 hours of overtime each day. Example: 120 means employees can record up to 2 hours of overtime per day. - Tolerance (Minutes): Defines the minimum overtime duration that will be counted.
Example: If tolerance is set to60, any overtime less than 60 minutes will not be included in the calculation.
- Max Duration (Minutes): Determines the maximum amount of overtime allowed per day.
Progressive Calculation : When the Is Progressive (✔) option is enabled, overtime will be calculated progressively based on company policy. Example: The first hour may be paid at 1.5x rate per hour, and the following hours at 2x rate per hour.
- Rate Configuration : Determines how overtime pay rate is calculated.
You can choose between two methods:
Fixed Rate – Uses a predefined hourly rate or tier-based rate.
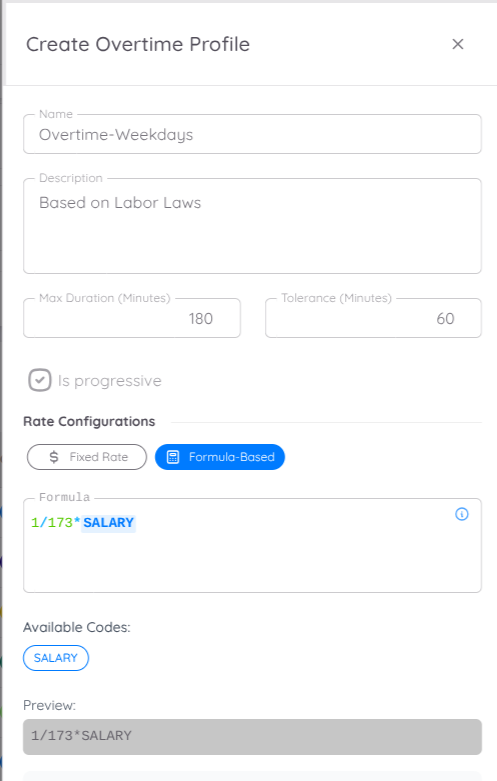
Example: if rate overtime is IDR 50,000/hour. You can define each tier level or hour to be multiplied by a specific value. For example, the first hour multiplied by 1, the second hour by 2, and so on.Formula-Based – Automatically calculates overtime based on an employee’s basic salary or other parameters set by the company.
When using the formula-based method, the system will generate a variable code that you can select called Salary, which refers to the employee’s basic salary as defined in their contract.
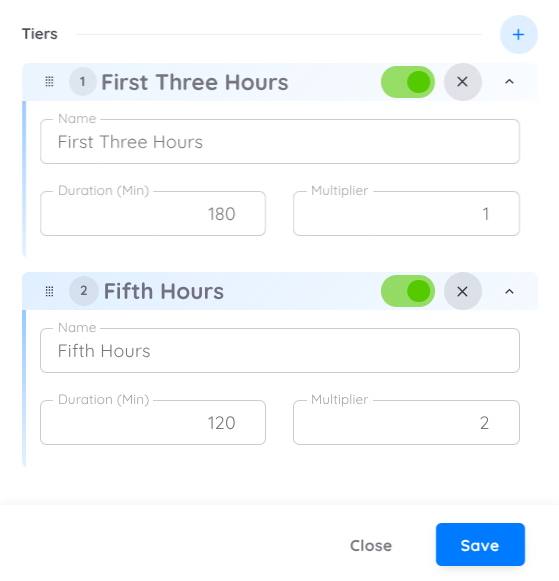
You can set the formula according to regulations, for example to find the hourly rate the formulation can be set as follows:1/173 * Salaryto determine the hourly rate, which will then be calculated further based on the tier levels.Tiers: Define how overtime is calculated for different time segments.
Each tier represents a time range (or minimum duration) with its own multiplier.
This means overtime pay can increase progressively depending on how long the employee works beyond regular hours.
Example Configuration:
| Tier | Minimum Duration (Minutes) | Multiplier |
|---|---|---|
| 1st Tier | 60 | 1.5 |
| 2nd Tier | 60 | 2.0 |
Explanation:
- The first hour (60 minutes) is multiplied by 1.5 (1.5x hourly rate).
- The next hour (after the first) is multiplied by 2.0 (2x hourly rate).
So, if an employee works 3 hours of overtime:
- The first hour is paid at 1.5x the hourly rate.
- The second hour is paid at 2x the hourly rate.
- The third hour is also paid at 2x the hourly rate.
The total overtime that will be calculated is 5.5x the hourly rate.
The system automatically processes overtime from the first tier onward.
If the condition for the first tier is met, it applies the multiplier (1.5x), then moves to the next tier (2x), and so on.
⚠️ Important Note About Tier Order
The order of tiers directly affects how the system calculates overtime.
Make sure each tier is arranged in the correct sequence to ensure accurate calculation results.
Scenario Example of Fixed Rate Configuration
For example, if you want to create a fixed rate profile with this scenario:
- The company applies a fixed rate of Rp 250,000 for a minimum of 3 hours of overtime.
- When employees work beyond 5 hours, the rate increases to Rp 500,000.
In this case, you can configure the profile as follows:
- Define Max Duration and Tolerance according to your company policy.
- Enable Is Progressive.
- Select Fixed Rate as the calculation type.
- Set the Rate to
250000. - Add tiers:
- Tier 1: Applies to the first 3 hours of overtime, paid at 1x.
- Tier 2: Applies to hours after the 5th hour, paid at 2x.
Scenario Example of Formula-Based Configuration
For example, if you want to create a Formula-Based overtime profile that follows the Indonesian Labor Law (UU Ketenagakerjaan) for regular weekdays under a 5-day workweek, the calculation is typically as follows:
- First hour of overtime: 1.5 × hourly wage
- Next hours: 2 × hourly wage
In this case, you can configure the profile as follows:
- Define Max Duration and Tolerance according to your company policy.
- Enable Is Progressive.
- Select Formula-Based as the calculation type.
- Set the formula as
1/173 * SALARY(based on the available code).
The system will automatically calculate the overtime pay based on each employee’s hourly wage. - Add tiers:
- Tier 1: Applies to the first hour of overtime, paid at 1.5x.
- Tier 2: Applies to the second and subsequent hours, paid at 2x.

Leave
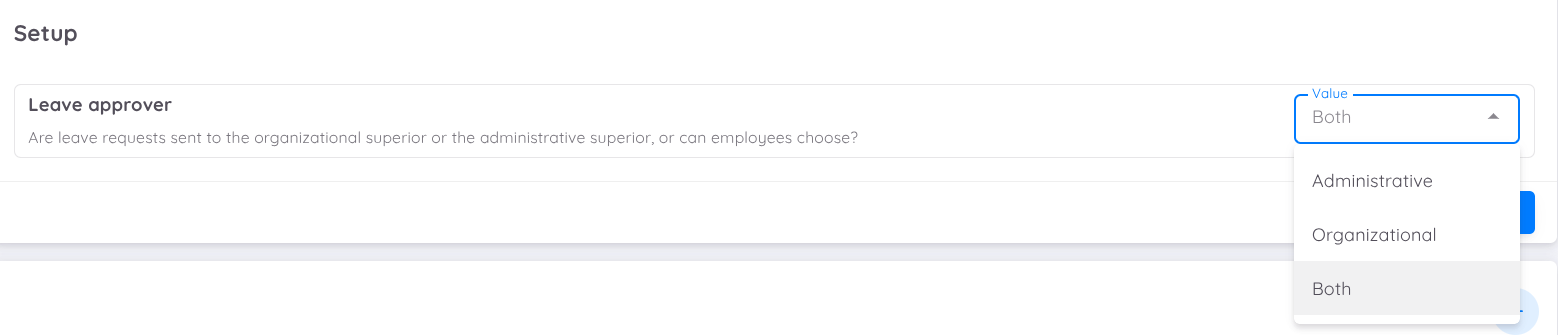
In the Leave Setup menu, management can configure leave requests to be approved either by the organizational superior or the administrative superior. Alternatively, you can enable the Both option to allow employees to choose their approver.
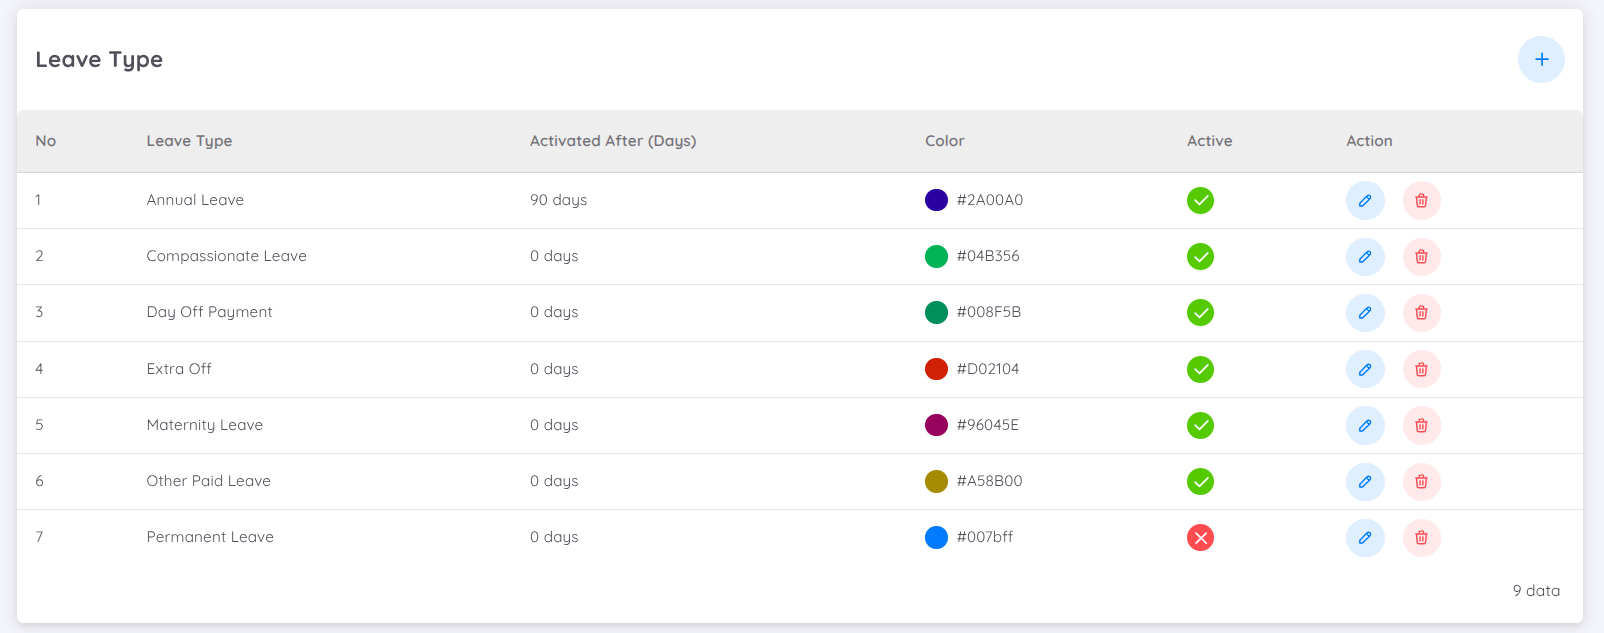
Companies also can create various types of leave as needed. Generally, there are two types of leave that can be created: regular leave (leave entitlement added according to the system) and extra leave (additional leave entitlement from the company/Head of Department).
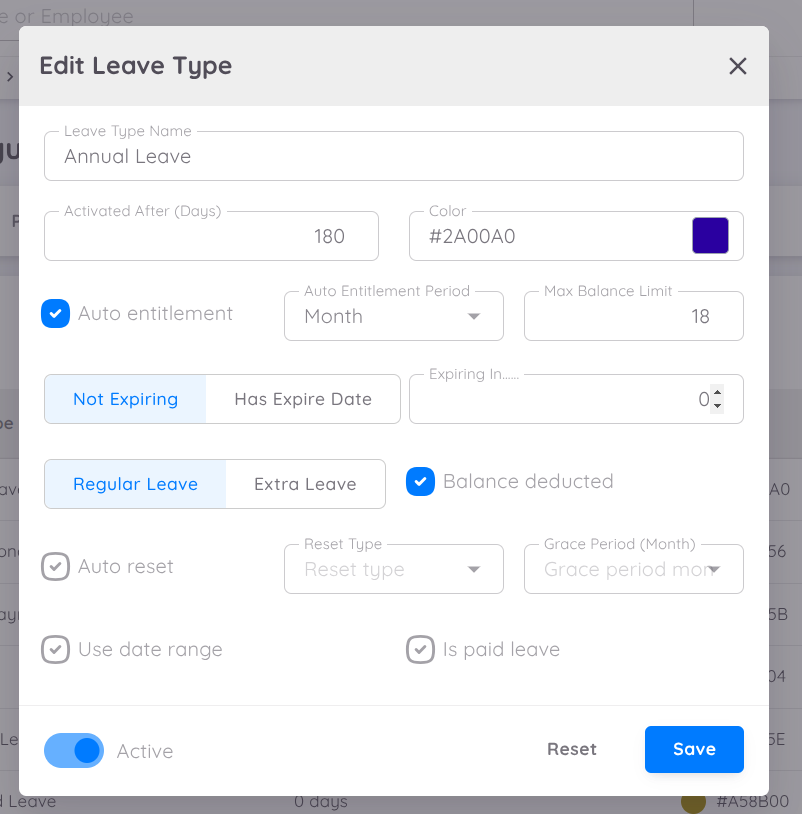
Here are the features available for configuring leave types:
- Activated After (days) : Defines the number of days after an employee joins before this leave type can be used.
- Auto Entitlement : Automatically adds leave entilement based on the employee's contract start date.
- Auto Entitlement Type : Specifies the period used for automatic leave entitlement (e.g., based on contract duration or calendar year).
- Max Limit : Sets the maximum accumulation limit for leave entitlements.
- Toggle Not Expiring or Has Expire Date : Determines whether this leave type has an expiration date or can be used indefinitely.
- Expiring In : Defines the duration (in days) before the levae expires if the Has Expire Date toggle is enabled.
- Auto Reset : Configures the system to automatically reset leave entitlements.
- Reset Type : Specifies the leave entilement reset method, with the following options :
- Reset based on contract - Leave entitlements are reset at based on the employee's contract start date.
- Annual reset - Leave entitlements are reset at the beginning of each year.
- Grace Period for Reset : = Allows HR to set a grace period (in months) where employees can still use their remaining leave before it is completely reset.
- Example : An annual reset with a 3-month grace period means that leave is reset every January 1st, but employees can still use their remaining leave from the previous year until March 31st. After that, unused leave will expire.
- Toggle Regular Leave or Extra Leave : Determines whether this leave type is classified as regular leave or extra leave.
- Balance Deducted : Defines whether this leave type wil deduct the employee's leave balance.
- Used Date Range : Enables the use of a date range when submitting a leave request.
- Is paid leave : Specifies whether this leave is a paid leave (does not reduce salary) or an unpaid leave.
NOTE
Employees cannot automatically use the leave types created in the setup page. A leave profile must be created for each employee before they can use the leave request feature.
For a step-by-step visual guide, you can watch the video tutorial on how to add a new leave type below :
Recruitment
The Recuritment module in Sentec EMS is designed to streamline the recruitment management process in each unit. Before using this module, initial configuration needs to be completed in the Setup menu to align with the unit's requirements.
The Recruitment module configuration can be accessed via Configuration > Setup. Three main settings are available :
Requirements
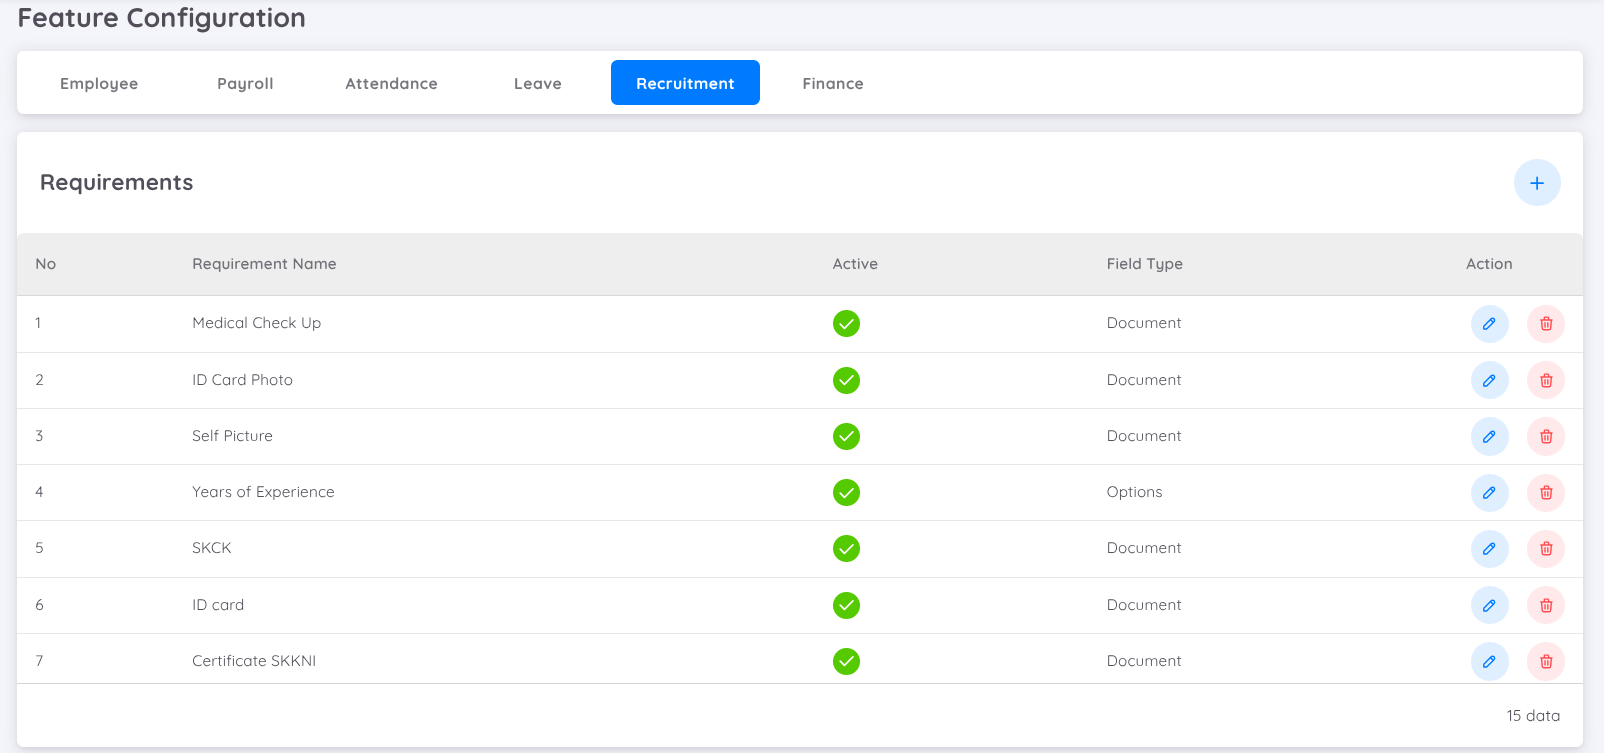
The requirements that will appear when a vacancy is published on the Job Portal. These are the documents or information candidates must provide when applying for a job, such as an ID photo, Family Card, Police Clearence Certificate, etc.
Note
There is no limit to the number of requirements
To add a new type of requirement :
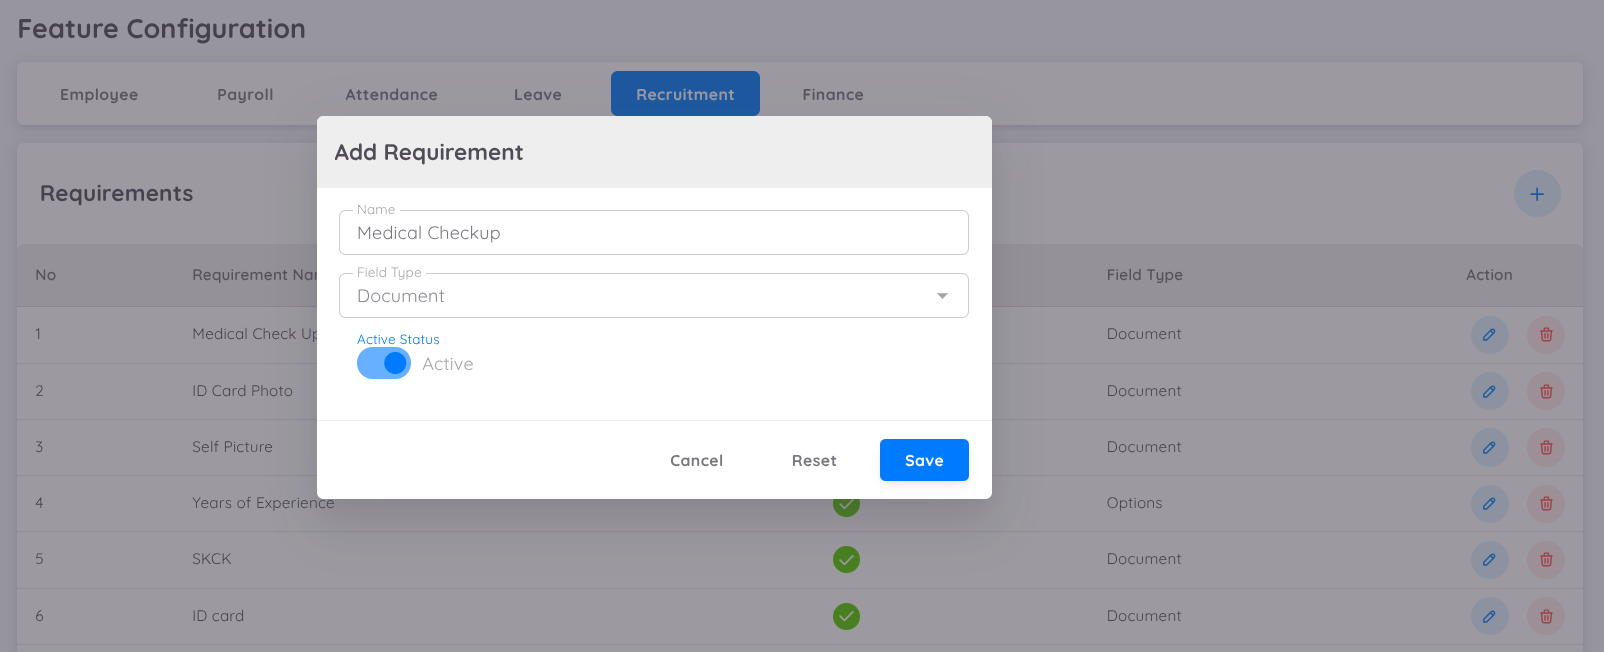
- Click the + button on the right side
- Enter the following information; Name(The name of the requirements), Type(Select the input type : text, selection or document), Activation Status(Enable or disable the requirements)
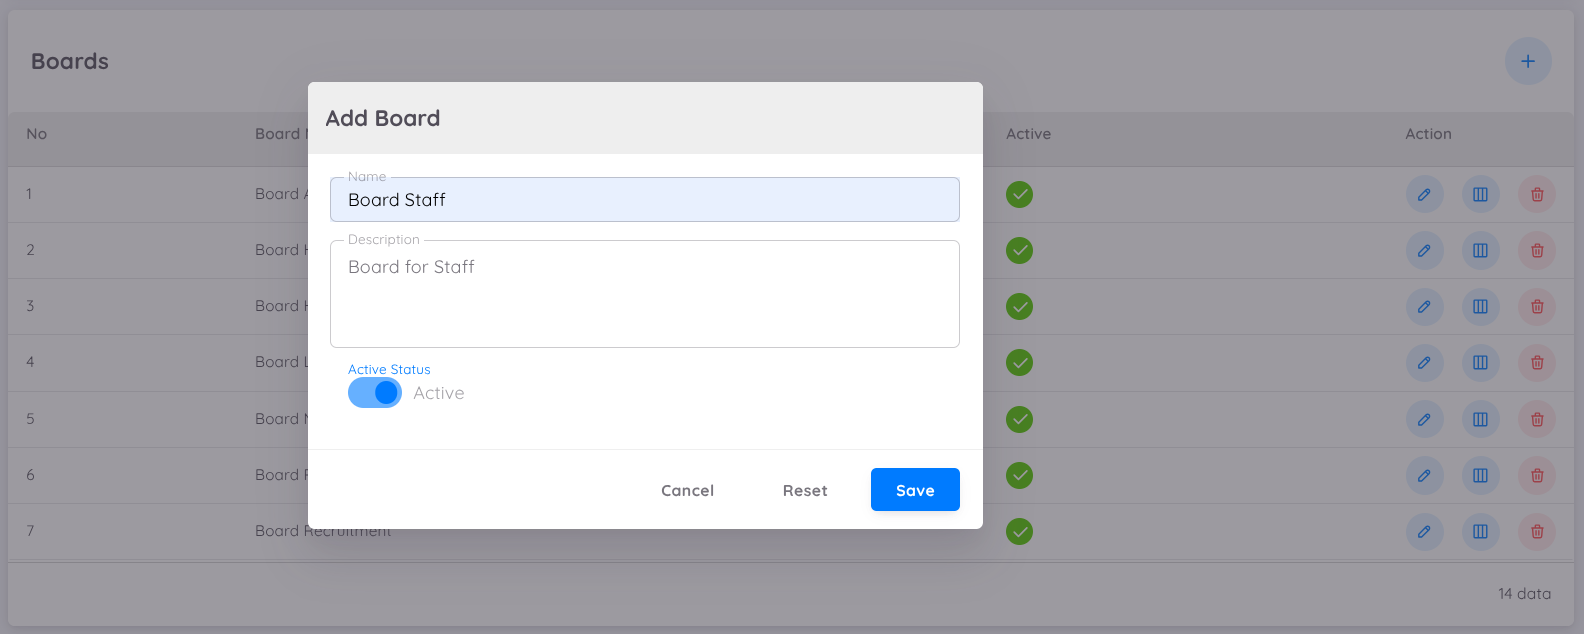
Boards
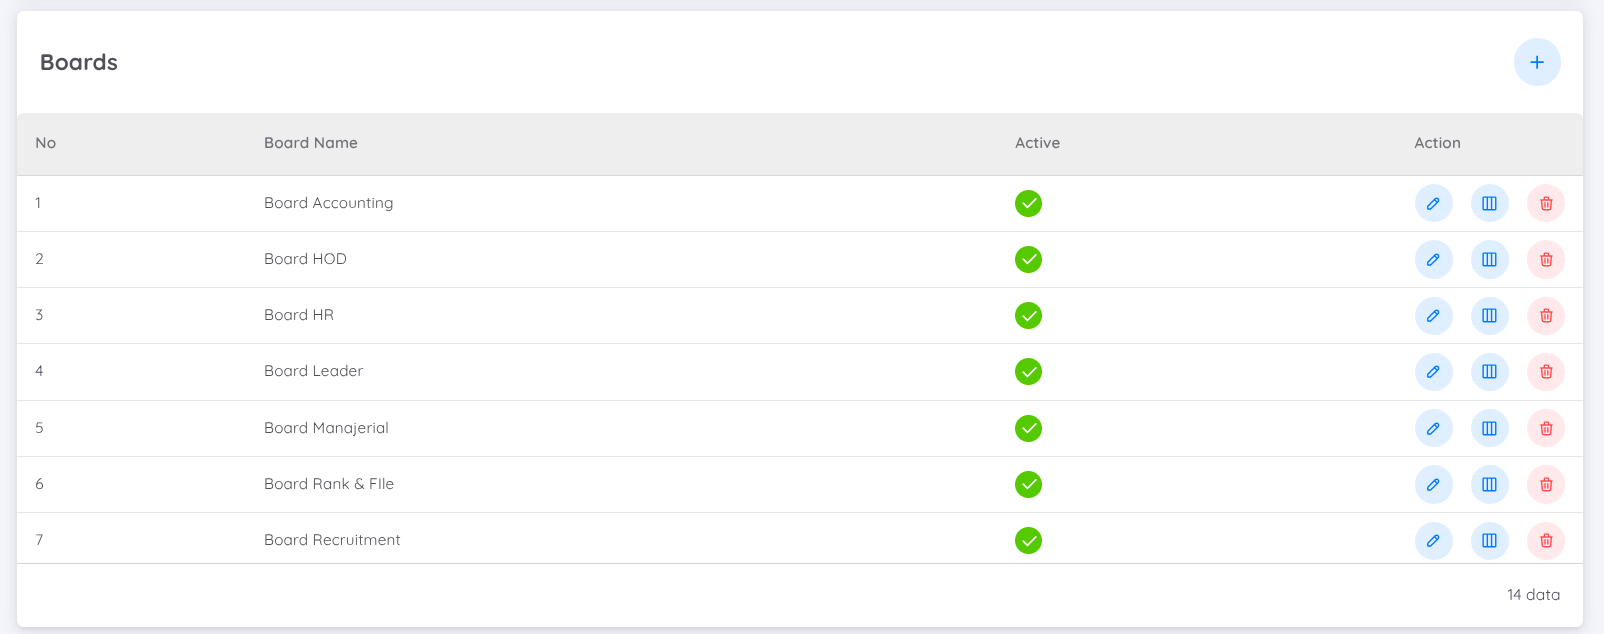
Creating a Kanban Board template for the recruitment process based on specific needs, such as recruitment for HOD positions. To create a new board :
Click the + button on the right side.
Enter the following information :
- Board Name : The name of the board template
- Description : A brief explanation of the board
- Activation Status : Enable or disable the board
After creating the board : Use the Edit Column button to add colum details. Columns represent the stages of the recruitment process, which each candidate will go through before eventually being offered a contract:

- Click Add Column to add a process column.
- Enter the Column Name and Description, then enable the column to display it in the Kanban.
- Add columns according to the recruitment process needs (there is no limit to the number of columns)
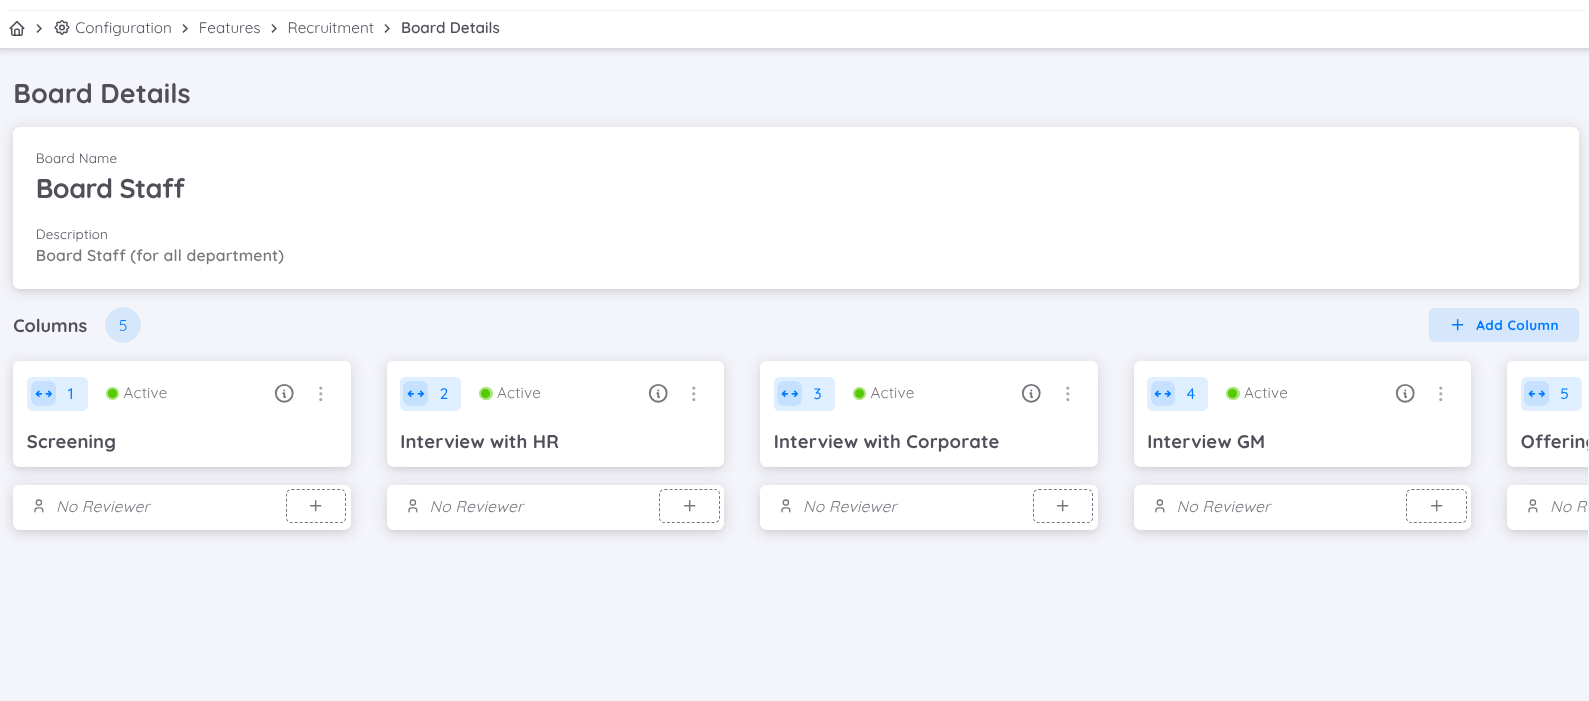
Assign a Reviewer to each column by clicking Add Reviewer. Reviewers are employees authorized to verify or interview candidates.
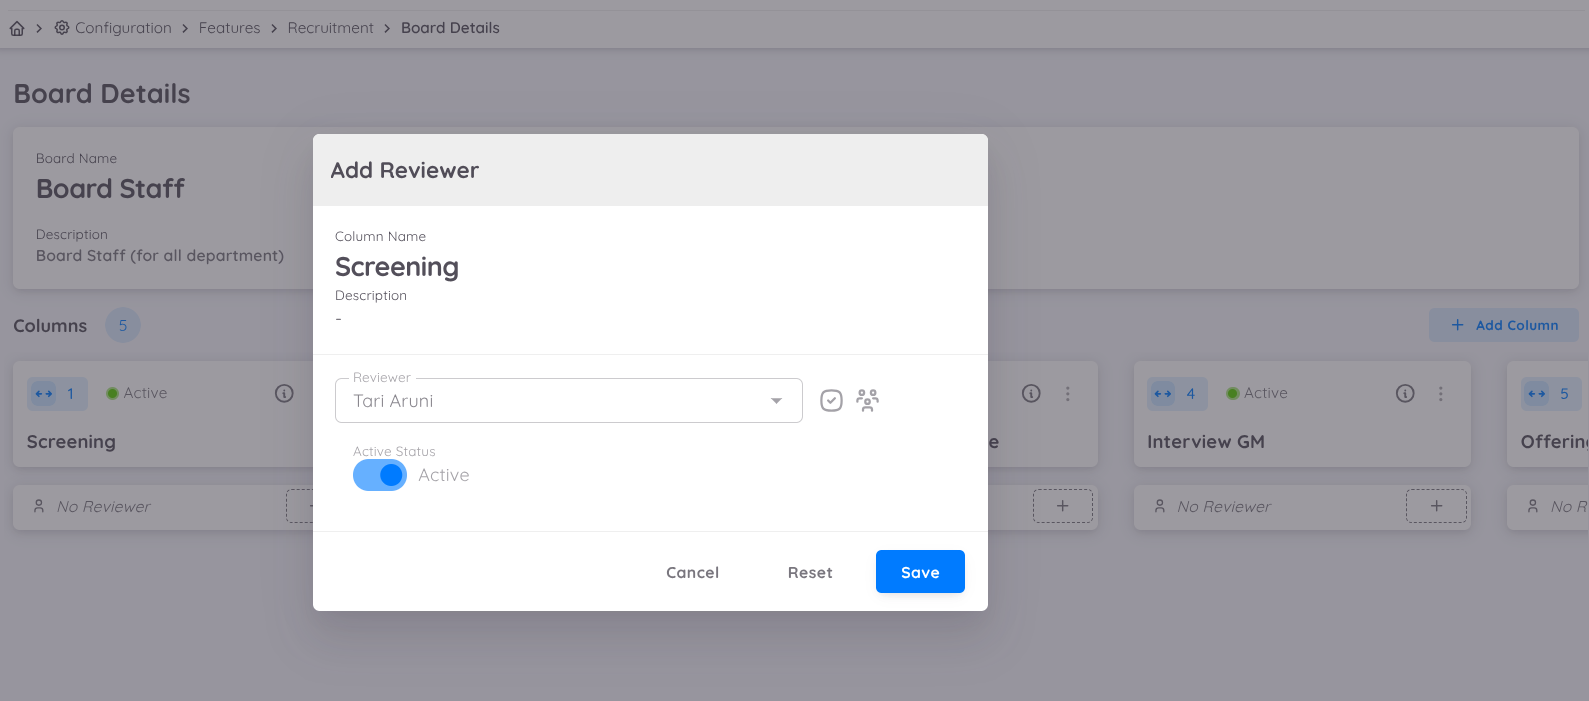
- Enter the employee's name (cross-property assignments are allowed)
- Reviewers can be changed when creating a job vacancy.
Job Portal
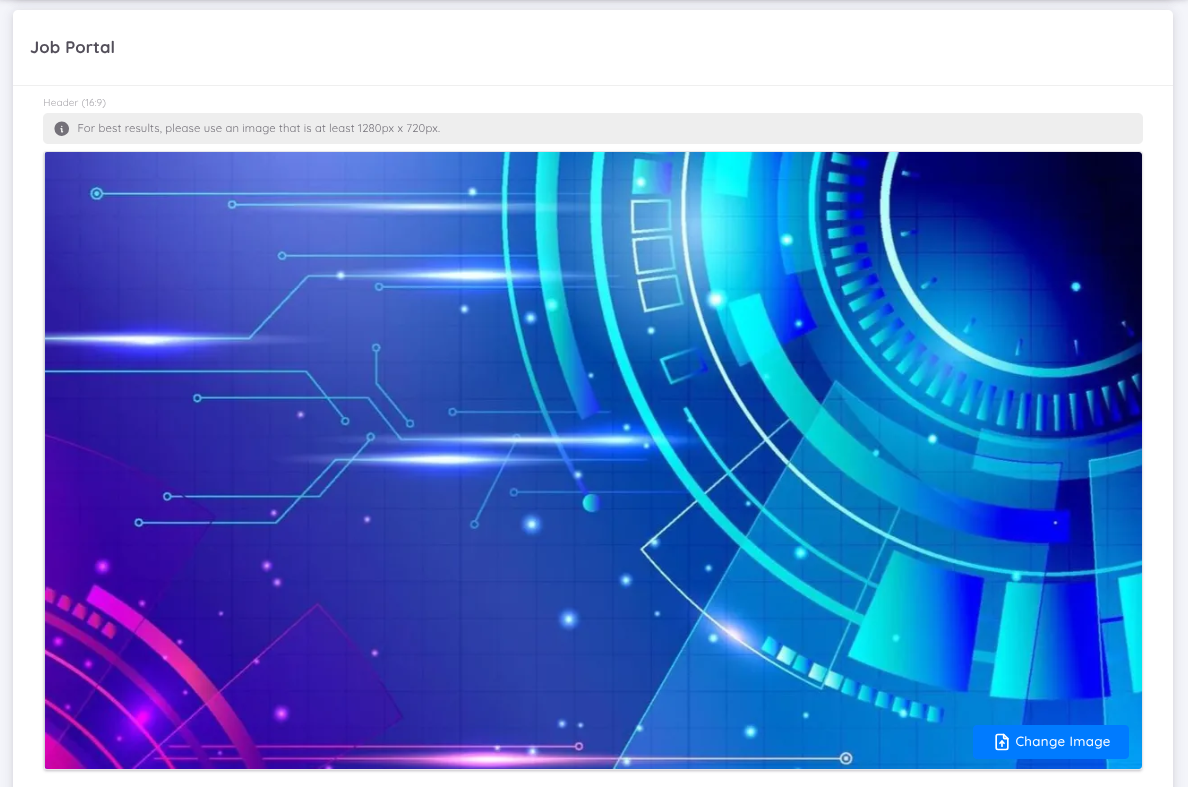
Customize the property display settings on the Job Portal :
- Header Photo : Upload a header photo in JPG/PNG format.
- Company Profile : Fill in the company profile description.
- Employee Range : Enter the range of total employees.
The Recruitment module configuration is highly flexible and can be tailored to each property's needs. Ensure all settings are correct before creating job vacancies on the Job Portal. If requirements change, the settings can be updated at any time.
Explore the visual guide by accessing the video below
Finance
The Finance module in Sentec EMS is designed to help companies manage loan policies efficiently. It enables the company to manage and monitor the loan process and repayments for each employee.
We have also added a Compensation Conversion feature in the Finance setup, which allows you to configure overtime compensation according to your company’s needs.
You can set up the Finance module in Configuration → Setup, and the available features for finance setup are:
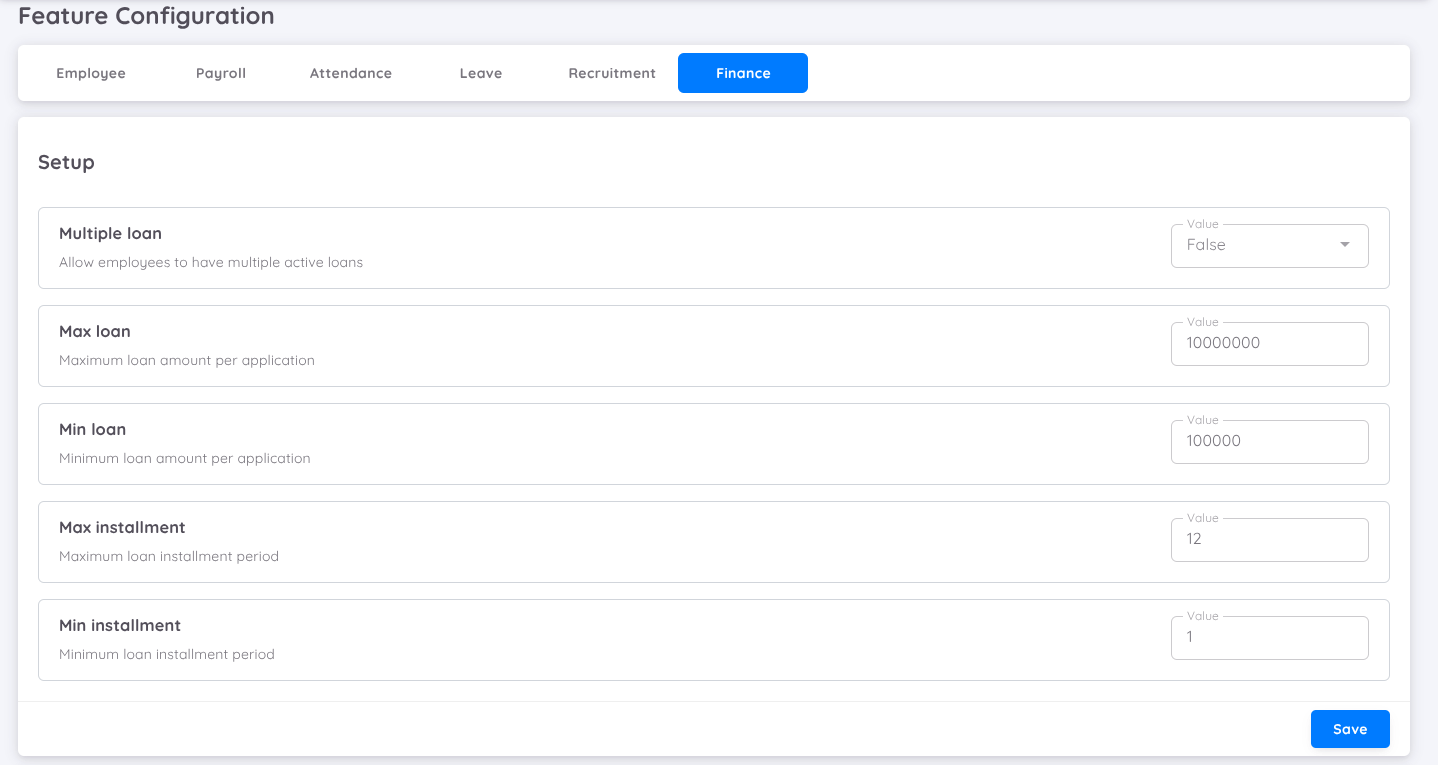
- Multiple Loan: Allows employees to have more than one active loan at the same time.
(Set to True if employees are allowed to take multiple loans.) - Max Loan: Defines the maximum loan amount allowed per application.
- Min Loan: Defines the minimum loan amount allowed per application.
- Max Installment: Determines the maximum number of installments for loan repayment.
- Min Installment: Determines the minimum number of installments for loan repayment.
(If the Minimum Installment is set to1, it means employees must repay the loan in at least one installment or one month.)
Compensation
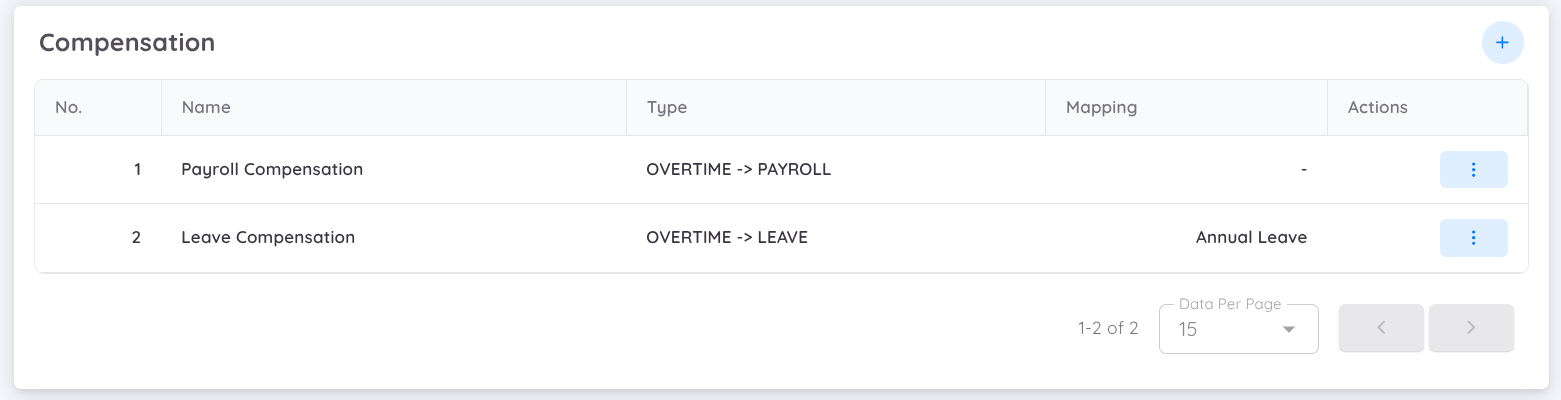
Companies can determine how employees overtime hours are rewarded, either as additional leave or as part of their payroll.
There are two types of compensation that can be configured in Sentec EMS:
Overtime -> Leave: Converts approved overtime hours into additional leave balance for employees.
The company can select any available leave type (such as Annual Leave, Compensation Leave, etc.) to which the overtime hours will be converted.
This provides flexibility in managing overtime rewards according to company policy.Overtime -> Payroll: Allows the company to configure how overtime payments are mapped to payroll components.
You can setup Overtime to Leave Conversion as follows:
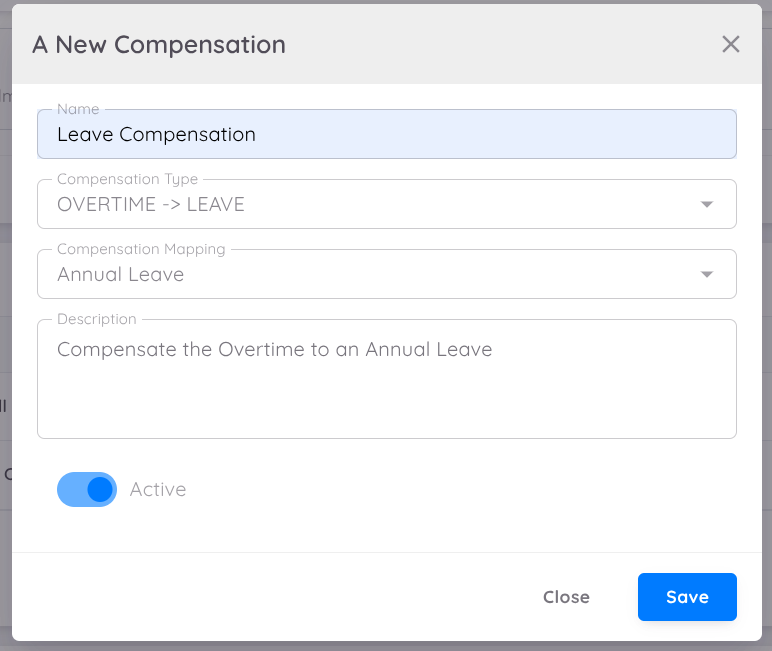
- Click the + button on the right side.
- Enter the following information:
- Name: The name of the compensation.
- Type: Select the compensation type (Overtime to Leave).
- Compensation Mapping: Choose from the list of available leave types configured in your property.
- Description: Add a description for the mapped compensation.
- Active Toggle: Enable or disable the compensation mapping.
The setup for mapping overtime to payroll follows the same steps. You can map the overtime compensation to any available payroll component.
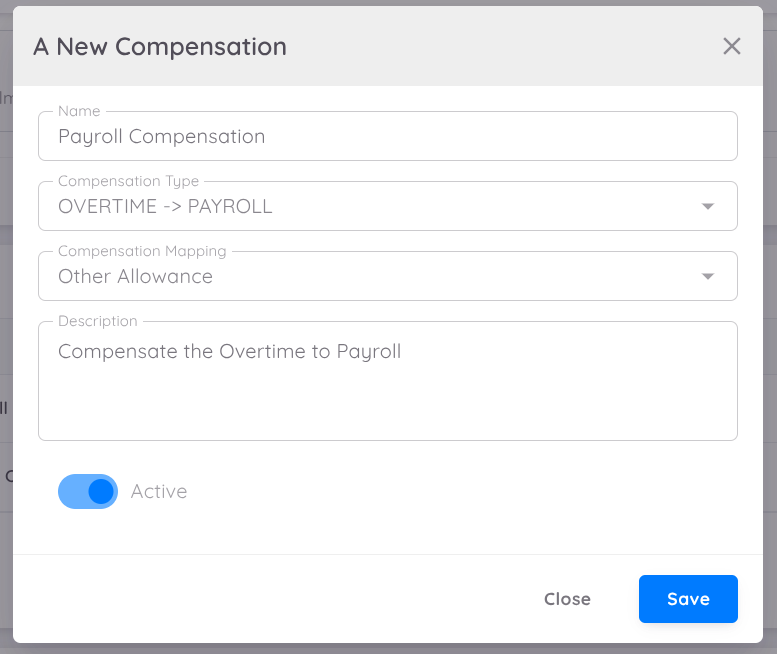
For example:
If mapped to Other Allowance, the overtime compensation will be converted and posted as Other Allowance in the payroll.
It will appear under the Other Allowance component on payslips and be included in payroll calculations according to that component’s rules.
NOTE
If you want the overtime to have its own account, contact our support team to request the addition of a new account in your payroll profile.
Loan Account
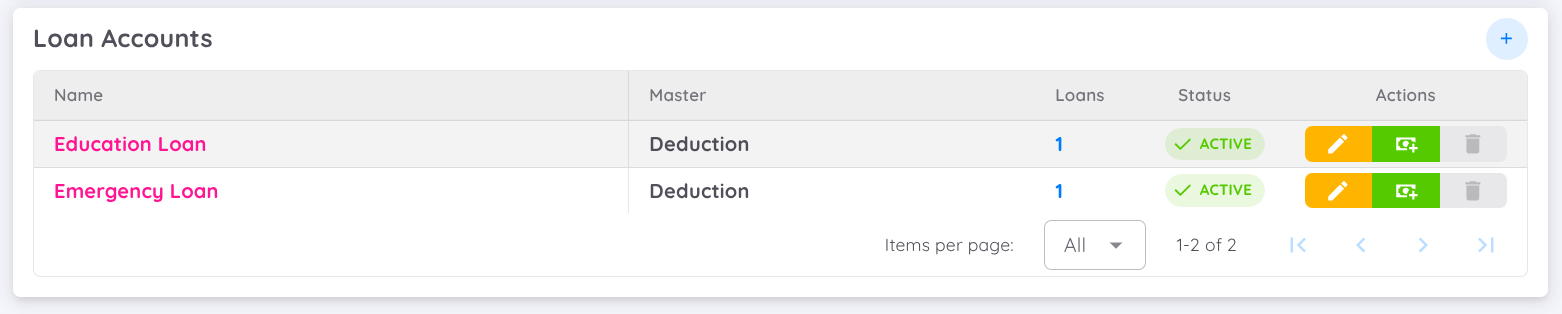
The Loan Account feature is designed to map your company’s loans to the master accounts in the payroll system.
You can also add your own loan account in payroll and then map it here to record loan transactions in both the payroll and finance modules.
NOTE
You can contact the Sentec EMS Support Team to set up a new loan account if needed.
You also have the option to map the loan account to any available master account.
For example:
If mapped to Deduction, the loan repayment amount will be recorded as a deduction in payroll (example, it will appear under the Deduction component on payslips and be processed according to that component’s rules).
NOTE
When adding a new loan for an employee, the accounts created in this setup will appear as options under Loan Account in finance module.
You can set up loan accounts as follows:

- Click the + button on the right side.
- Enter the following information:
- Account Name: Enter the name of the loan account.
- Master Account: Select the master account.
(You can choose any account listed from your payroll profile) - Active Toggle: Enable or disable the loan account.
NOTE
You can disable, update, or delete the loan account when it is not yet in use. You cannot make changes to loan accounts that are currently being used.
Performance
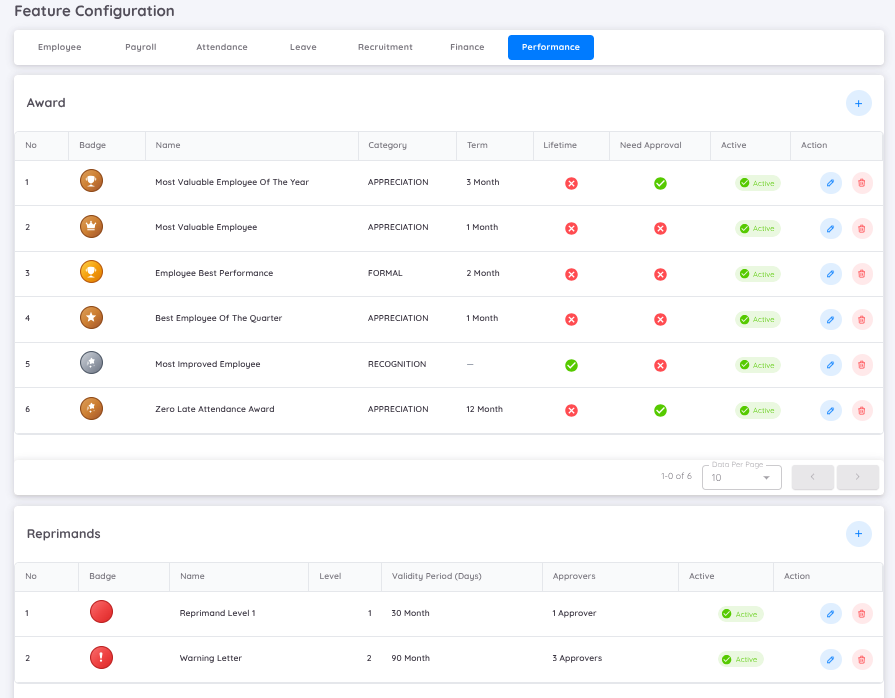
In the Performance Setup, Management can configure several performance-related settings, including Awards, Reprimands, and Component Weight Profiles for KPI.
Award
In the Award feature, Management can assign awards to employees based on specific criteria such as recognition or appreciation. These awards will be displayed as badges on the employee’s profile and can be configured as either term-based or lifetime recognition.
To create an award, navigate to Configuration → Setup Menu, then open the Performance tab and click the Plus (+) button to add a new award.
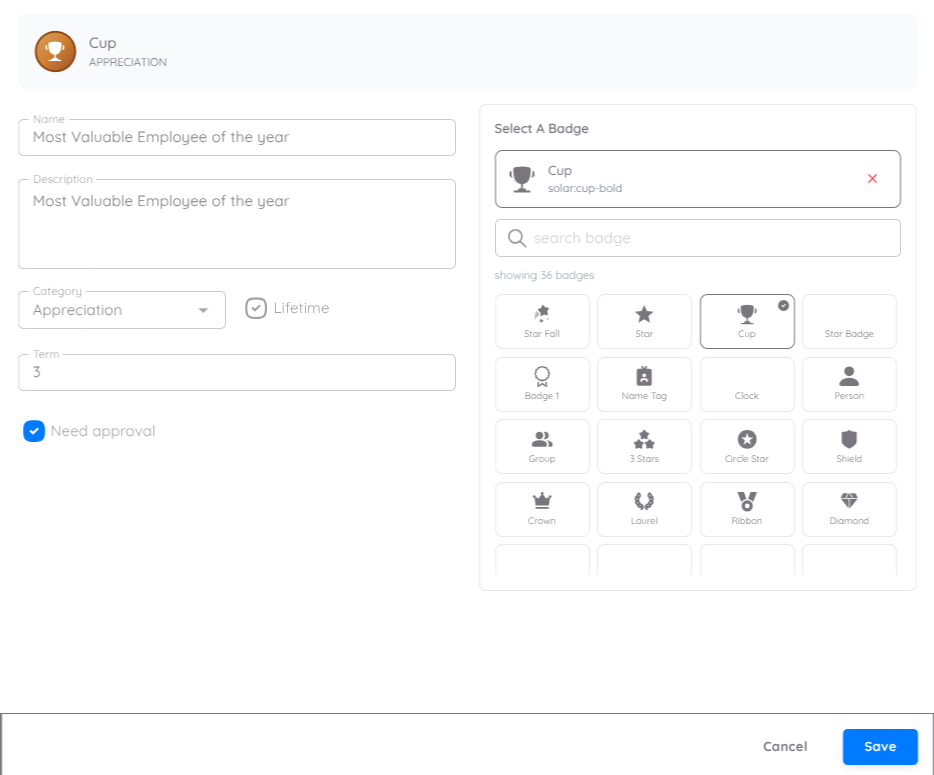
When creating an award, follow these steps:
- Enter the award name and provide a description explaining its purpose.
- Select a badge to represent the award.
- Choose the award category, such as:
- Formal: Used for official, structured recognition programs within the organization
- Appreciation: To acknowledge specific contributions, efforts, or behaviors that may not fall under formal performance metrics but still deserve recognition
- Recognition: To honor notable achievements, long-term contributions, or exceptional performance with significant impact
- Define the award duration:
- Enable Lifetime if the award is permanent
- If the award is term-based, disable Lifetime and set the duration (in months)
- Enable Need Approval if the award requires approval before becoming active
Once configured, the award can be assigned to employees based on Management’s discretion, and it can be assigned via Performance → Award.
Reprimand
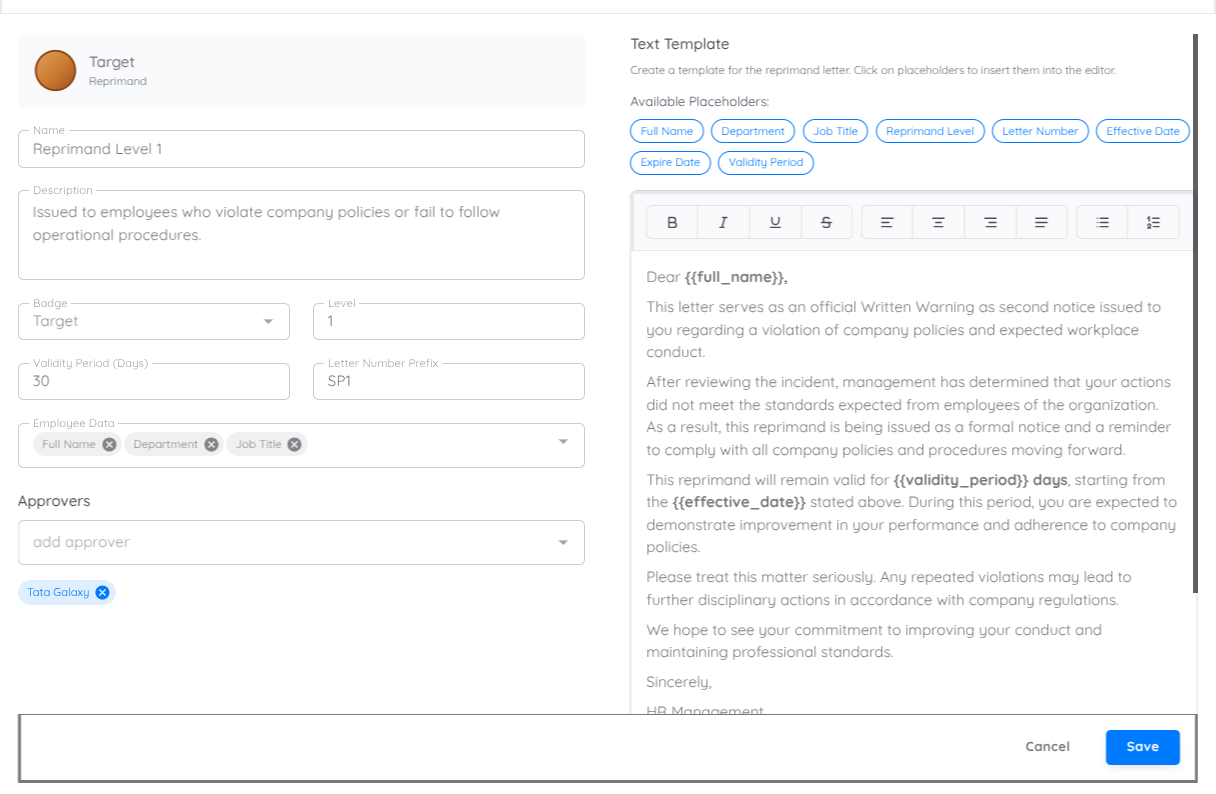
In the Reprimand Setup, users can create reprimand templates by selecting Create Reprimand and filling in the required information.
Required Information:
- Name: Enter the name of the reprimand template (e.g., Reprimand Level 1)
- Description: Provide a brief explanation of when this reprimand should be used
- Badge: Select a badge type to visually categorize the reprimand
- Level: Define the reprimand level (e.g., Level 1 – First Warning, Level 2 – Written Warning, Level 3 – Final Warning)
- Validity Period (Days): Specify how long the reprimand remains valid
- Letter Number Prefix: Defines the prefix for reprimand letters (e.g., WRN). The system will automatically generate sequential numbering in the format: prefix/number/year (e.g., WRN/001/2026)
- Employee Data: Select employee fields to be displayed in the letter (e.g., Full Name, Position, Department, Gender)
- Approvers: Assign one or more users responsible for reviewing and approving the reprimand
Once the template is created, it can be used to issue standardized reprimand letters, ensure proper approval workflows, and maintain consistent disciplinary documentation.
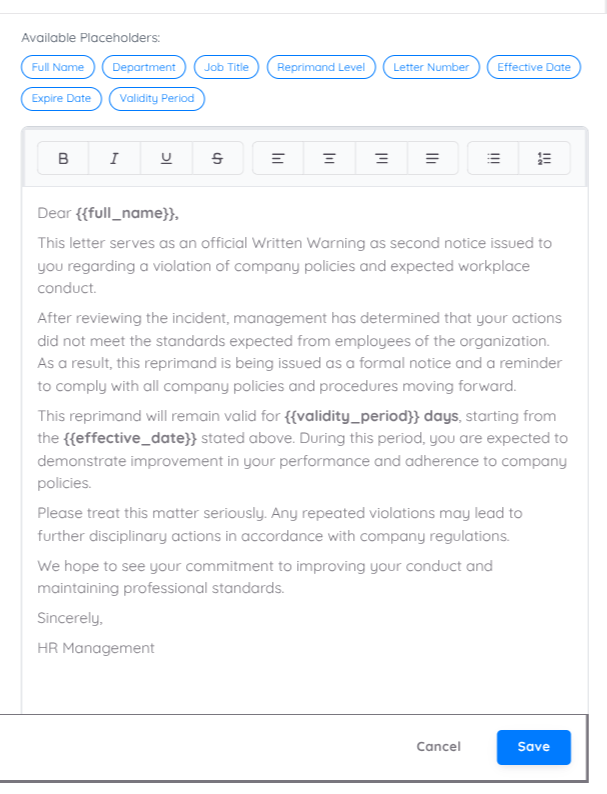
In the Text Template section, users can configure the format and content of the reprimand letter.
Users can also insert placeholders into the template to automatically populate employee and reprimand data when generating the letter.
How it works:
- The system provides a list of available placeholders
- Click a placeholder from the Available Placeholders section to insert it into the text editor
- The system will automatically replace placeholders with actual data when generating the reprimand letter
This feature ensures that reprimand letters are standardized, dynamic, and automatically populated with relevant information.
Component Weight Profile
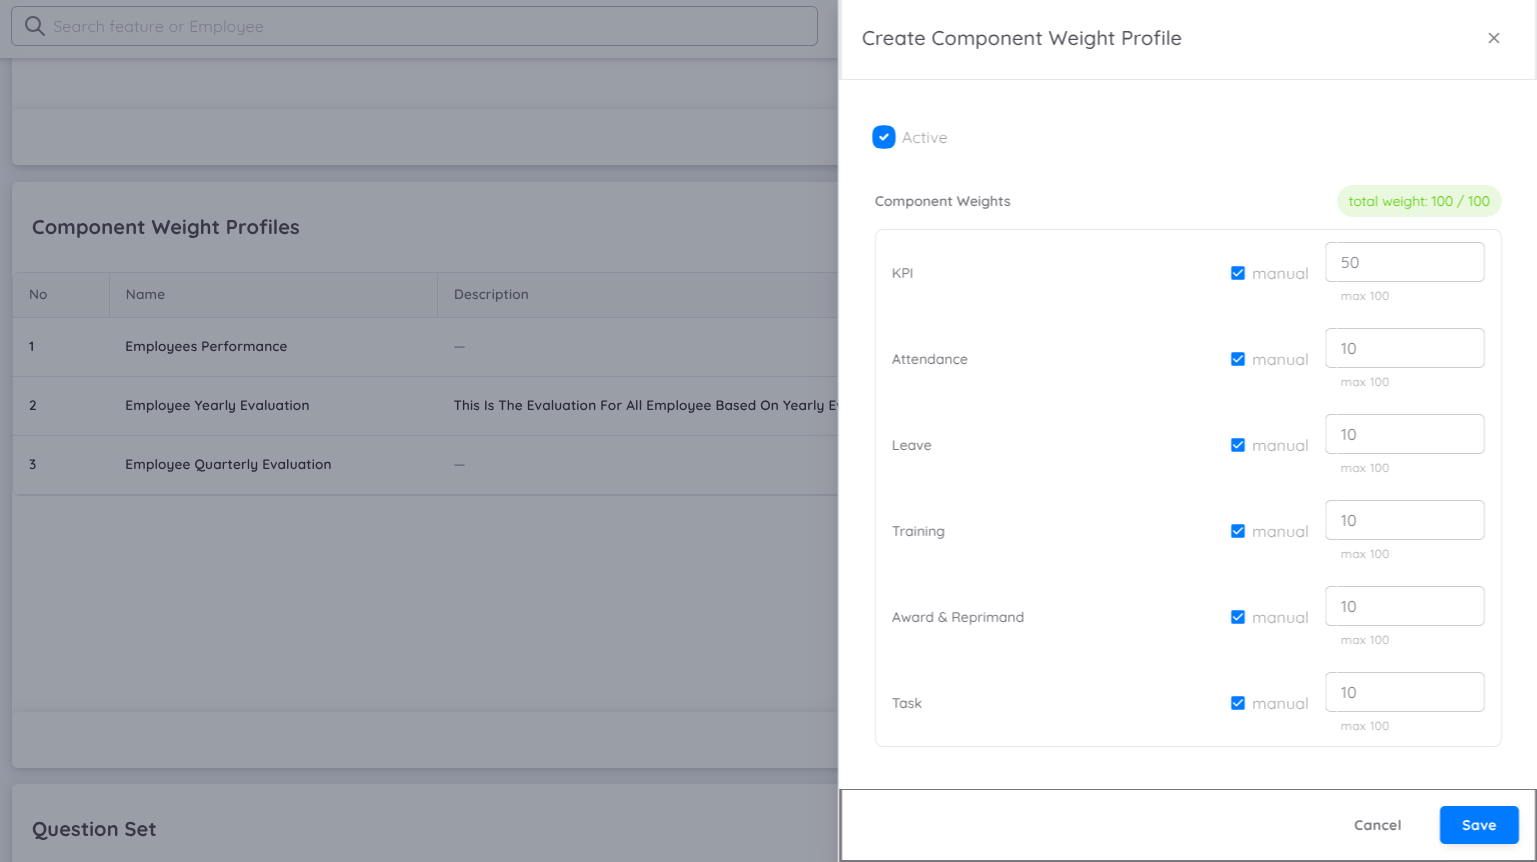
The Component Weight Profile is the initial configuration that must be completed before a Performance Report can be created in Sentec EMS.
This setup defines the performance components (indicators) that will be used to evaluate employee performance and determines the weight distribution of each component. Each component contributes proportionally to the employee’s final evaluation score based on its assigned weight.
The purpose of the Component Weight Profile is to ensure that employee performance evaluations are conducted using measurable, structured, and configurable indicators that align with the organization’s assessment requirements.
Currently, the following performance components are available in Sentec EMS and may be included in the evaluation process:
| Component | Description |
|---|---|
| KPI (Key Performance Indicator) | Measures employee performance based on predefined KPIs, performance targets, and achievement results. This component evaluates how effectively employees meet their assigned objectives and business goals. |
| Attendance | Evaluates employee attendance records during the evaluation period, including: • Attendance presence • Lateness or tardiness • Attendance consistency This component helps measure employee discipline and punctuality. |
| Leave | Measures employee leave utilization during the evaluation period. This component may consider the frequency and type of leave taken as part of the overall performance assessment, depending on company policy. |
| Training | Evaluates employee participation in training programs and development initiatives, including: • Training enrollment • Training completion • Participation in mandatory or optional learning programs This component reflects employee commitment to skill enhancement and professional development. |
| Awards & Reprimand | Measures employee recognition and disciplinary records during the evaluation period, including: • Awards or achievements received • Positive recognition • Warnings, reprimands, or disciplinary actions This component provides insight into employee conduct and workplace contribution. |
| Task | Evaluates employee performance based on assigned task completion, including: • Task progress • Completion status • Achievement against assigned responsibilities This component helps assess productivity and execution of assigned work. |
Component Weight Rules
The following rules apply when configuring a Component Weight Profile in Sentec EMS:
- Weight Assignment for Active Components
Every active component must have an assigned weight value. If a component is enabled for evaluation, it cannot remain without a defined weight.
- Total Weight Must Equal 100%
The combined weight of all active components must total exactly 100%. This ensures that the final performance score is distributed proportionally across all selected evaluation indicators.
Example:
| Component | Weight |
|---|---|
| KPI | 50% |
| Attendance | 10% |
| Leave | 10% |
| Training | 10% |
| Awards & Reprimand | 5% |
| Task | 15% |
| Total | 100% |
- Flexible Component Activation
Management may activate or deactivate performance components based on evaluation requirements, organizational policies, or department-specific needs. This flexibility allows companies to customize evaluation criteria according to different job roles or performance frameworks.
- Active Components Must Contribute to the Total Score
If a component is activated:
- It must have a weight greater than 0%
- It must contribute to the overall 100% calculation
Inactive components will not be included in the performance evaluation and will not affect the final score.
Key Notes
- The Component Weight Profile must be configured before creating a Performance Report.
- Only active components are included in performance score calculations.
- The total weight distribution must always equal 100% to ensure accurate performance evaluation.
- Organizations may configure different component combinations depending on their performance assessment strategy.
Adding Component Weight Profile
To create a Component Weight Profile Template, click the ➕ (Plus) button and configure the following information:
| Field | Description |
|---|---|
| Name | Enter the name of the component weight profile template. Use a clear and descriptive name to identify the evaluation setup. |
| Description | Provide a brief explanation or purpose of the profile template. This helps management understand when and how the profile should be used. |
| Component Weight | Assign the weight value for each performance component that will be used in the evaluation process. Each active component must have a weight, and the total combined weight must equal 100%. |
After completing the required information, save the configuration to make the profile available for performance evaluation.
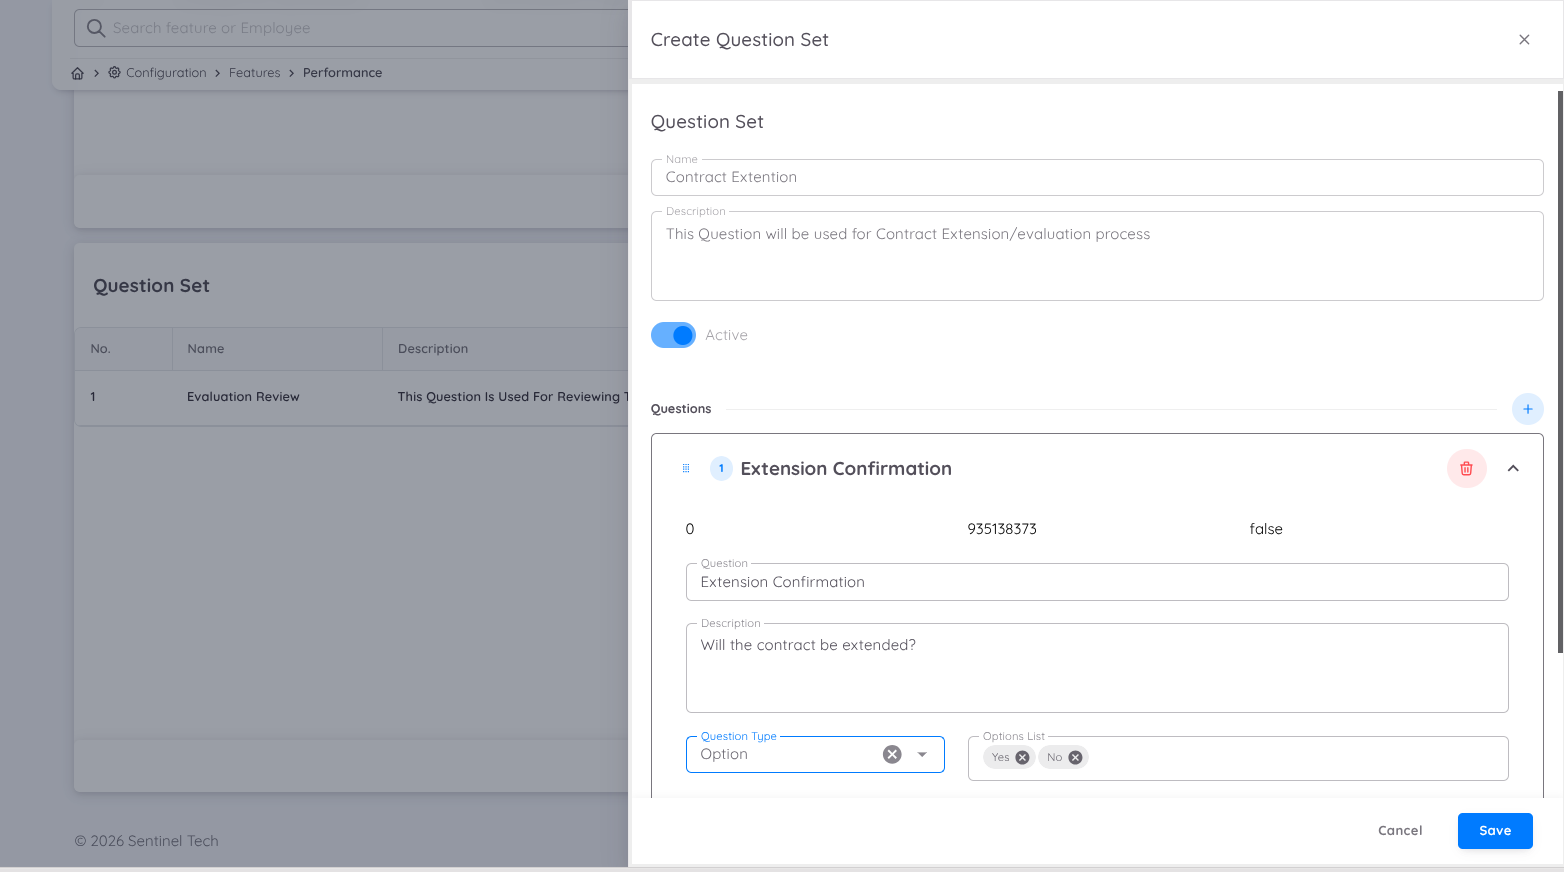
Question Set
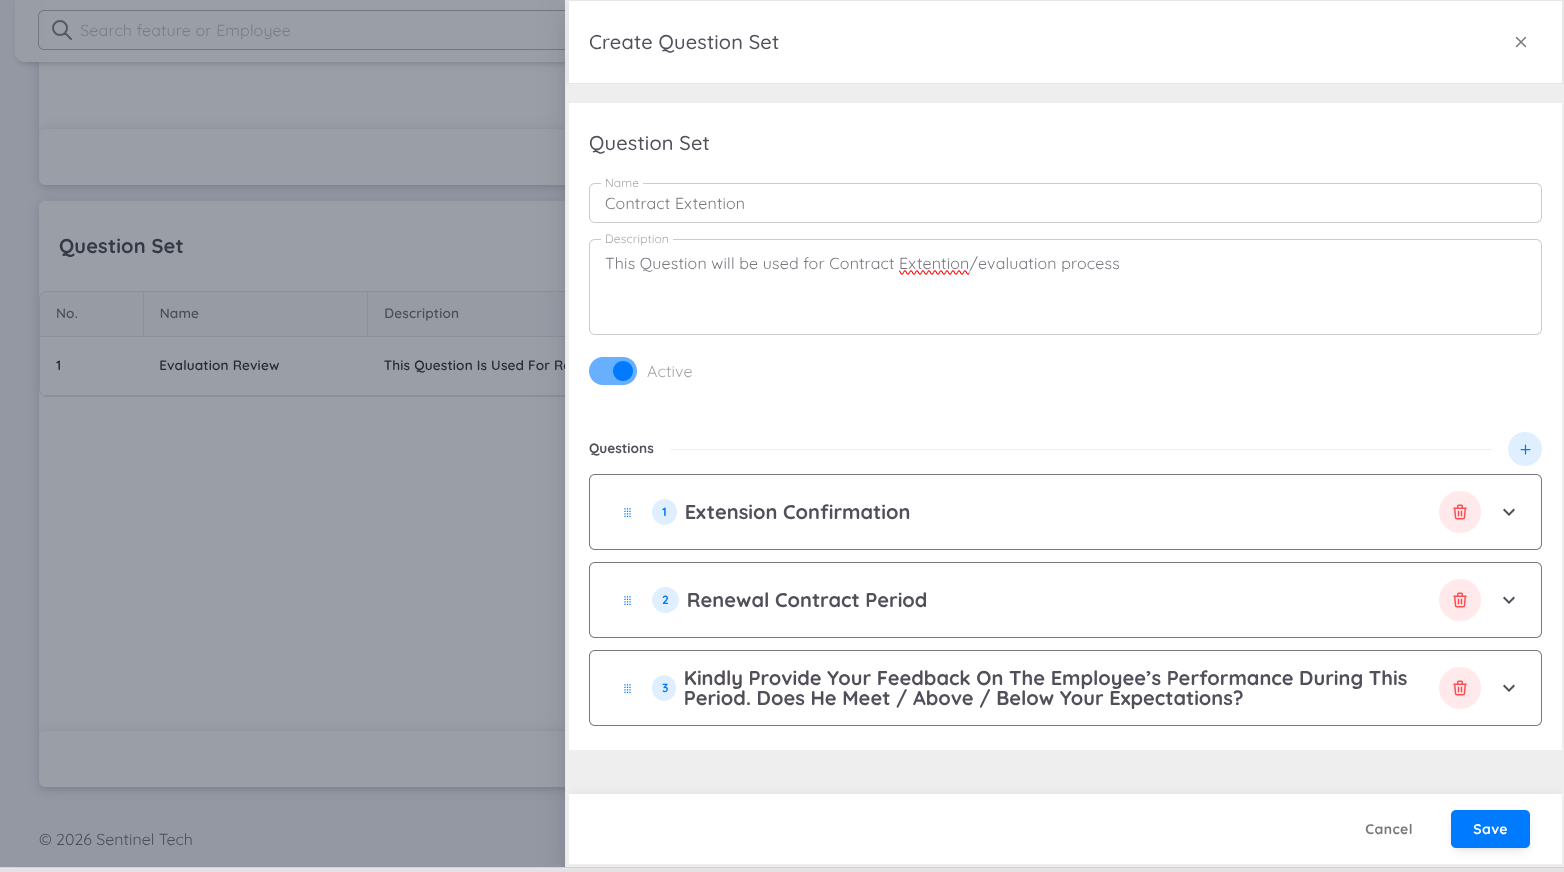
In the Performance Module, organizations may optionally configure a Question Set to support additional evaluation requirements.
Each property or business unit can customize question sets based on their specific business needs, evaluation standards, and assessment criteria. The use of question sets is optional and may be enabled when a qualitative assessment is required as part of the evaluation process.
Question sets can also be utilized to support contract evaluations, including processes such as:
- Employee promotion evaluation
- Contract extension or renewal assessment
- Performance review discussions
- Any other business process requiring structured questionnaires
Adding a Question Set
To create a new Question Set, click the ➕ (Plus) button on the Question Set Setup page.
The following information must be configured:
| Field | Description |
|---|---|
| Name | Enter the name of the question set template. Use a clear and descriptive name to identify the purpose of the questionnaire. |
| Description | Provide a brief explanation regarding the objective or usage of the question set. |
| Question Lists | Add the list of questions that will be used during the evaluation process. |
Each question entry contains the following configuration:
| Column | Description |
|---|---|
| Question | The main question that will be displayed to evaluators. |
| Description | Additional explanation or context for the question (optional). |
| Question Type | Determines the response format for the question. |
Available Question Types
Each question can be configured using one of the following input types:
| Question Type | Description |
|---|---|
| Date | Allows users to provide a date-based response. |
| Time | Allows users to provide a time-based response. |
| Number | Allows users to input numerical values. |
| Text | Allows users to provide written or descriptive responses. |
| Option | Allows users to select from predefined answer options. |
| Percentage | Allows users to input values in percentage format. |
This flexibility allows organizations to design question sets that align with different evaluation objectives and business requirements.
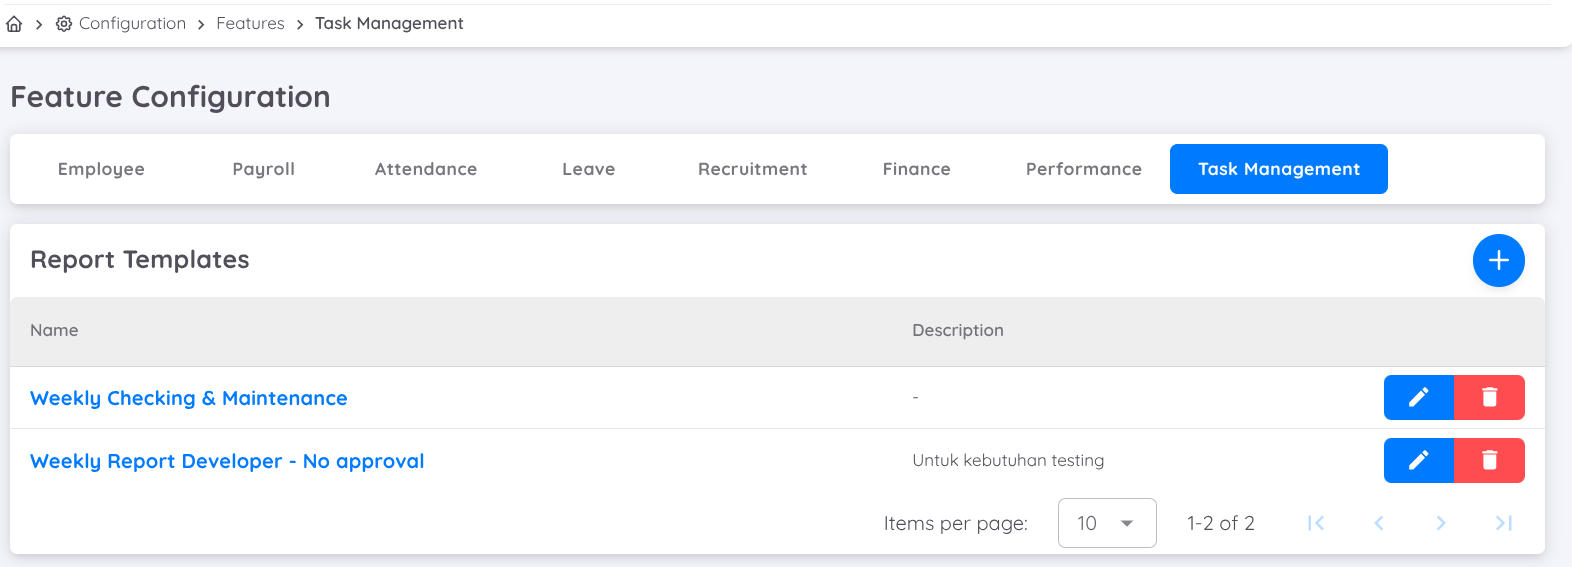
Task Management
When creating a task template, you can organize tasks into multiple categories to make them easier to manage and track.
Each template also provides an approval option. If approval is required, enable the Need Approval option and assign one or more approvers as needed. This allows tasks to go through a proper review and validation process before they are completed or approved.
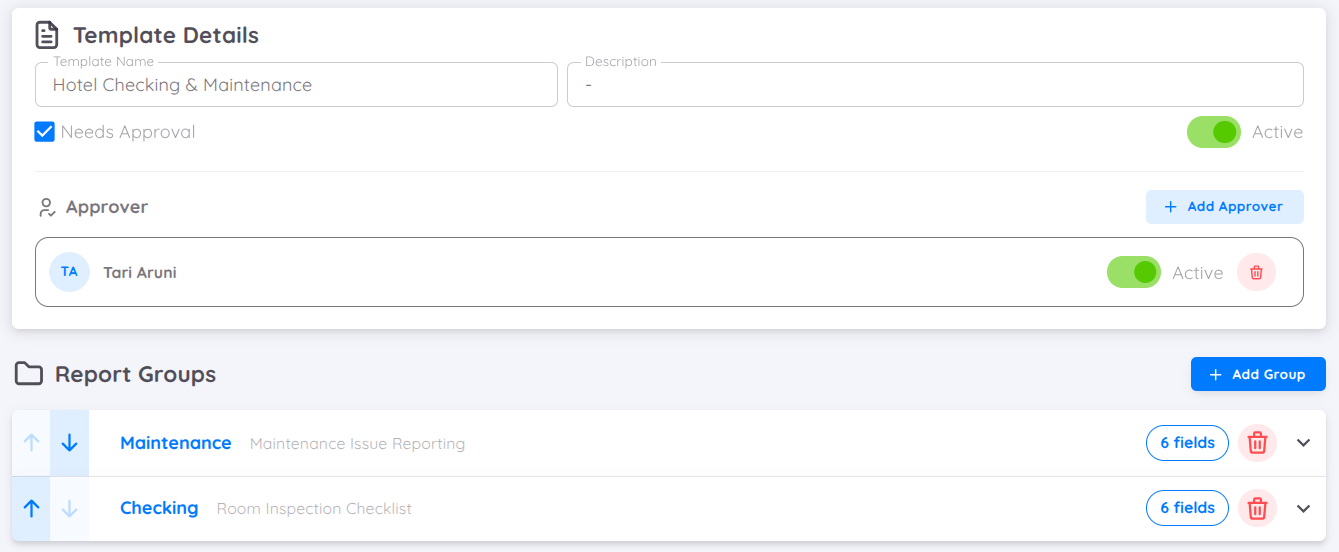
Each task template group contains its own set of fields, allowing you to customize the structure based on the selected category. You can create multiple groups depending on how you want to organize and manage different task categories.
Each field can be customized by:
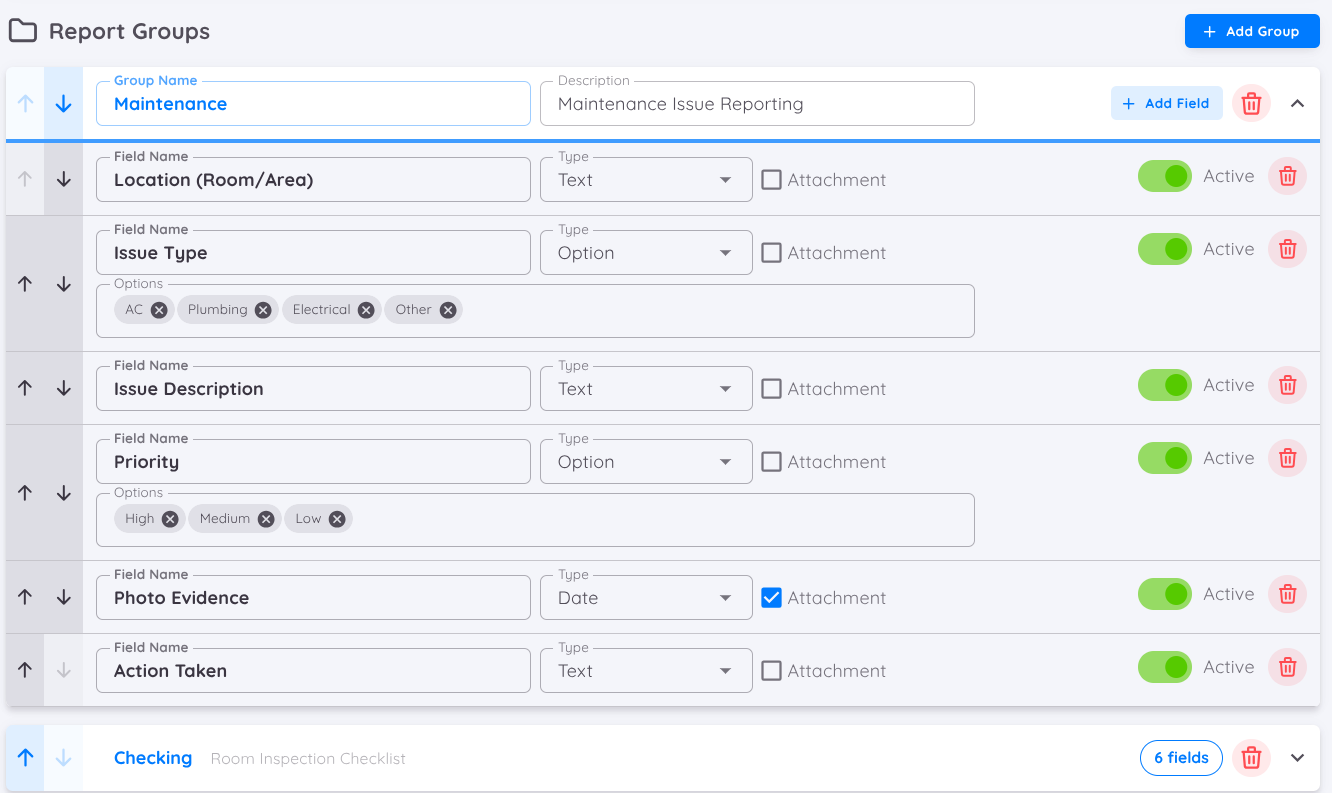
- Setting the field type allows you to define the kind of input users must provide when completing the task report.
Available field types may include:
| Field Type | Description |
|---|---|
| Text | Used for short or long written input. |
| Option | Used for selecting predefined choices. |
| Date | Used for selecting a specific date. |
| Number | Used for entering numeric values or quantities. |
| Time | Used for selecting or recording a specific time. |
| Percentage | Used for entering percentage-based values or progress. |
Selecting the appropriate field type helps standardize task reporting and ensures the required information is collected accurately.
- Enabling attachments if supporting files are required
- Activating or deactivating the field as needed
You can also create multiple report groups, each with its own set of fields, depending on the category or use case you want to apply.