Schedule
Sentec EMS supports flexible work schedule creation. All work schedule options must be created first through the Configuration - Setup - Attendance menu.
Create
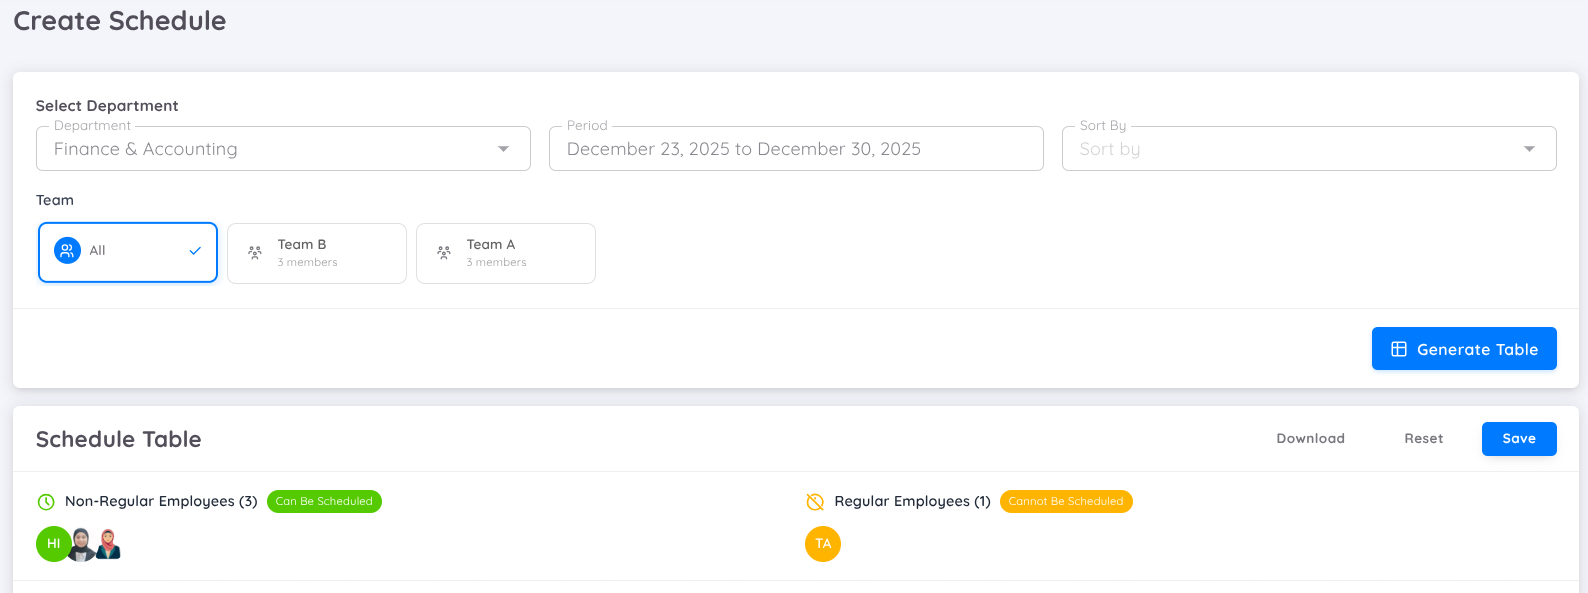
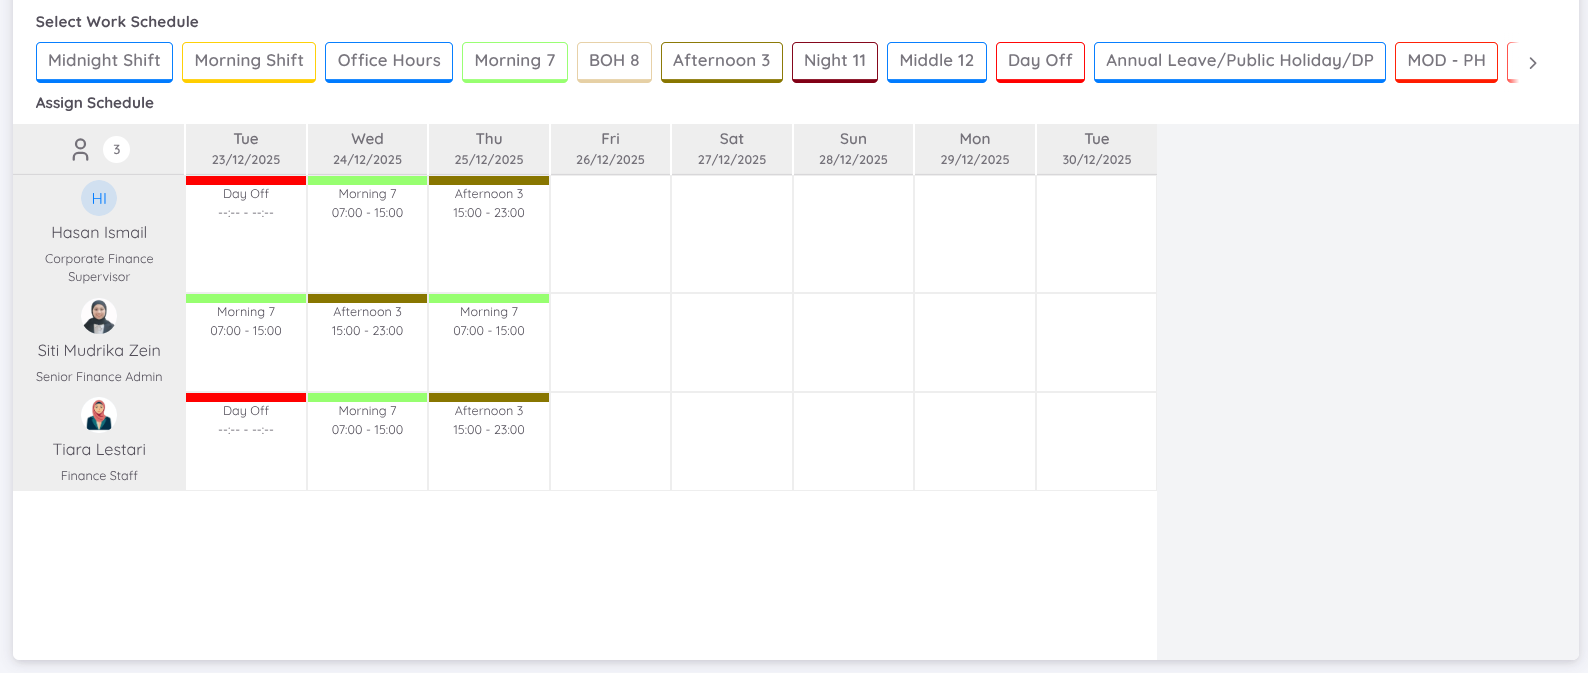
On this page, work schedules can be created for employees for a specific date range based on department using the table view. The work schedules available above the table are schedules with the shift type.
Each employee can only have one work schedule per day when using the table view. If there is an error in the schedule setup, the previous work schedule can be replaced by overwriting it with a new schedule.
Work schedules created using the table view will be immediately active and can be viewed through the View menu in the calendar view.
NOTE
- Work schedule creation or updates using the table view can only be performed for the next day and onwards (future dates).
- Once a schedule is active, it can be viewed and managed through the View menu.
- Only employees with the shift work type can be assigned schedules through the Create menu.
Update Schedule
In the Create menu, active work schedules can be updated either individually or for multiple employees at once. These changes only apply to the next day and onwards (future dates).
To update a schedule, go to the Create menu, then select the Department and the date range to be updated.
If there are active schedules within the selected period, they will be displayed in the table after clicking Generate Table. The active schedules will be shown in the calendar section for each shift employee.
To change a schedule, select the new Work Schedule, then click the appropriate calendar cell based on the employee's name and the date to be changed. The new schedule will replace the existing schedule.
After completing the changes, click Save. Once the changes are saved, the work schedule will be automatically updated with the new schedule, allowing the employee to record attendance based on the latest schedule.
Schedule adjustments through the Create menu can only be made for a single schedule, meaning an existing schedule can be replaced with another schedule on a specific date.
This feature allows schedules for multiple employees to be adjusted at the same time without having to change each schedule individually through the View menu.
Creator
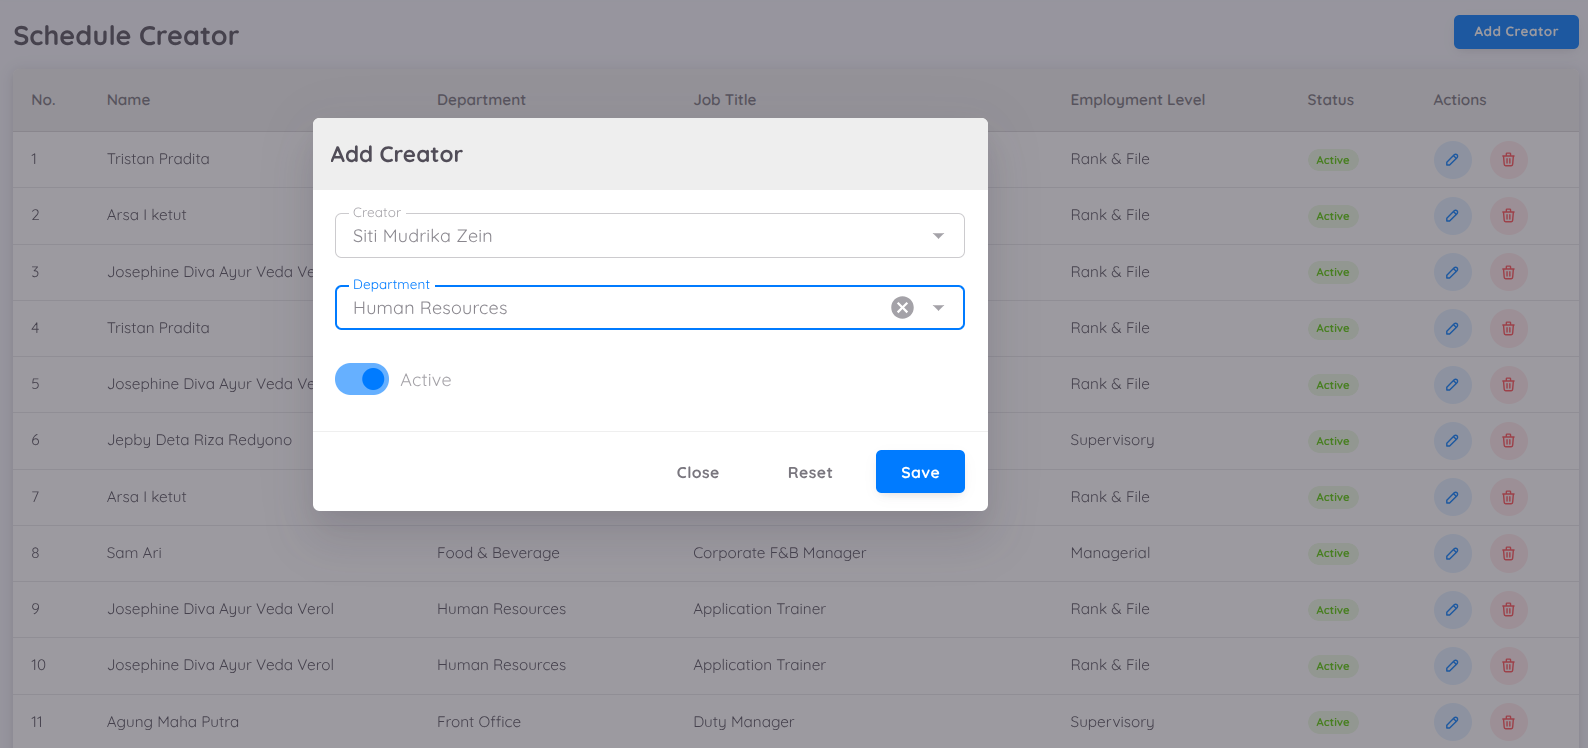
On this page, employees other than HODs can be granted Schedule Creator permission to create planned work schedules. Employees with this permission can create planned work schedules for one or more departments, depending on the access granted.
Work schedules created by Schedule Creators will follow the Schedule Plan settings configured by Management. Depending on the setup, the schedule plan can be:
- Auto-approved, allowing the schedule to be activated immediately without requiring approval.
- Require approval, where the schedule plan must be approved by the HOD through the Employee Page or by Management before it can be activated and used by employees.
Adding Schedule Creator Access
To grant access to employees responsible for creating planned work schedules, go to Attendance → Schedule → Creator.
Add Schedule Creator access for each employee and specify the departments they are allowed to manage.
If an employee needs to create planned work schedules for multiple departments or across departments (cross-department), add access to each required department.
Employees who have been granted Schedule Creator access will be able to access the Plan menu in the Employee Portal.
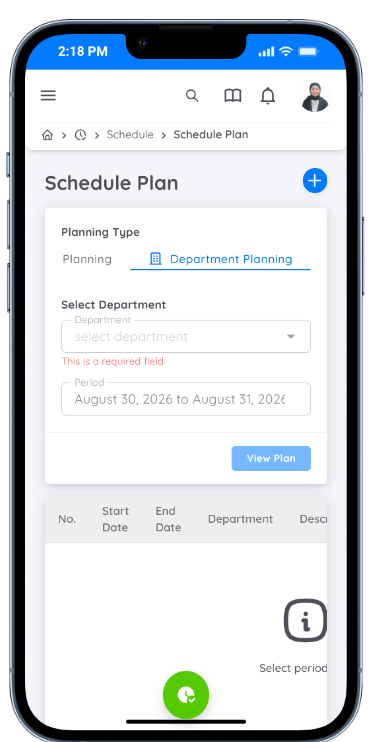
Plan
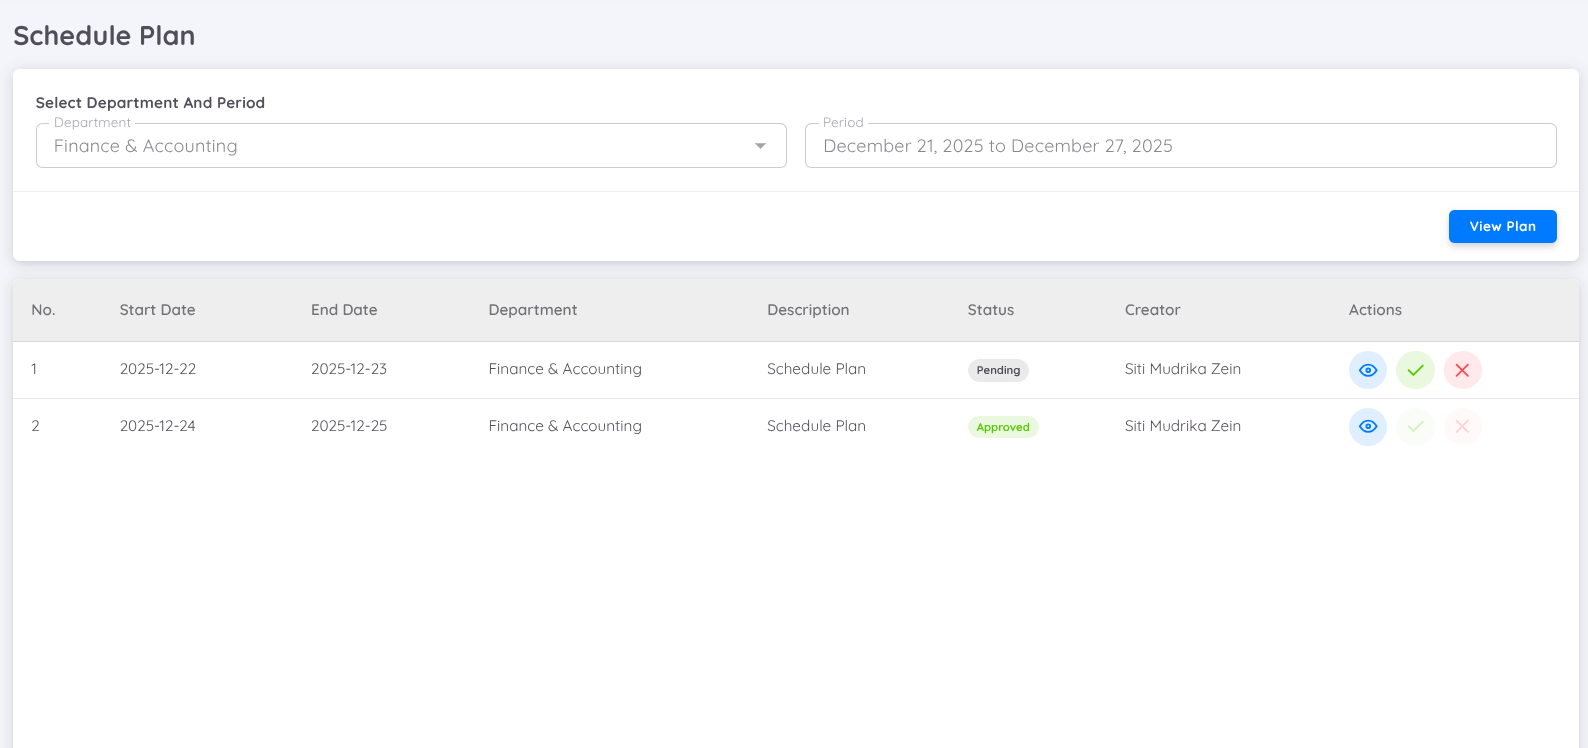
This page displays all planned work schedules created by Schedule Creators based on the selected date range.
According to the Schedule Plan settings, if the schedule plan is not set to Auto-approved, the Head of Department (HOD) will receive a notification to approve the schedule plan after it has been created by the Creator.
From the Management side, the schedule plan can also be approved (Approve) or rejected (Reject) through the Management page. Once the schedule plan is approved, the work schedule will become active according to the created plan.
NOTE
Currently, if the Schedule Plan is not set to Auto-approved, the Creator cannot delete or modify a schedule plan that is already active or still in the approval process.
If only minor changes are required, the schedule plan can be approved first. Once it becomes active, the work schedule can be updated through the table or calendar view by Management or the HOD. Schedule adjustments can also be requested by employees through a request.
Request
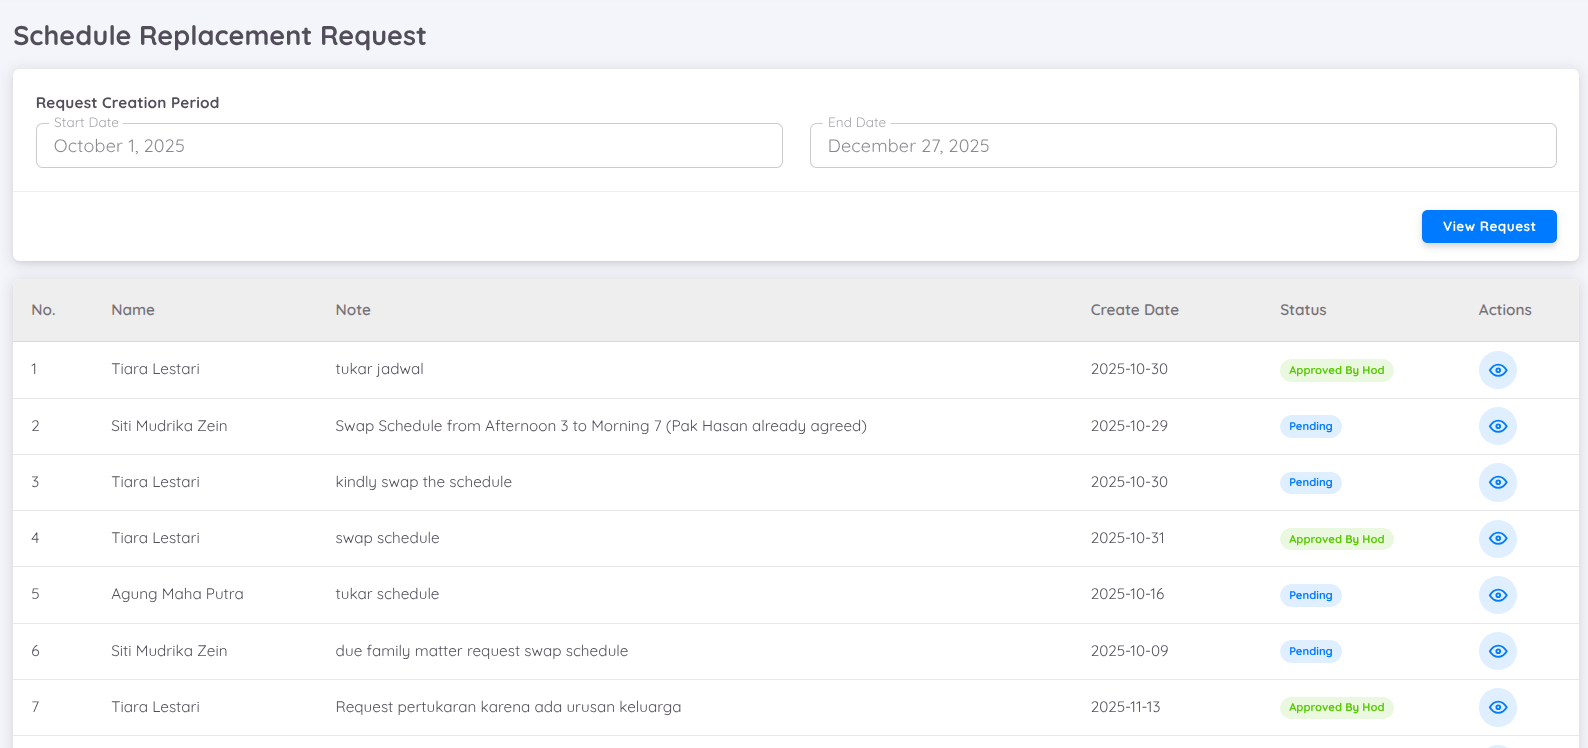
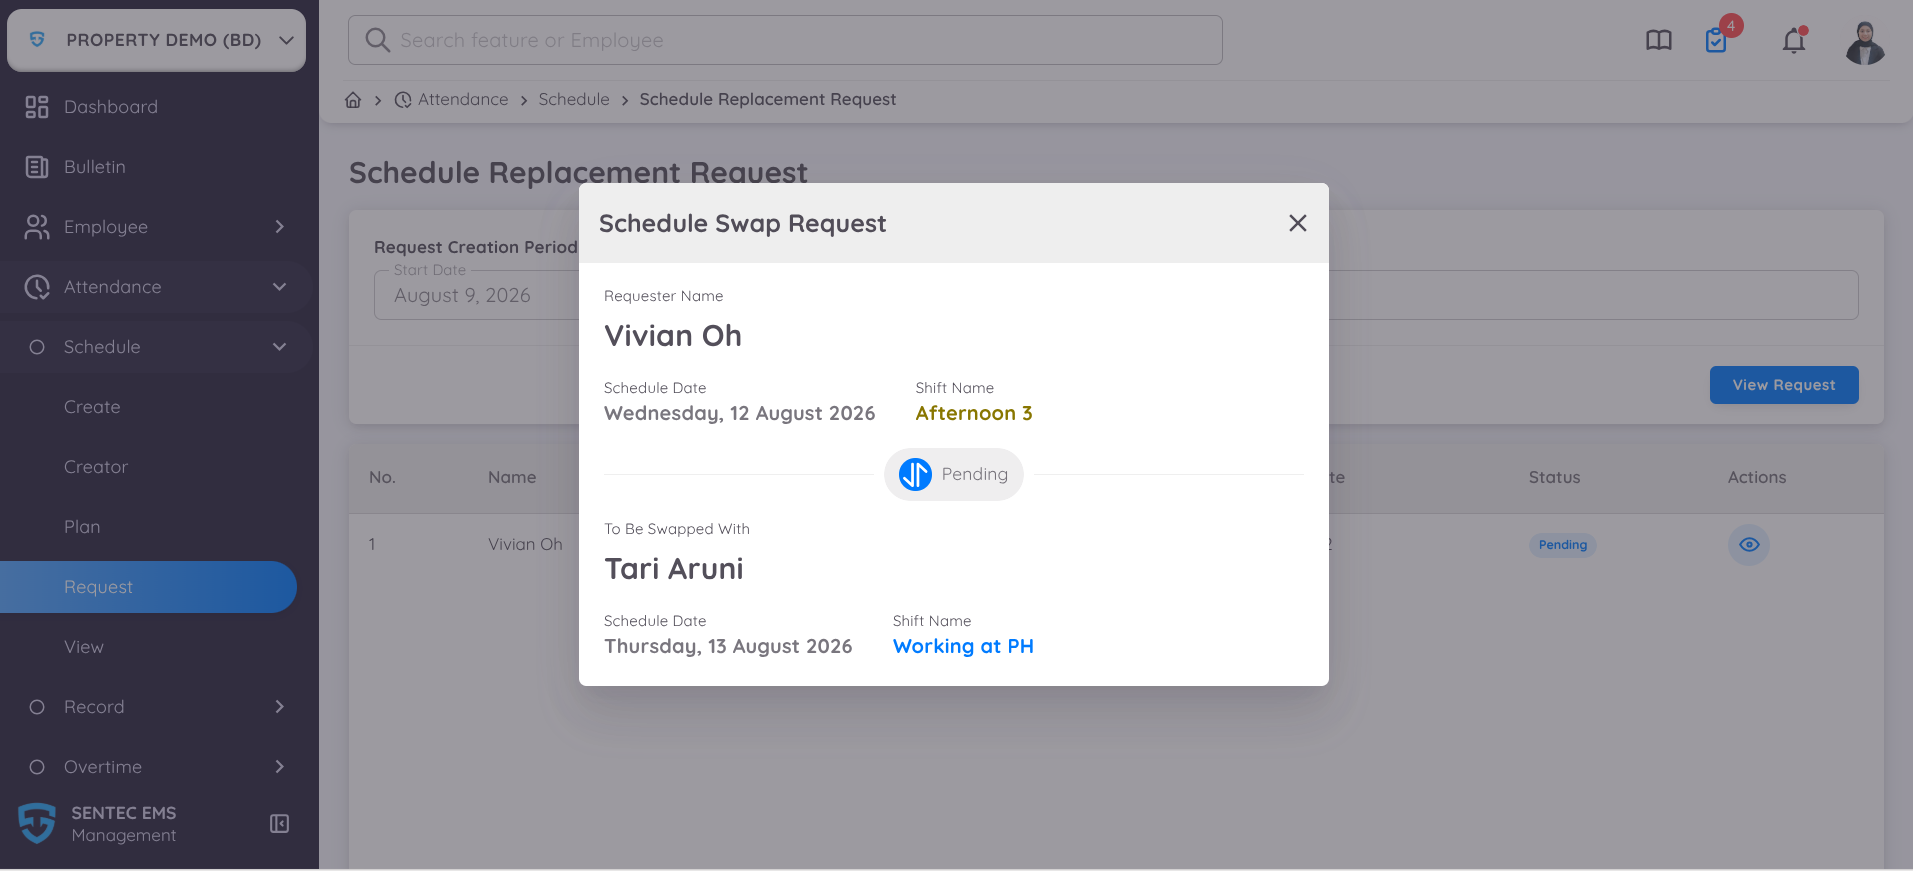
This page displays the process for exchanging work schedules between employees. The schedule replacement request process is as follows:
An employee submits a request to exchange their work schedule with another employee within the same department.
The employee invited to exchange schedules approves the request.
NOTE
The employee invited to exchange schedules will receive a notification regarding the request and can provide approval through the Approval menu on the Employee Page.
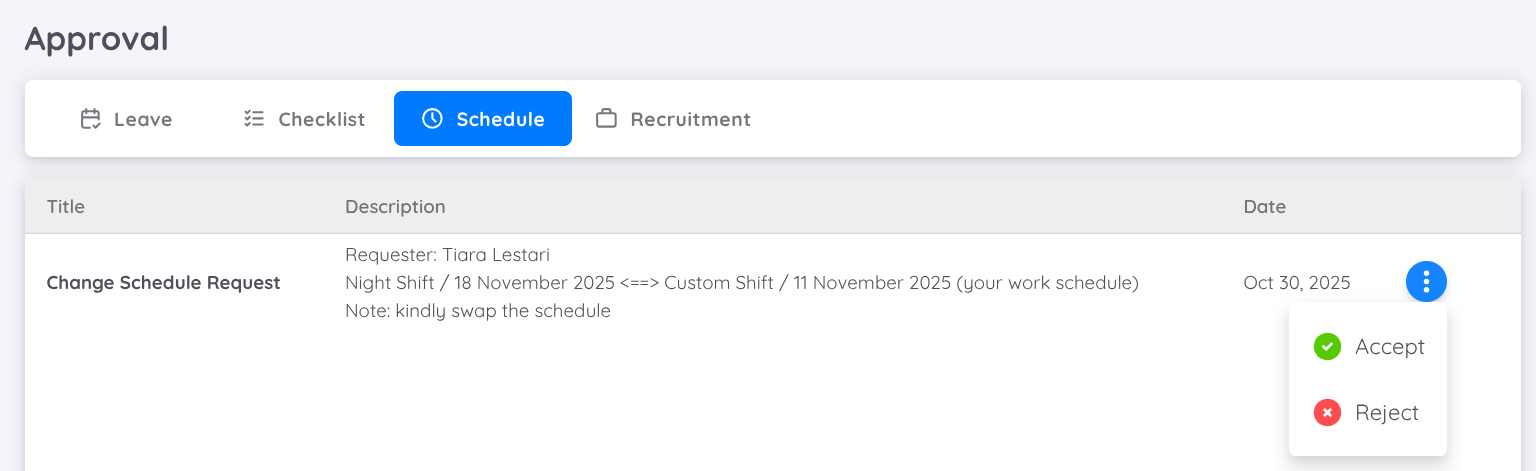
The Head of Department (HOD) approves the schedule replacement request.
If the request is not approved by either the employee in step 2 and/or the HOD in step 3, the schedule replacement process will be cancelled.
Note
On the Management page, only the details and list of Swap Schedule requests can be viewed. The approval process is handled entirely by the employees.
View
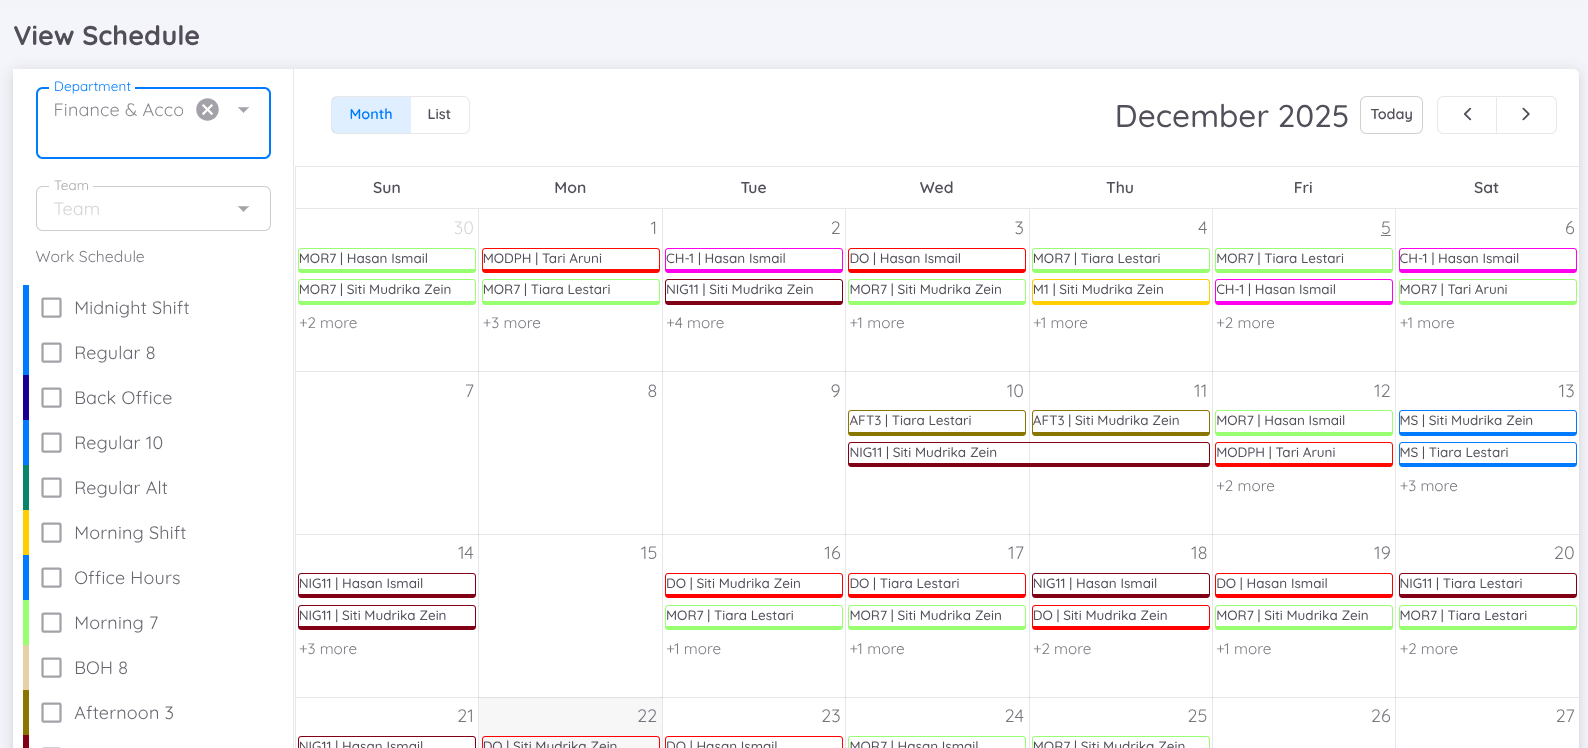
Displays the work schedule in calendar form. Please select the department first to view the employee work schedule for 1 month in the calendar. Users can filter the work schedule using the menu on the left.
Manage Schedule
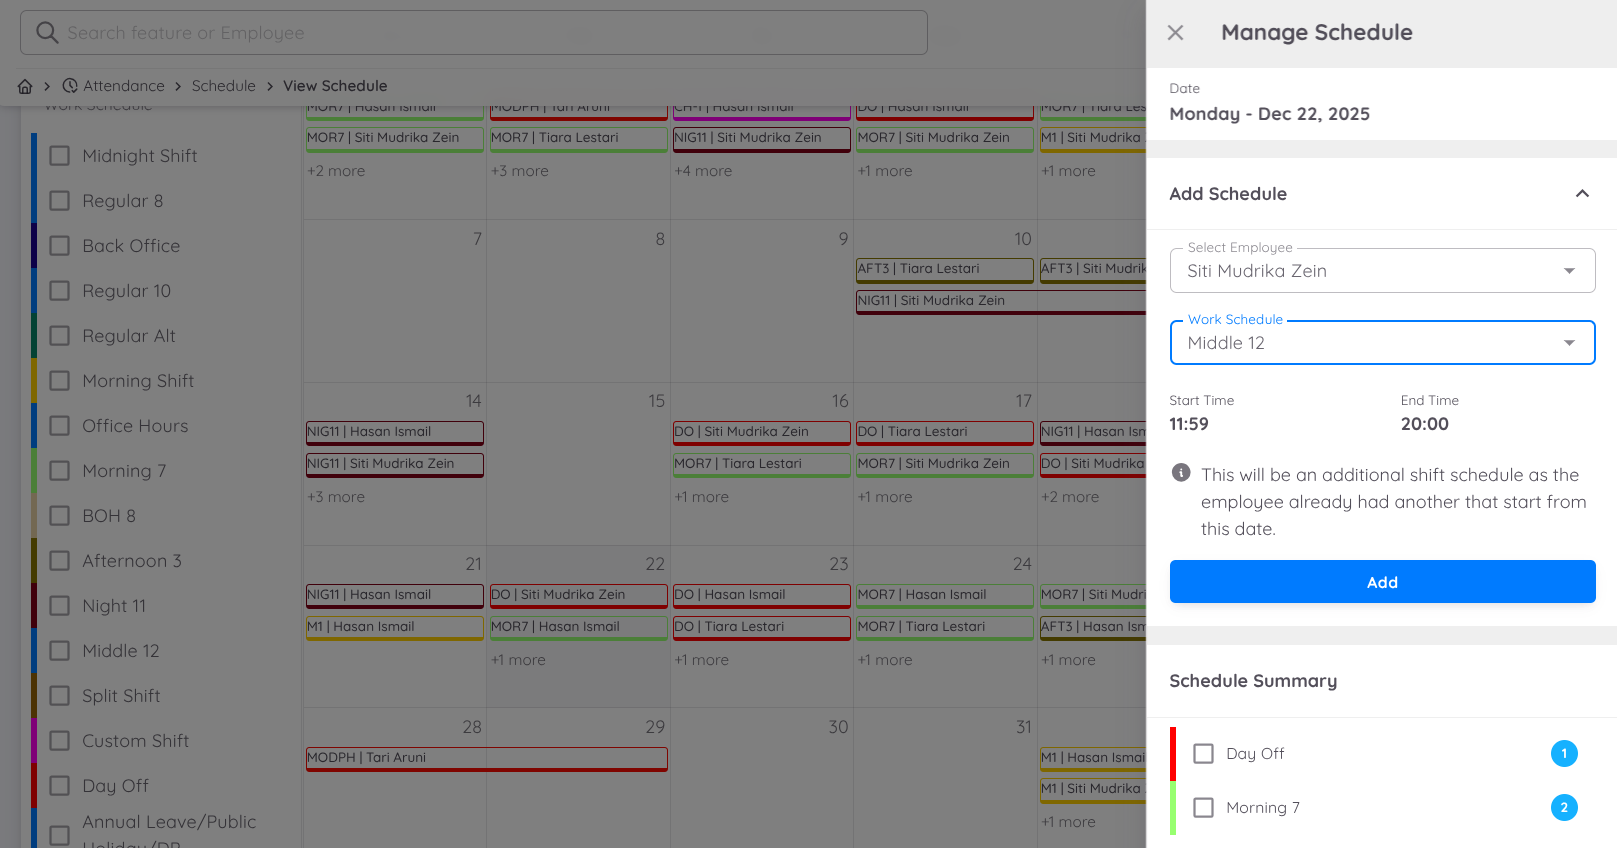
On this page, users can add, delete, or update employees' work schedules. Click a date on the calendar, and the Manage Schedule form will appear on the right. Select the employee and the work schedule you want to add or change.
Note
An employee can have more than one work schedule on the same day.
Change Schedule
To change an employee's work schedule, click the date on the calendar, then select the employee whose schedule you want to change.
In the Manage Schedule form, add the new schedule by selecting the employee and the appropriate work schedule, then click Add.
After adding the new schedule, delete the previous schedule under Schedule on This Date by clicking the Trash icon.
Schedule changes can also be made by deleting the previous schedule first and then adding the new schedule.
Add Additional Schedule
To add an additional work schedule on the same day, click the date on the calendar to display the Manage Schedule form.
Select the employee who will receive the additional schedule, then select the work schedule to be added and click Add.
The additional schedule will be added without removing the existing work schedule. Therefore, an employee can have more than one work schedule on the same day.
Delete Schedule
To delete an existing work schedule, click the date on the calendar to display the Manage Schedule form.
Scroll down to Schedule on This Date, then locate the work schedule you want to delete.
Click the Trash icon next to the work schedule to delete it.
Note
Work schedule changes can be made for back dates, today, and future dates.
However, a schedule that already has attendance records cannot be changed or deleted. If a schedule adjustment is required, delete the attendance records first before making changes to the schedule.
Schedule adjustments can also be made through the Create Schedule menu. However, in this menu, schedule changes can only be made for the next day and onwards (future dates), and only single schedules can be adjusted.
Custom Work Hour
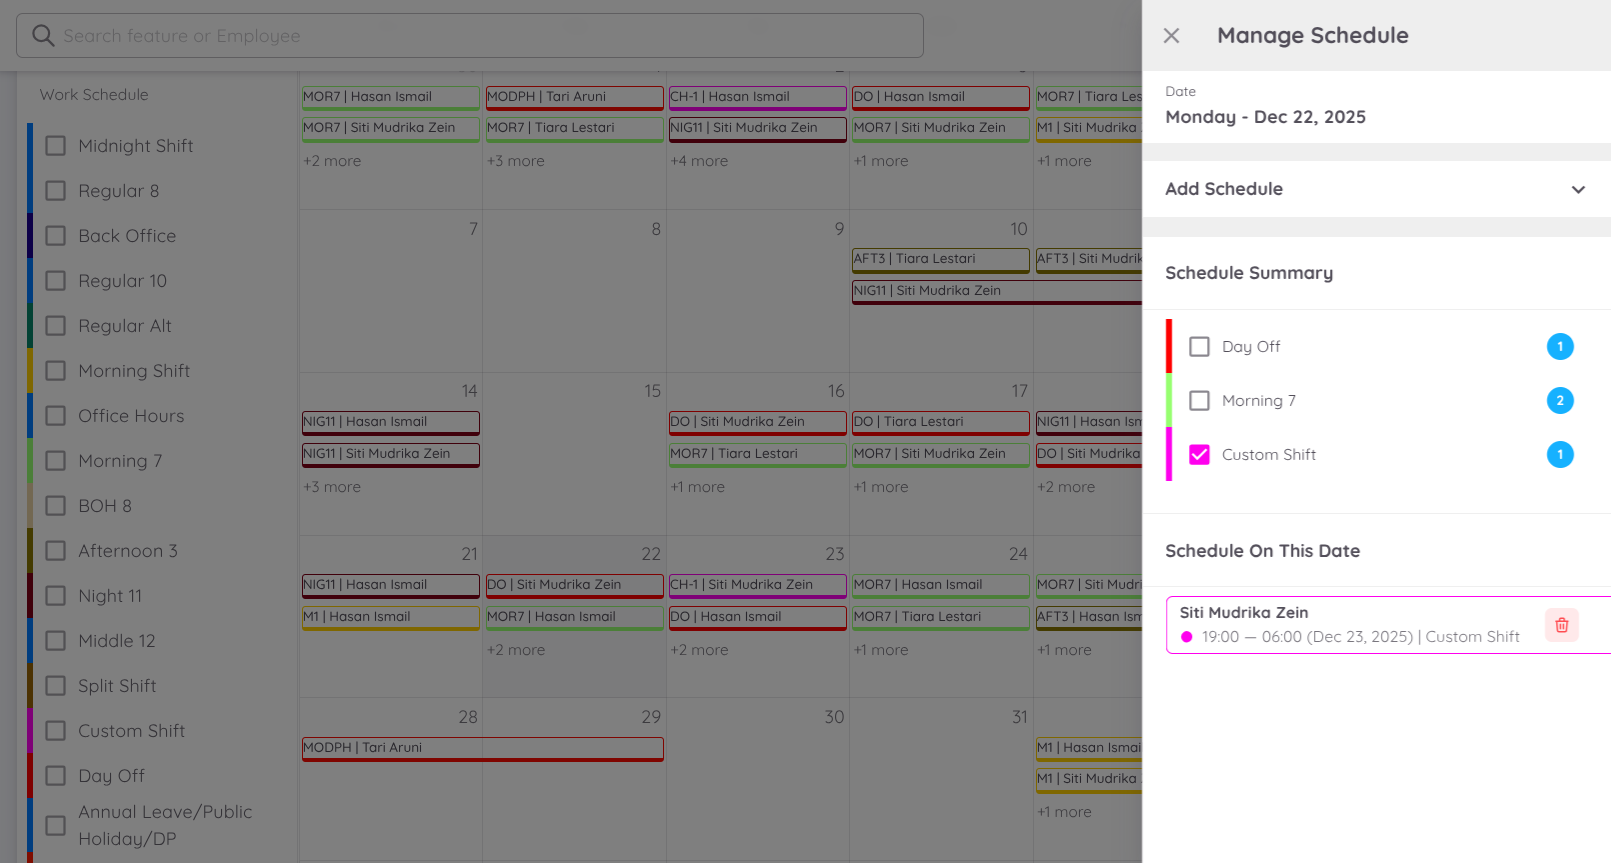
Users can add work schedules for employees not previously listed in the "Work Schedule". Select the employee, then enter the check-in and check-out times for the work schedule. This type of "Work Schedule" must use "Custom Hour" in the Configuration - Setup - Attendance menu.
Note
It is recommended to create a specific "Work Schedule" for this case.
Split Shift
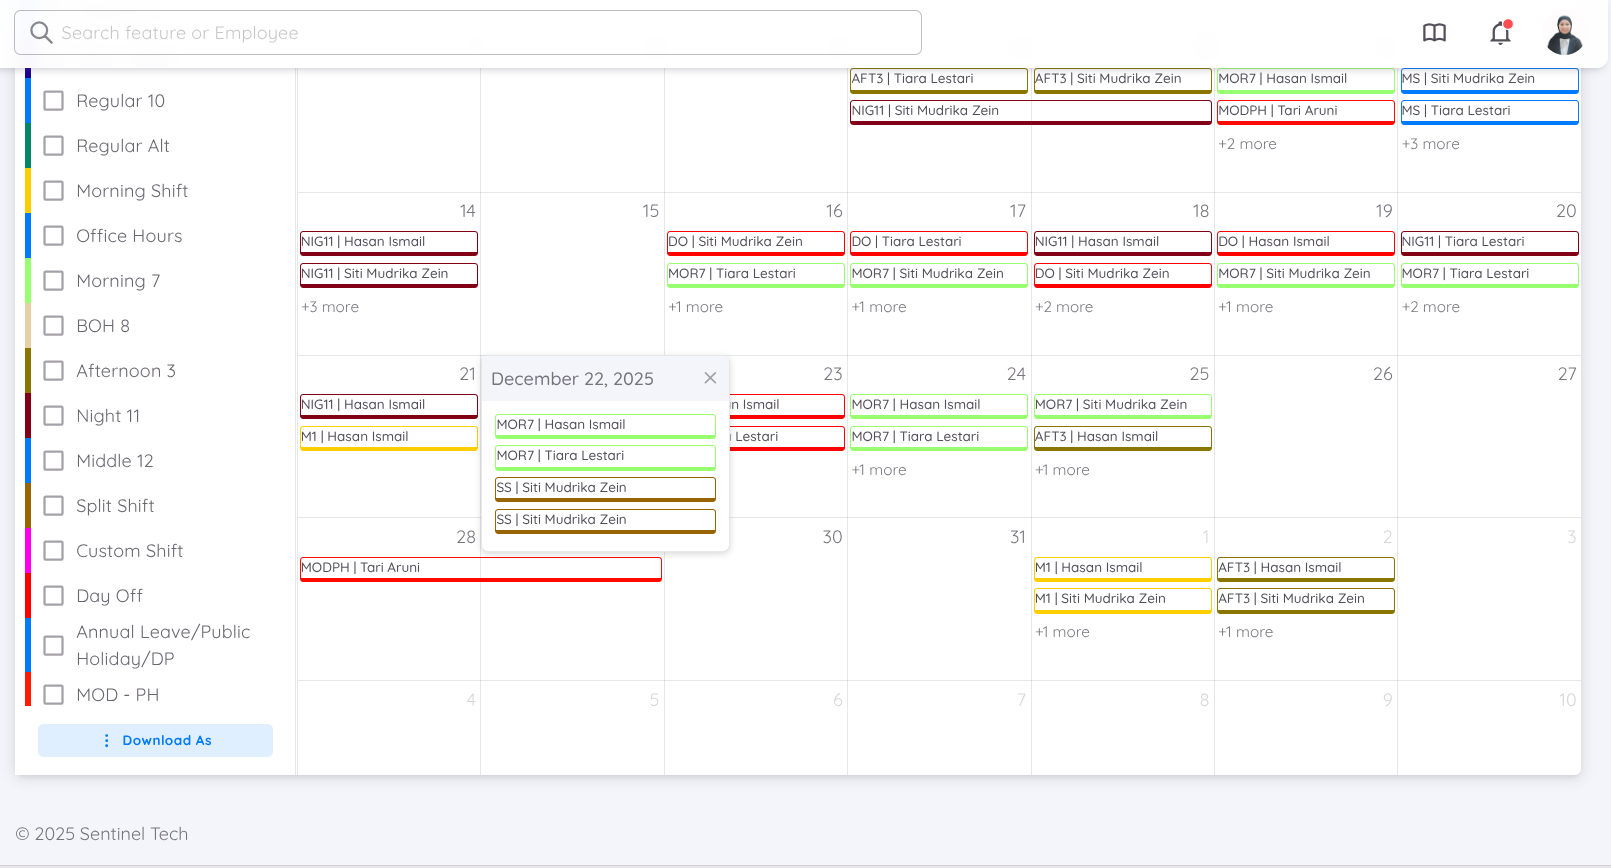
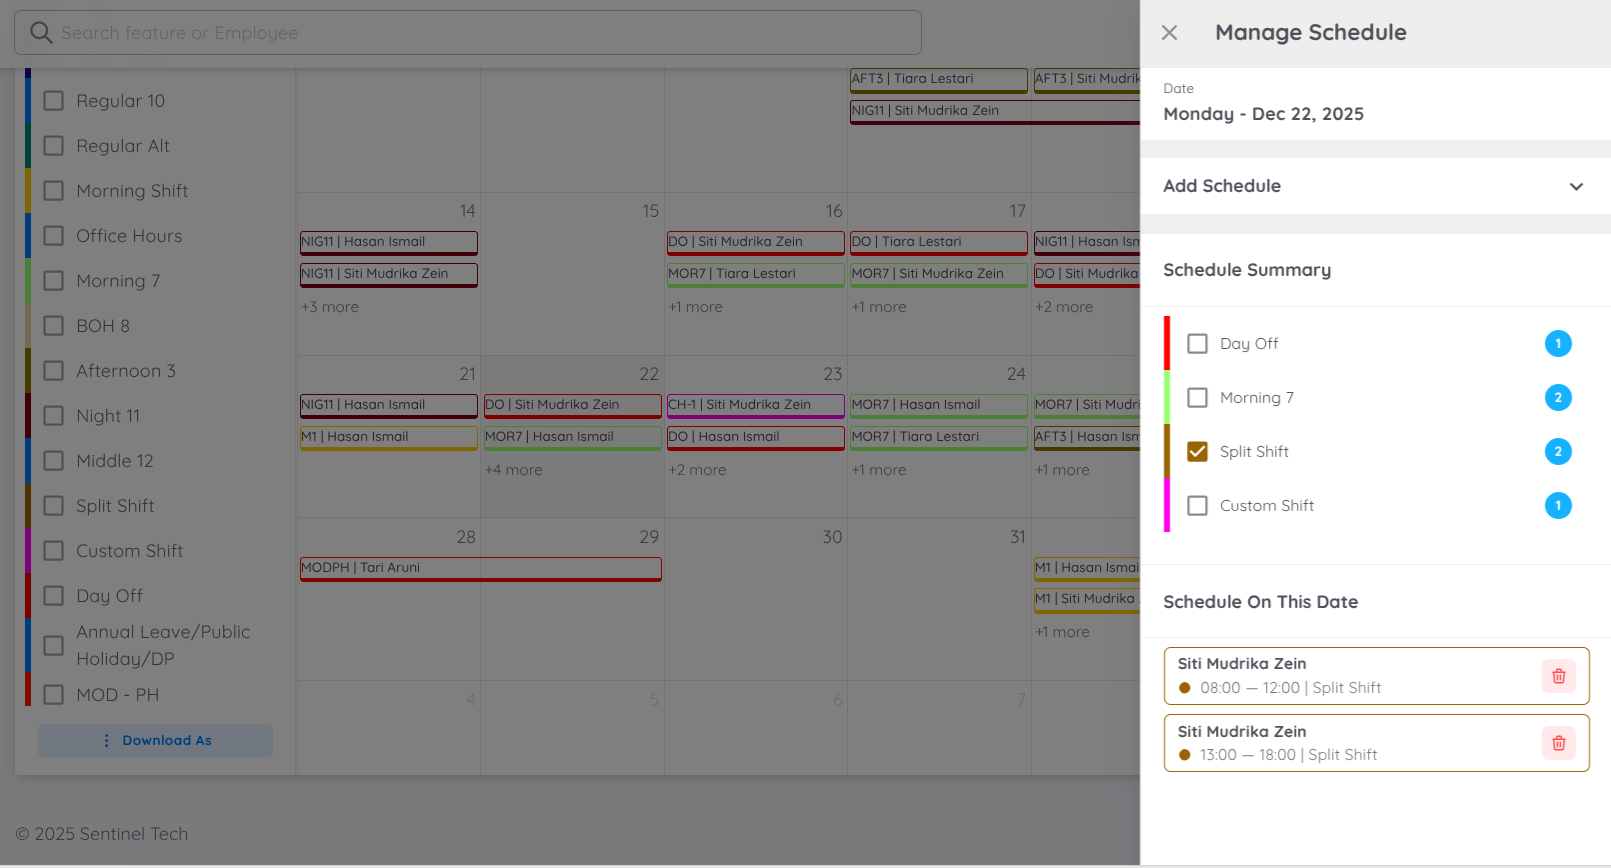
A work schedule where the working hours are split in one day. For example, an employee works 8 hours in a day, but the working hours are divided into two 4-hour sessions. Users can create a schedule with split working hours similar to custom working hours. Enable the "Split Shift" option when creating the employee's work schedule.
Note
It is recommended to create a specific "Work Schedule" for this case. Employees must still check in/out according to the specified times.
Individual Work Schedule Assignment
In addition to the Attendance → Schedule menu, work schedules can also be assigned directly through the Employee Profile. This feature is available for both regular employees and shift employees.
This method allows HR or Management to manage an employee's work schedule directly without having to access the Schedule page.
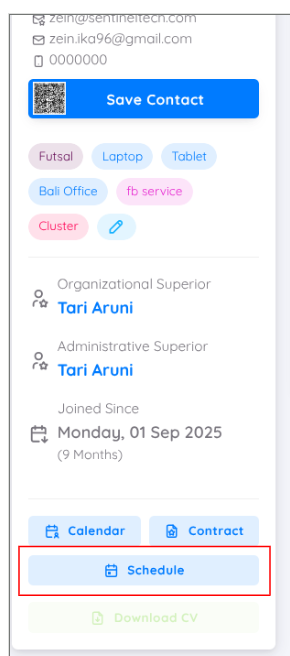
To assign a work schedule, open the Employee Profile, then click the Schedule button.
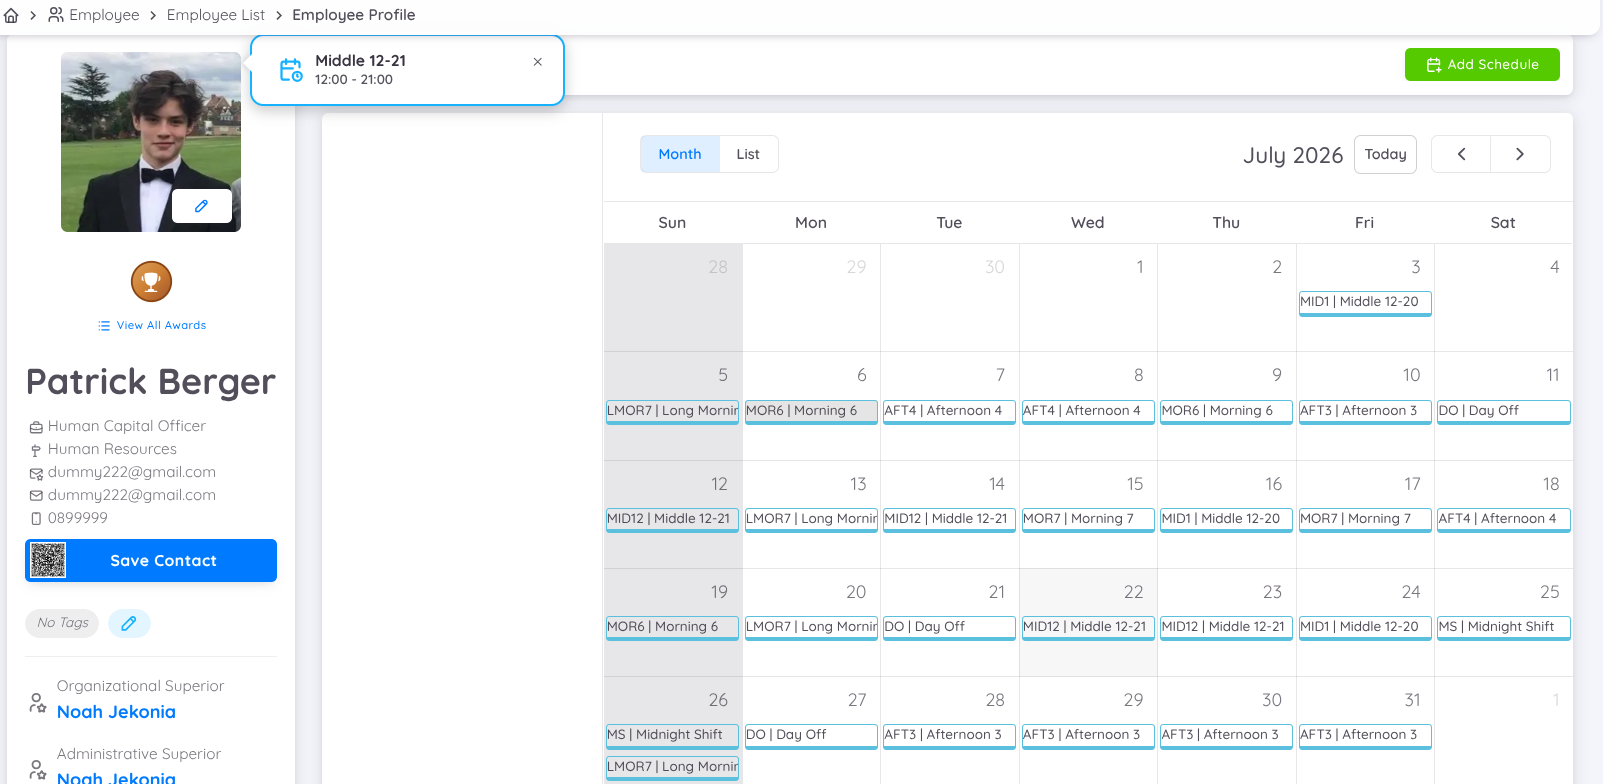
Similar to the Calendar page, all work schedules assigned to the employee will be displayed on this page. In addition, attendance records and other related activities will also be displayed.
Assigning a Work Schedule
On the Schedule Management page, HR or Management can easily assign work schedules using the click-to-assign method.
Click the Add Schedule button to display all work schedules that have been created in the Schedule Setup menu.
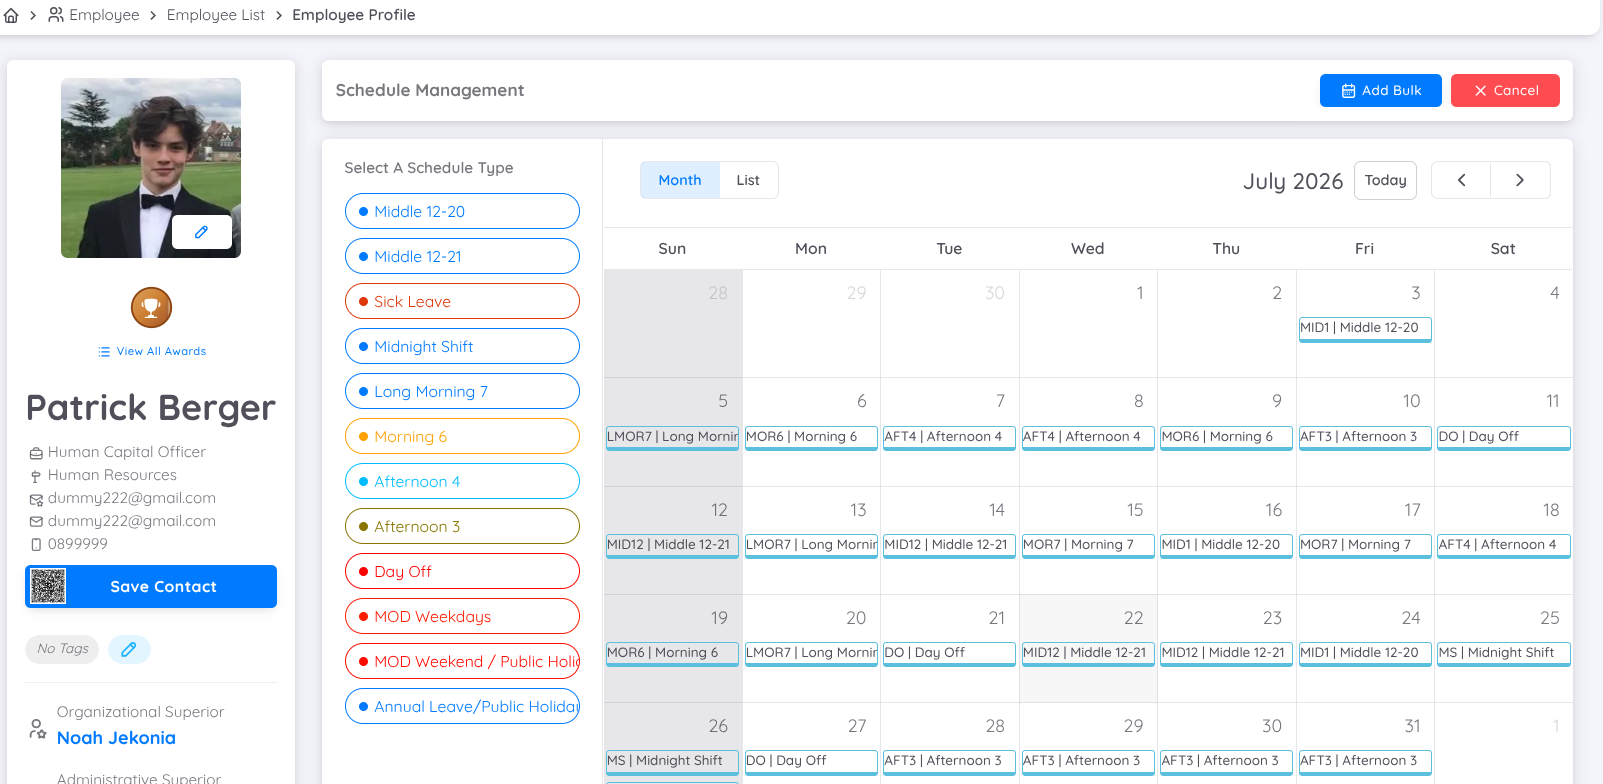
Select the work schedule to be assigned until it is highlighted, then click the corresponding date on the calendar. Once finished, click Save to save the changes. The assigned work schedule will become active immediately for the selected date.
Notes
- Work schedules can be assigned to one or multiple dates at the same time.
- Work schedules can also be assigned using backdated dates when required.
- To remove a work schedule before saving, simply click the assigned schedule on the corresponding date.
Assigning Work Schedules in Bulk
On the Schedule Management page, work schedules can also be assigned in bulk to simplify recurring schedule management. This feature allows HR or Management to assign one or multiple work schedules across a specified period without assigning them individually.
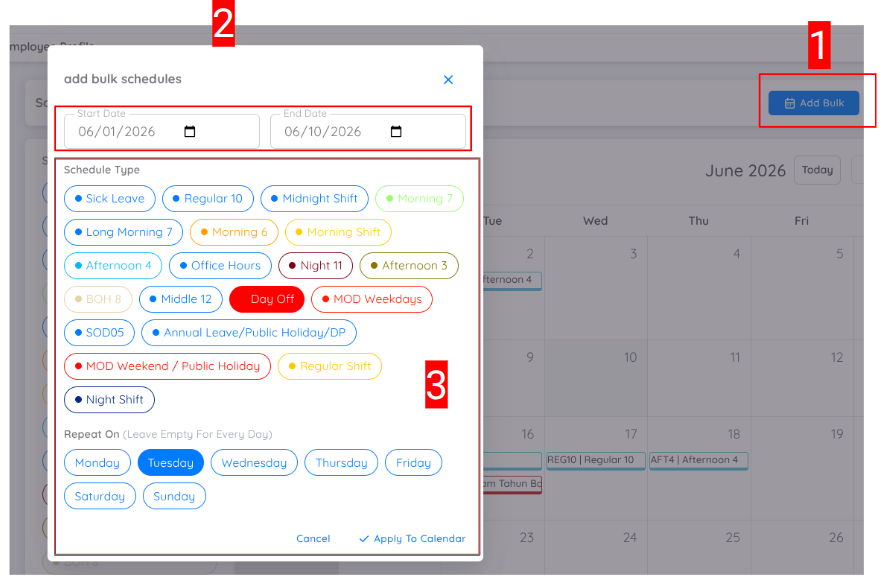
The Add Bulk feature provides a faster and more efficient way to manage recurring work schedules.
To assign work schedules in bulk:
- Click Add Schedule, then select Add Bulk.
- Specify the schedule period. The selected period can also be configured using backdated dates, allowing work schedules to be applied retrospectively when required.
- Select the work schedule, then choose the days of the week to which it should be assigned. The system will automatically repeat the selected work schedule on the chosen days throughout the specified period.
Example
If an employee has a Day Off every Tuesday, select the Day Off schedule and choose Tuesday as the assigned day. After saving, the system will automatically assign the Day Off schedule to every Tuesday within the selected period.
In addition, work schedules can be assigned to a single day, multiple days simultaneously, or multiple different work schedules can be distributed across different days within the same period.
Once the configuration is complete, click Save. The work schedules assigned through Add Bulk will become active immediately based on the selected period and assigned days.
Deleting a Work Schedule
Work schedules that have already been saved and activated can also be deleted from the Schedule Management page.
To delete a work schedule:
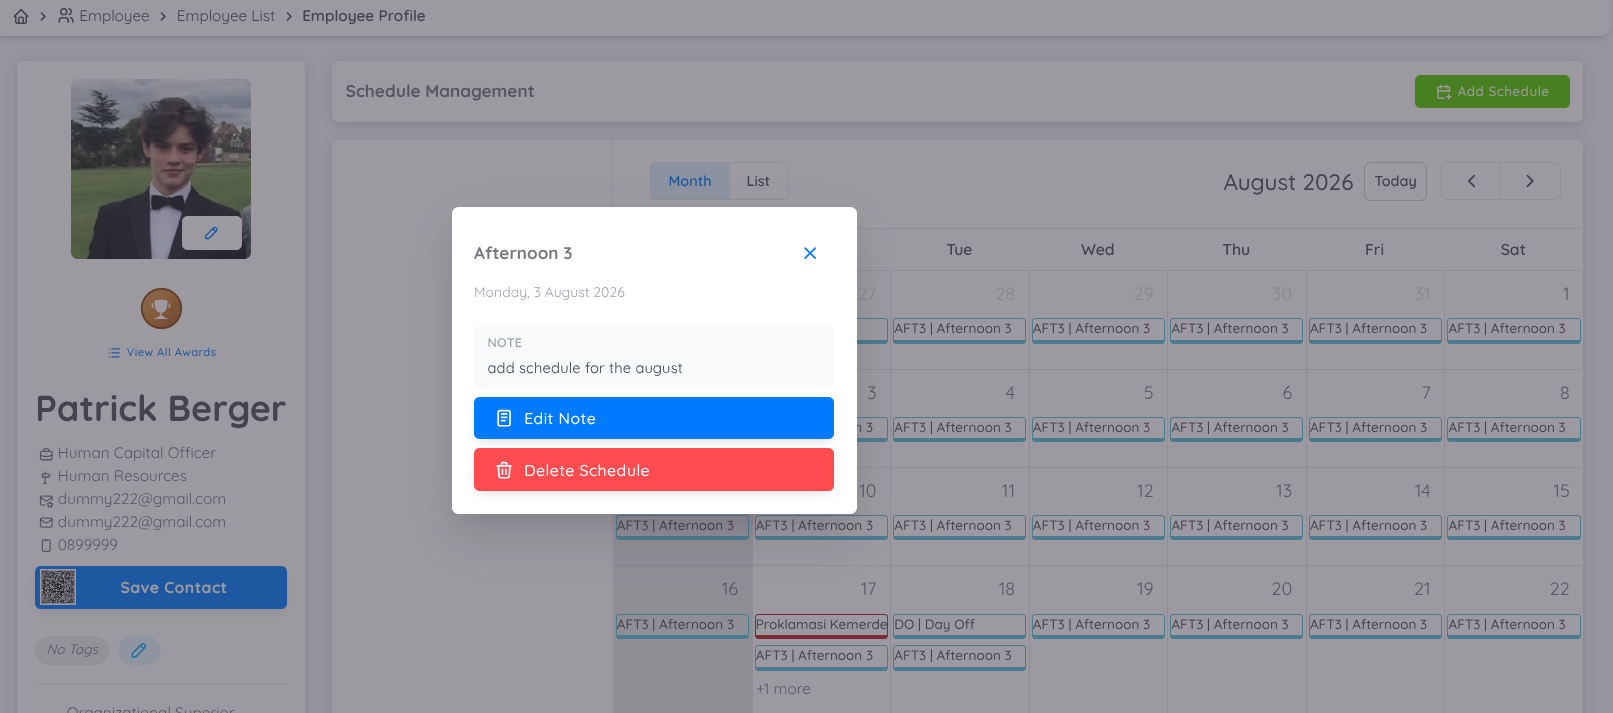
- Click the work schedule to be deleted on the calendar.
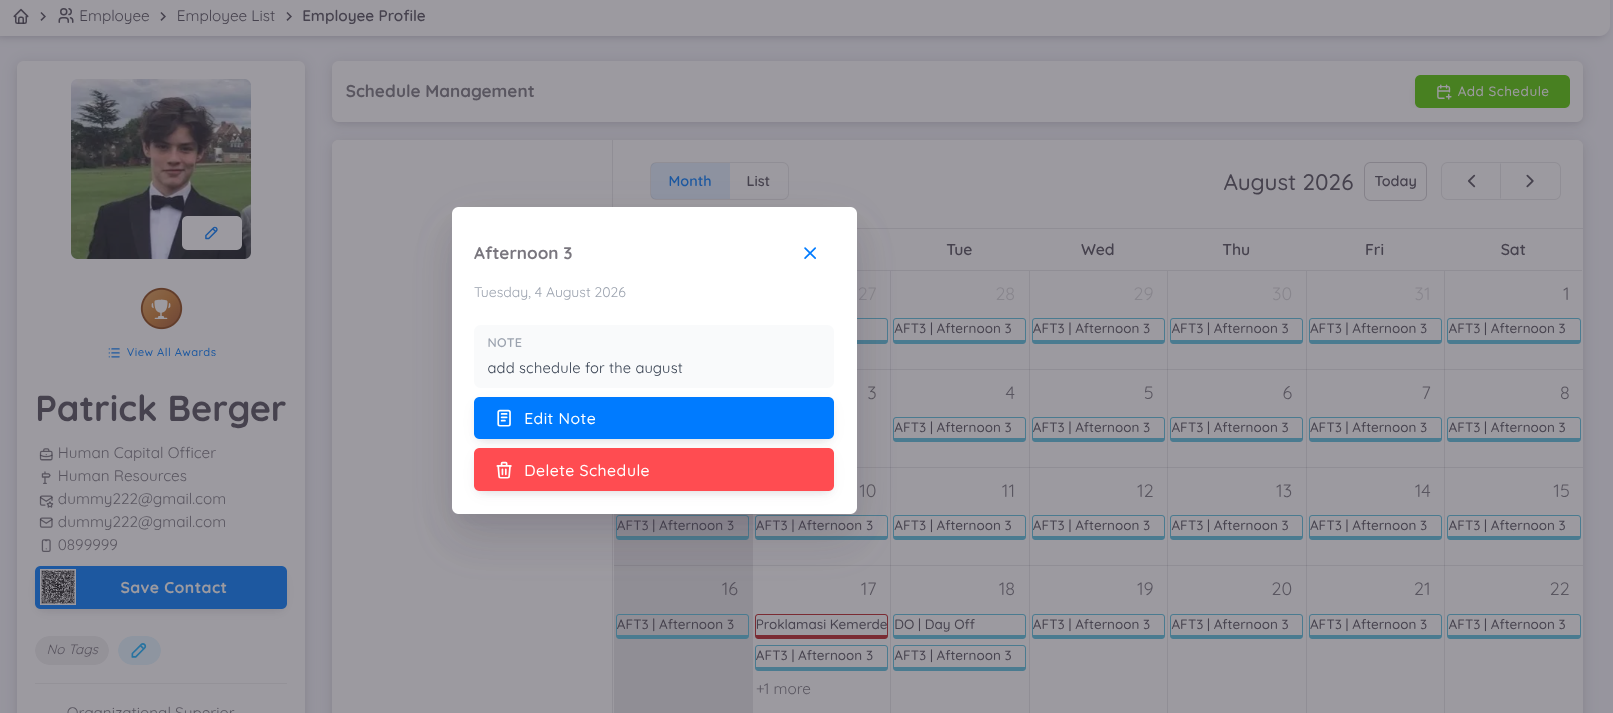
- The Delete Schedule dialog will appear.
- Click Delete Schedule to continue.
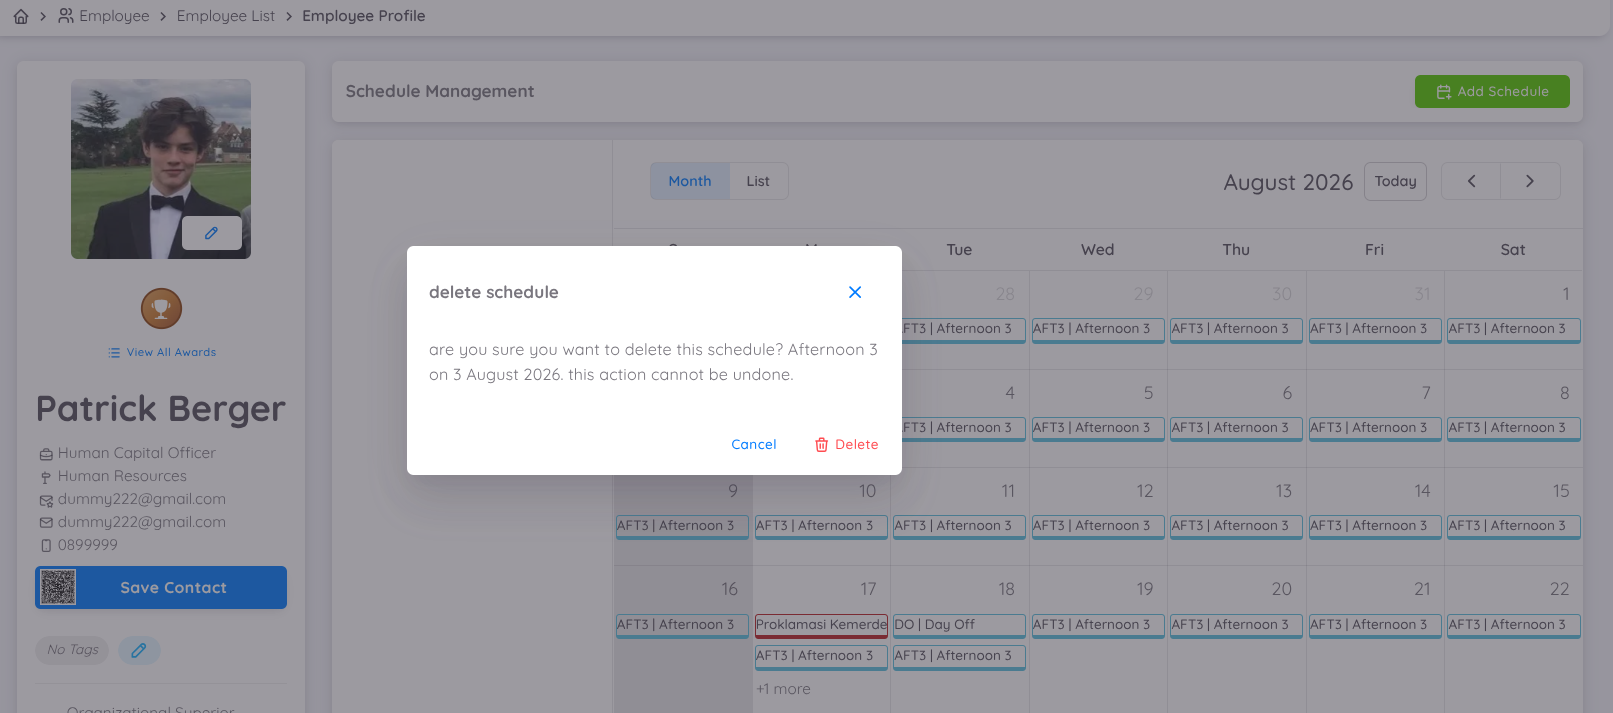
A confirmation dialog will then appear. Click Delete to confirm the deletion. Once confirmed, the work schedule will be removed from the calendar.
Adding or Editing Work Schedule Notes
Work schedule notes can also be added or edited through the Schedule Profile page.
To add or edit a note:
- Click the work schedule for which the note will be added or edited.
- Select Add Note.
- If the work schedule already has a note, the existing note will be displayed and the Add Note button will change to Edit Note.
- Add or update the note as needed, then click Save to save the changes.