How to Activate an Employee Contract (Activate Employee)
Overview
This page provides a guide to the employee contract activation process in Sentec EMS. Contract activation is performed for employees who are joining the company, whether as New Hires or Re-hires.
Step 1: Add Employee Data and Contract
There are two methods to add an employee contract in Sentec EMS:
- Add an employee manually through Employee List - Current.
- Add an employee through the Recruitment process.
This guide will first explain the contract activation process through Employee List - Current, followed by the contract activation process through Recruitment.
Method 1: Add an Employee Through Employee List - Current
To add a new employee through Employee List - Current:
Open the following menu:
Employee → List → Current
On the Employee List - Current page, click the Add Employee button.
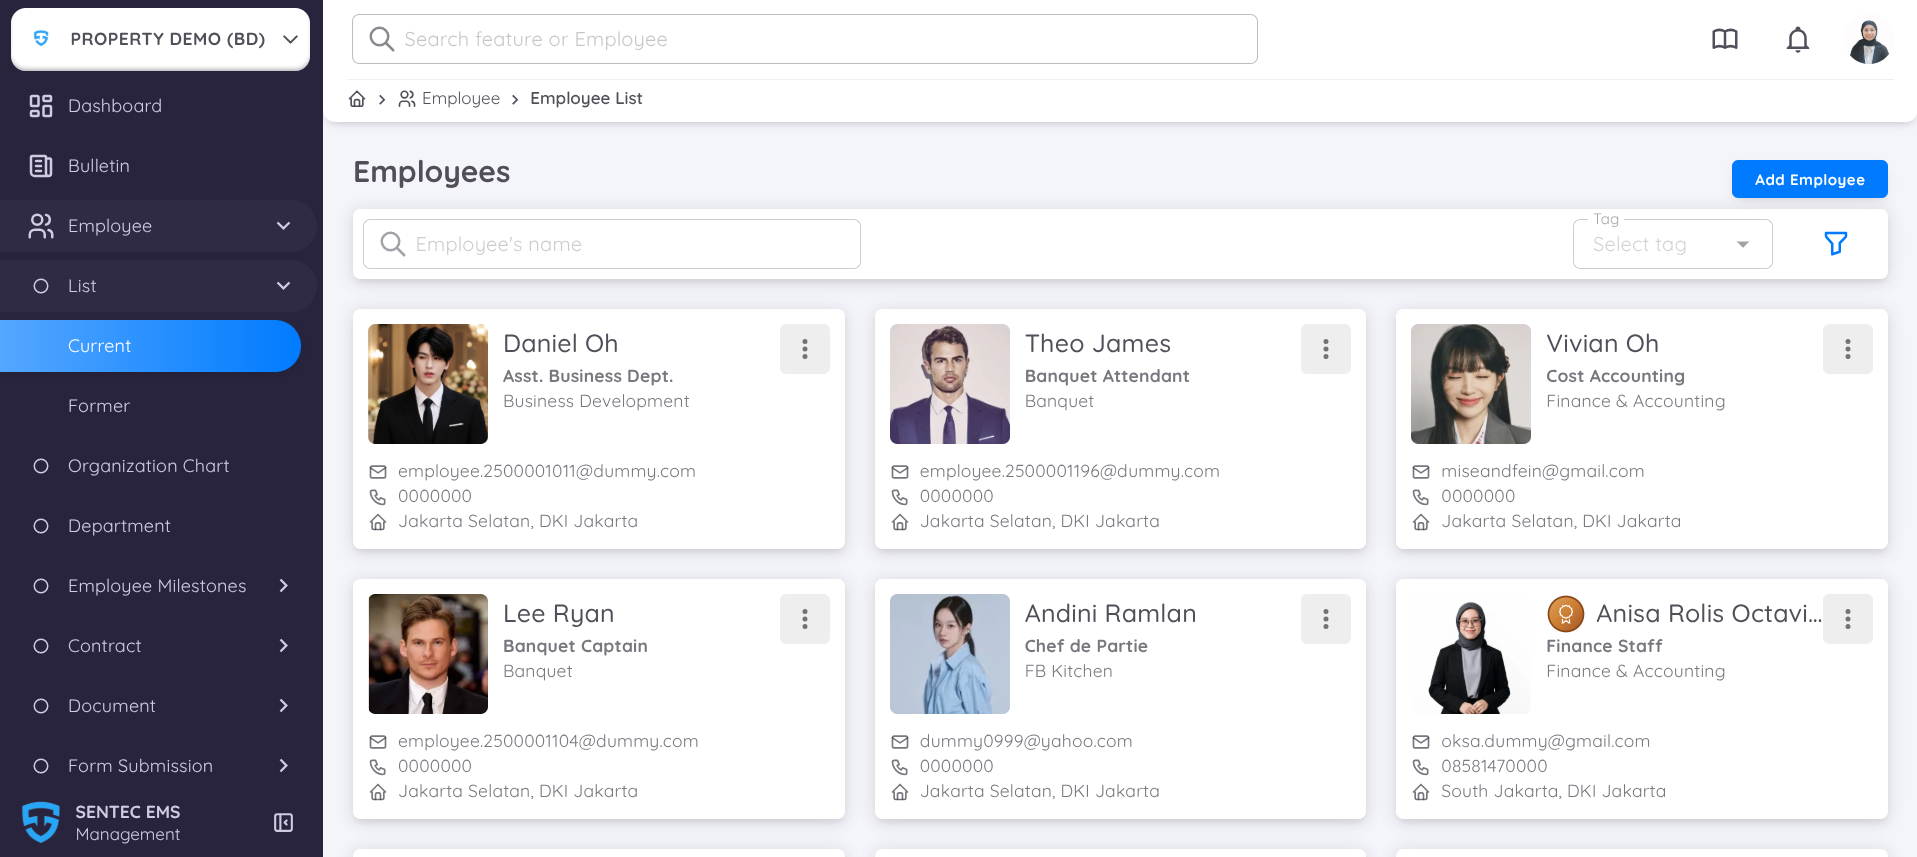
After clicking Add Employee, the system will display the Add New Employee page to begin the employee creation process. This process consists of three stages:
- Employee
- Contract
- Confirmation
Employee Tab
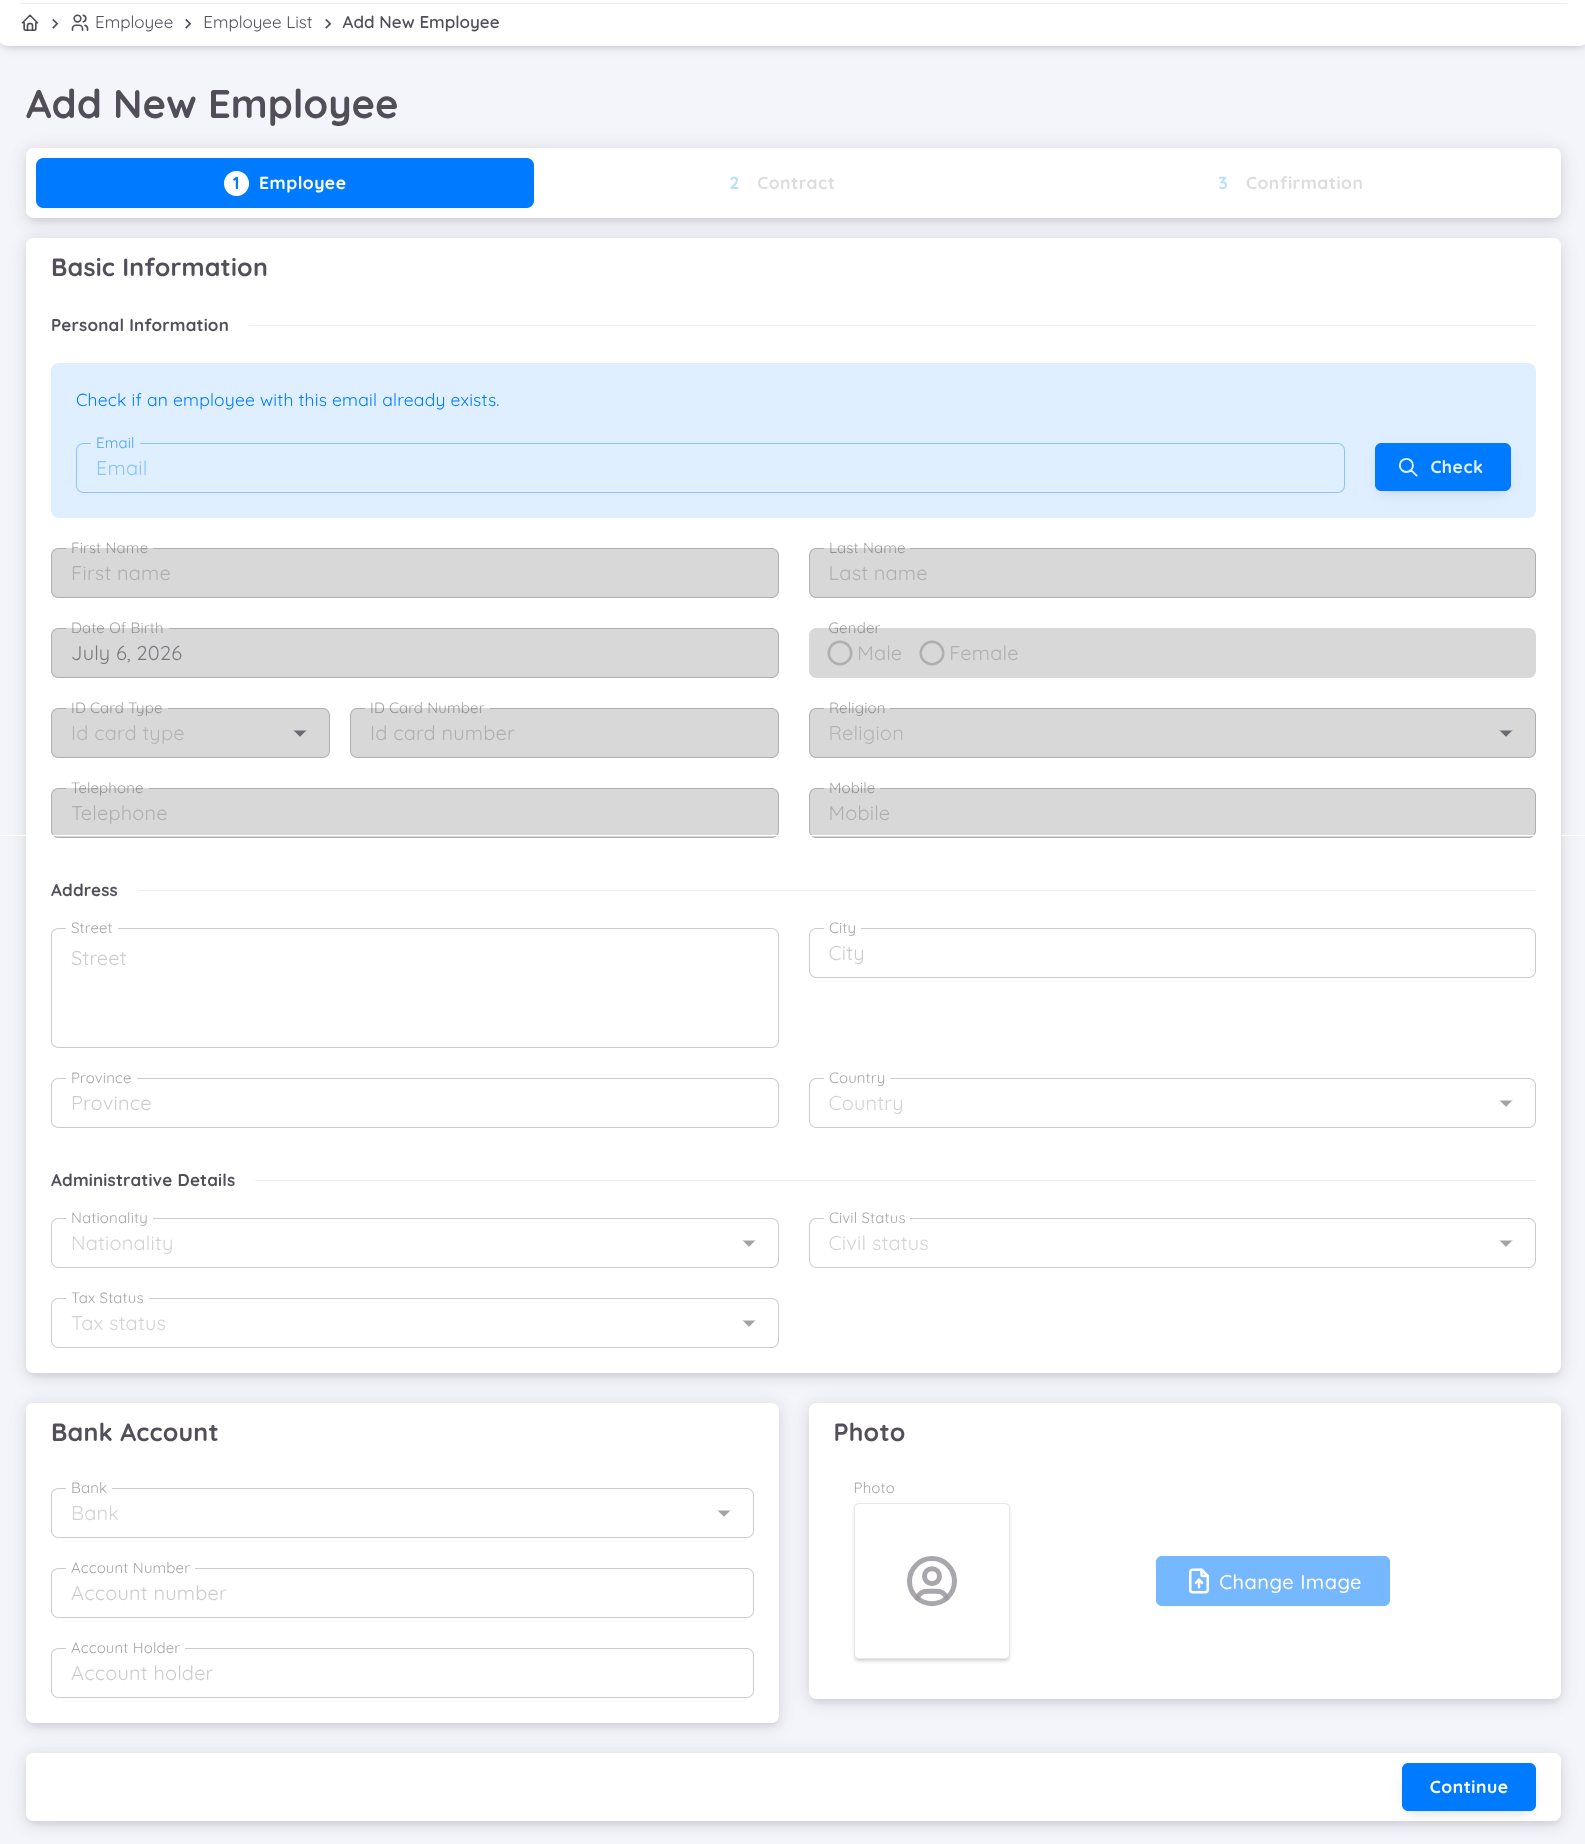
At this stage, complete the employee's Basic Information, including:
- Employee personal information.
- Bank Account information to be used.
To begin adding a new employee, enter the employee's email address that will be used to log in to the system, then click the Check button.
The system will validate whether the email address has already been registered in Sentec EMS.
- If the Email Is Already Registered
If the email address has already been registered in Sentec EMS, the system will display a notification pop-up indicating that the email address is already in use.
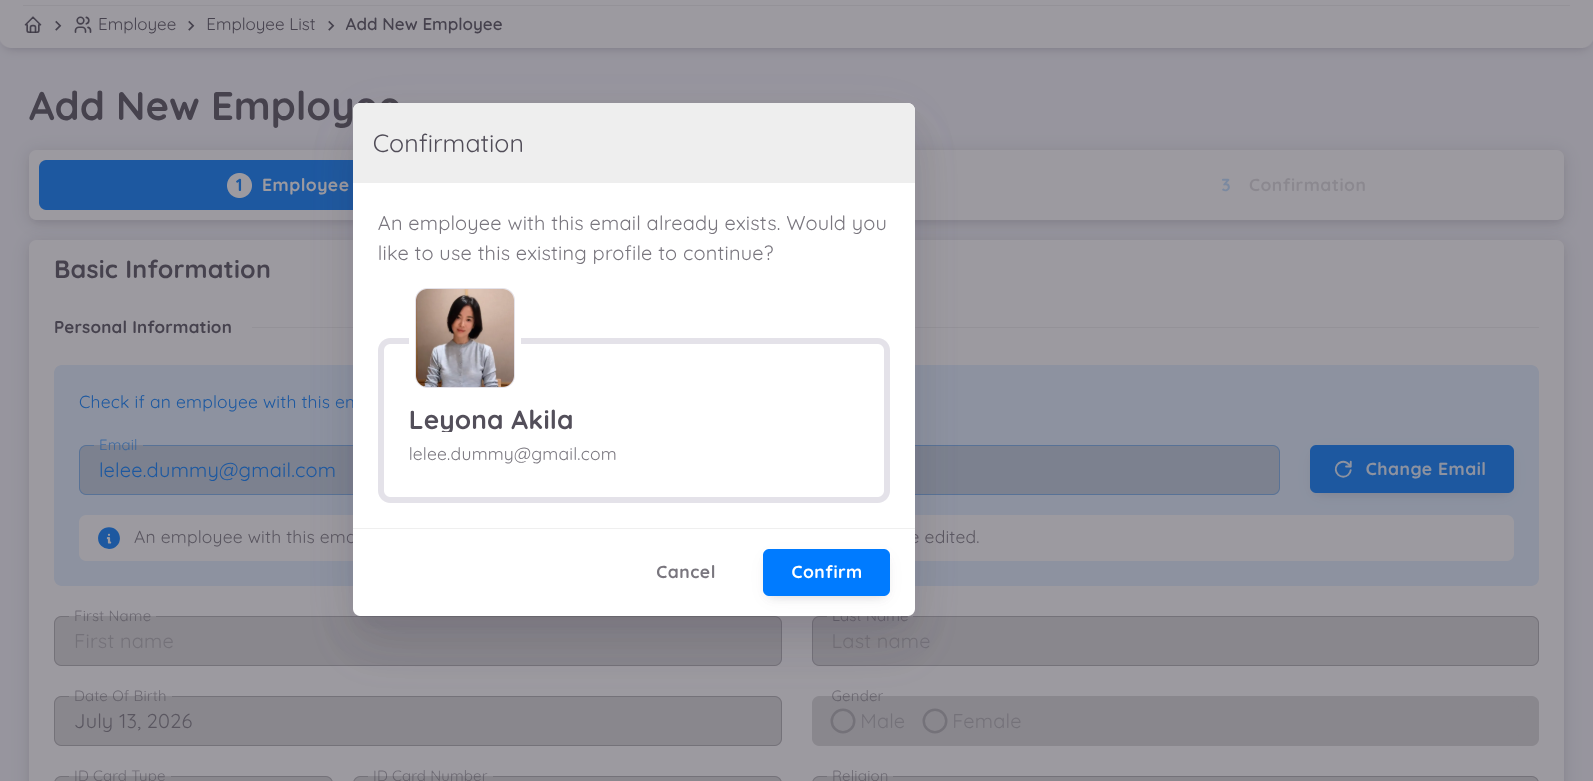
Click Confirm to use the existing employee data.
The system will automatically retrieve the employee's existing information based on the previously saved employee records (existing employee data). As a result, the Basic Information section will be populated automatically, and there is no need to re-enter the existing information.
- If the Email Is Not Yet Registered
If the email address has never been used in Sentec EMS, the system will display a notification indicating that the email address has not been registered.
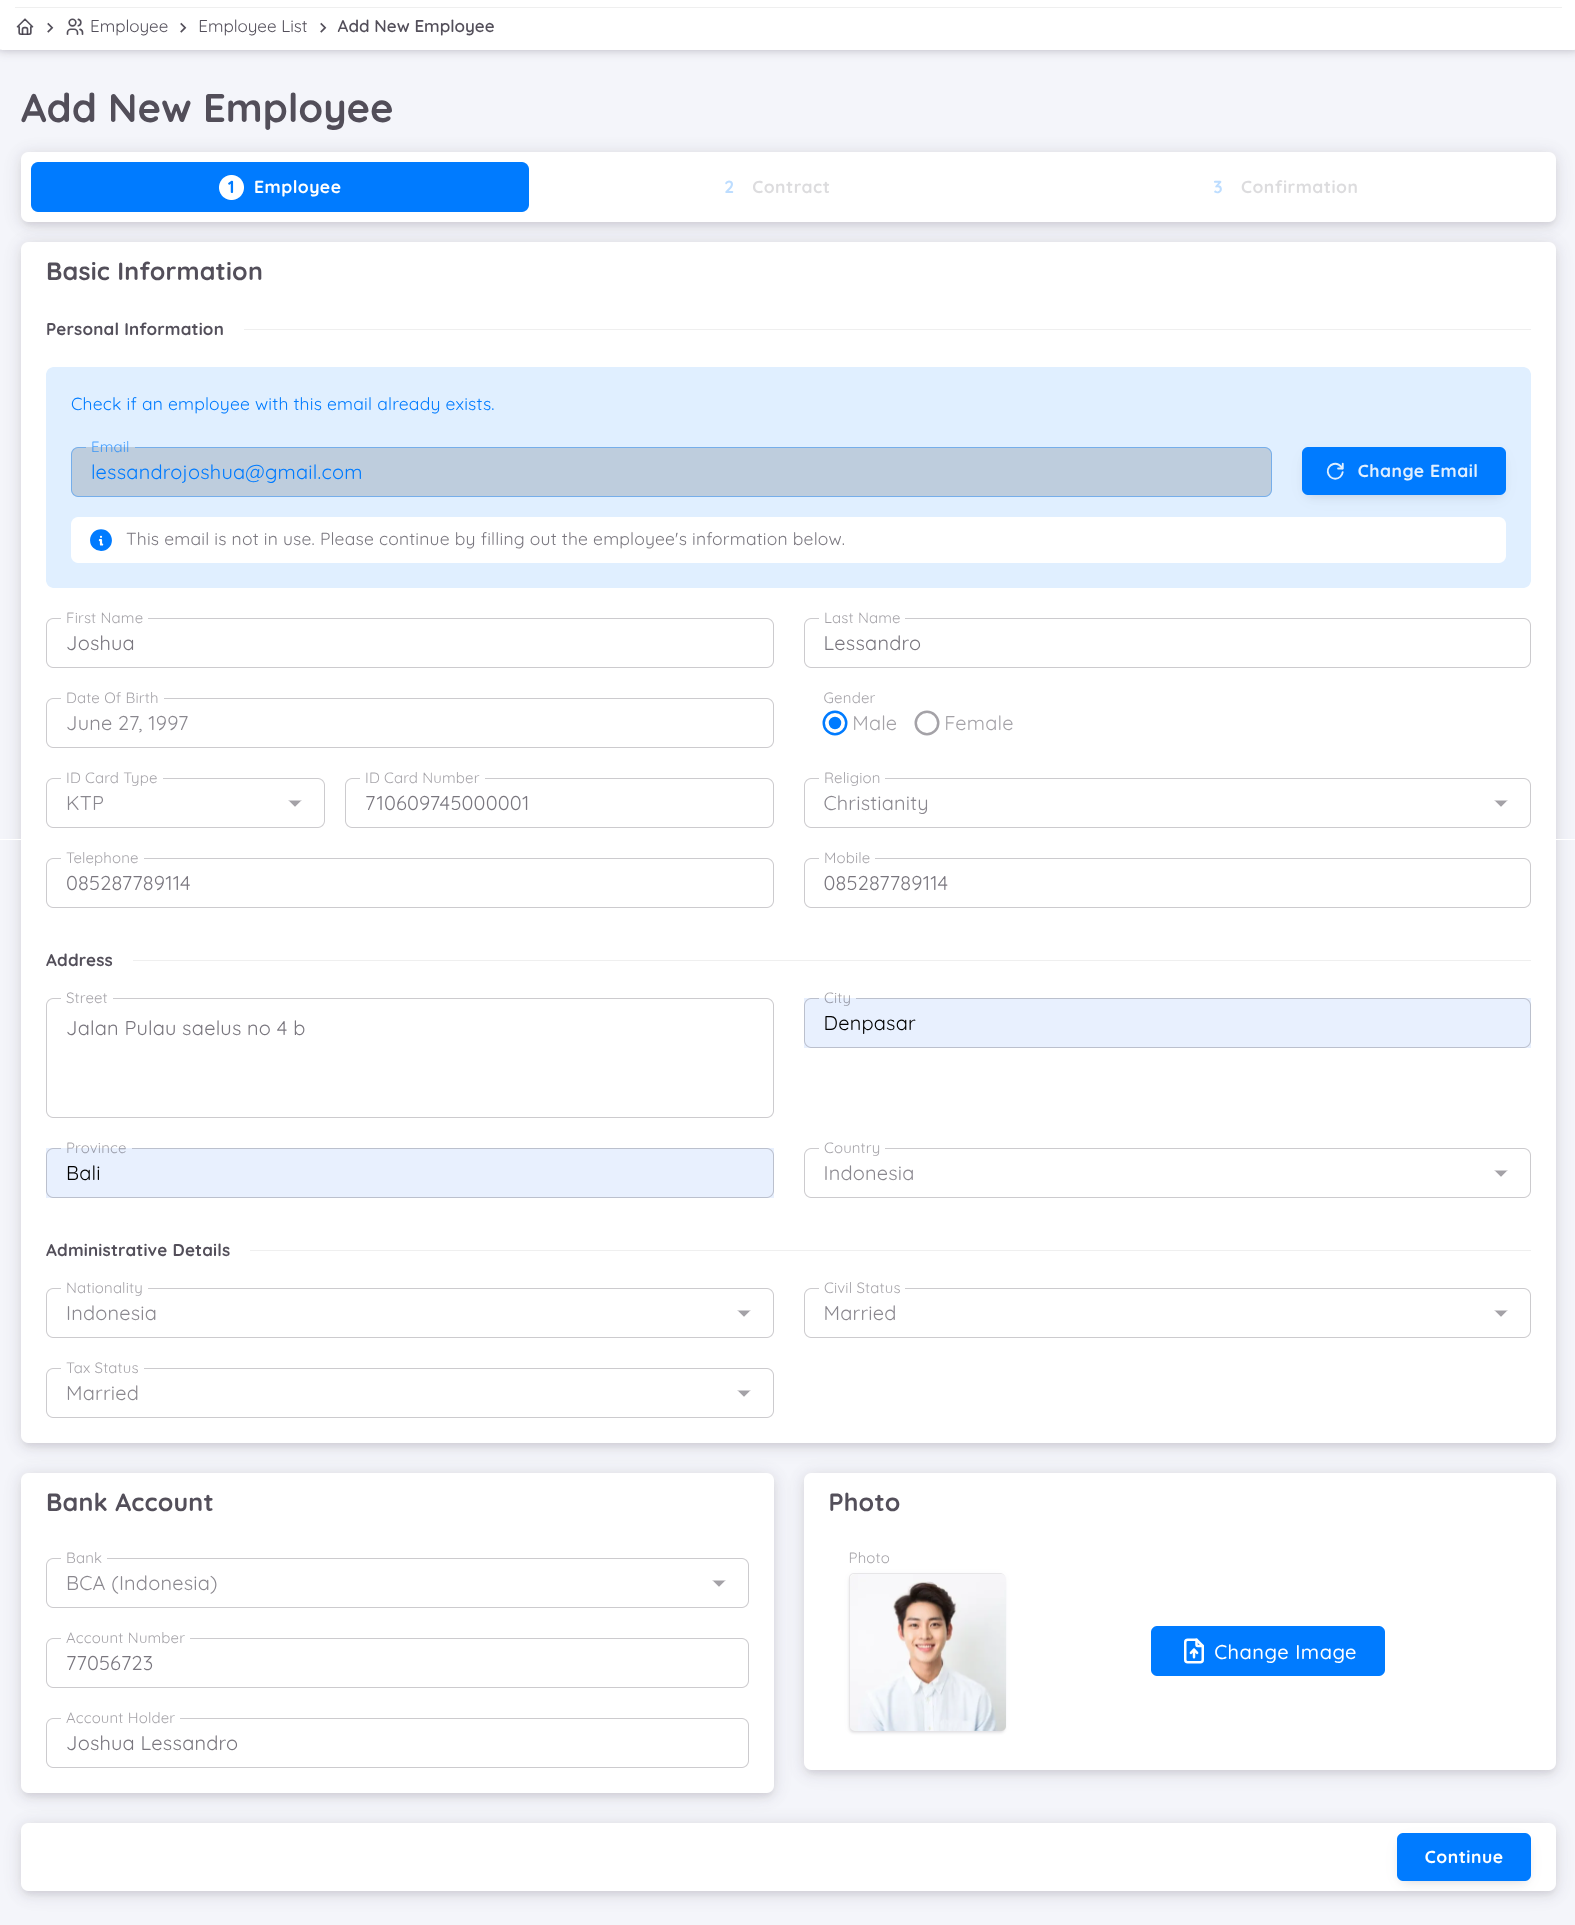
Next, complete all fields in the Basic Information section along with any additional information required for the employee.
After all information has been completed and verified, click Continue to proceed to the next stage.
Contract Tab
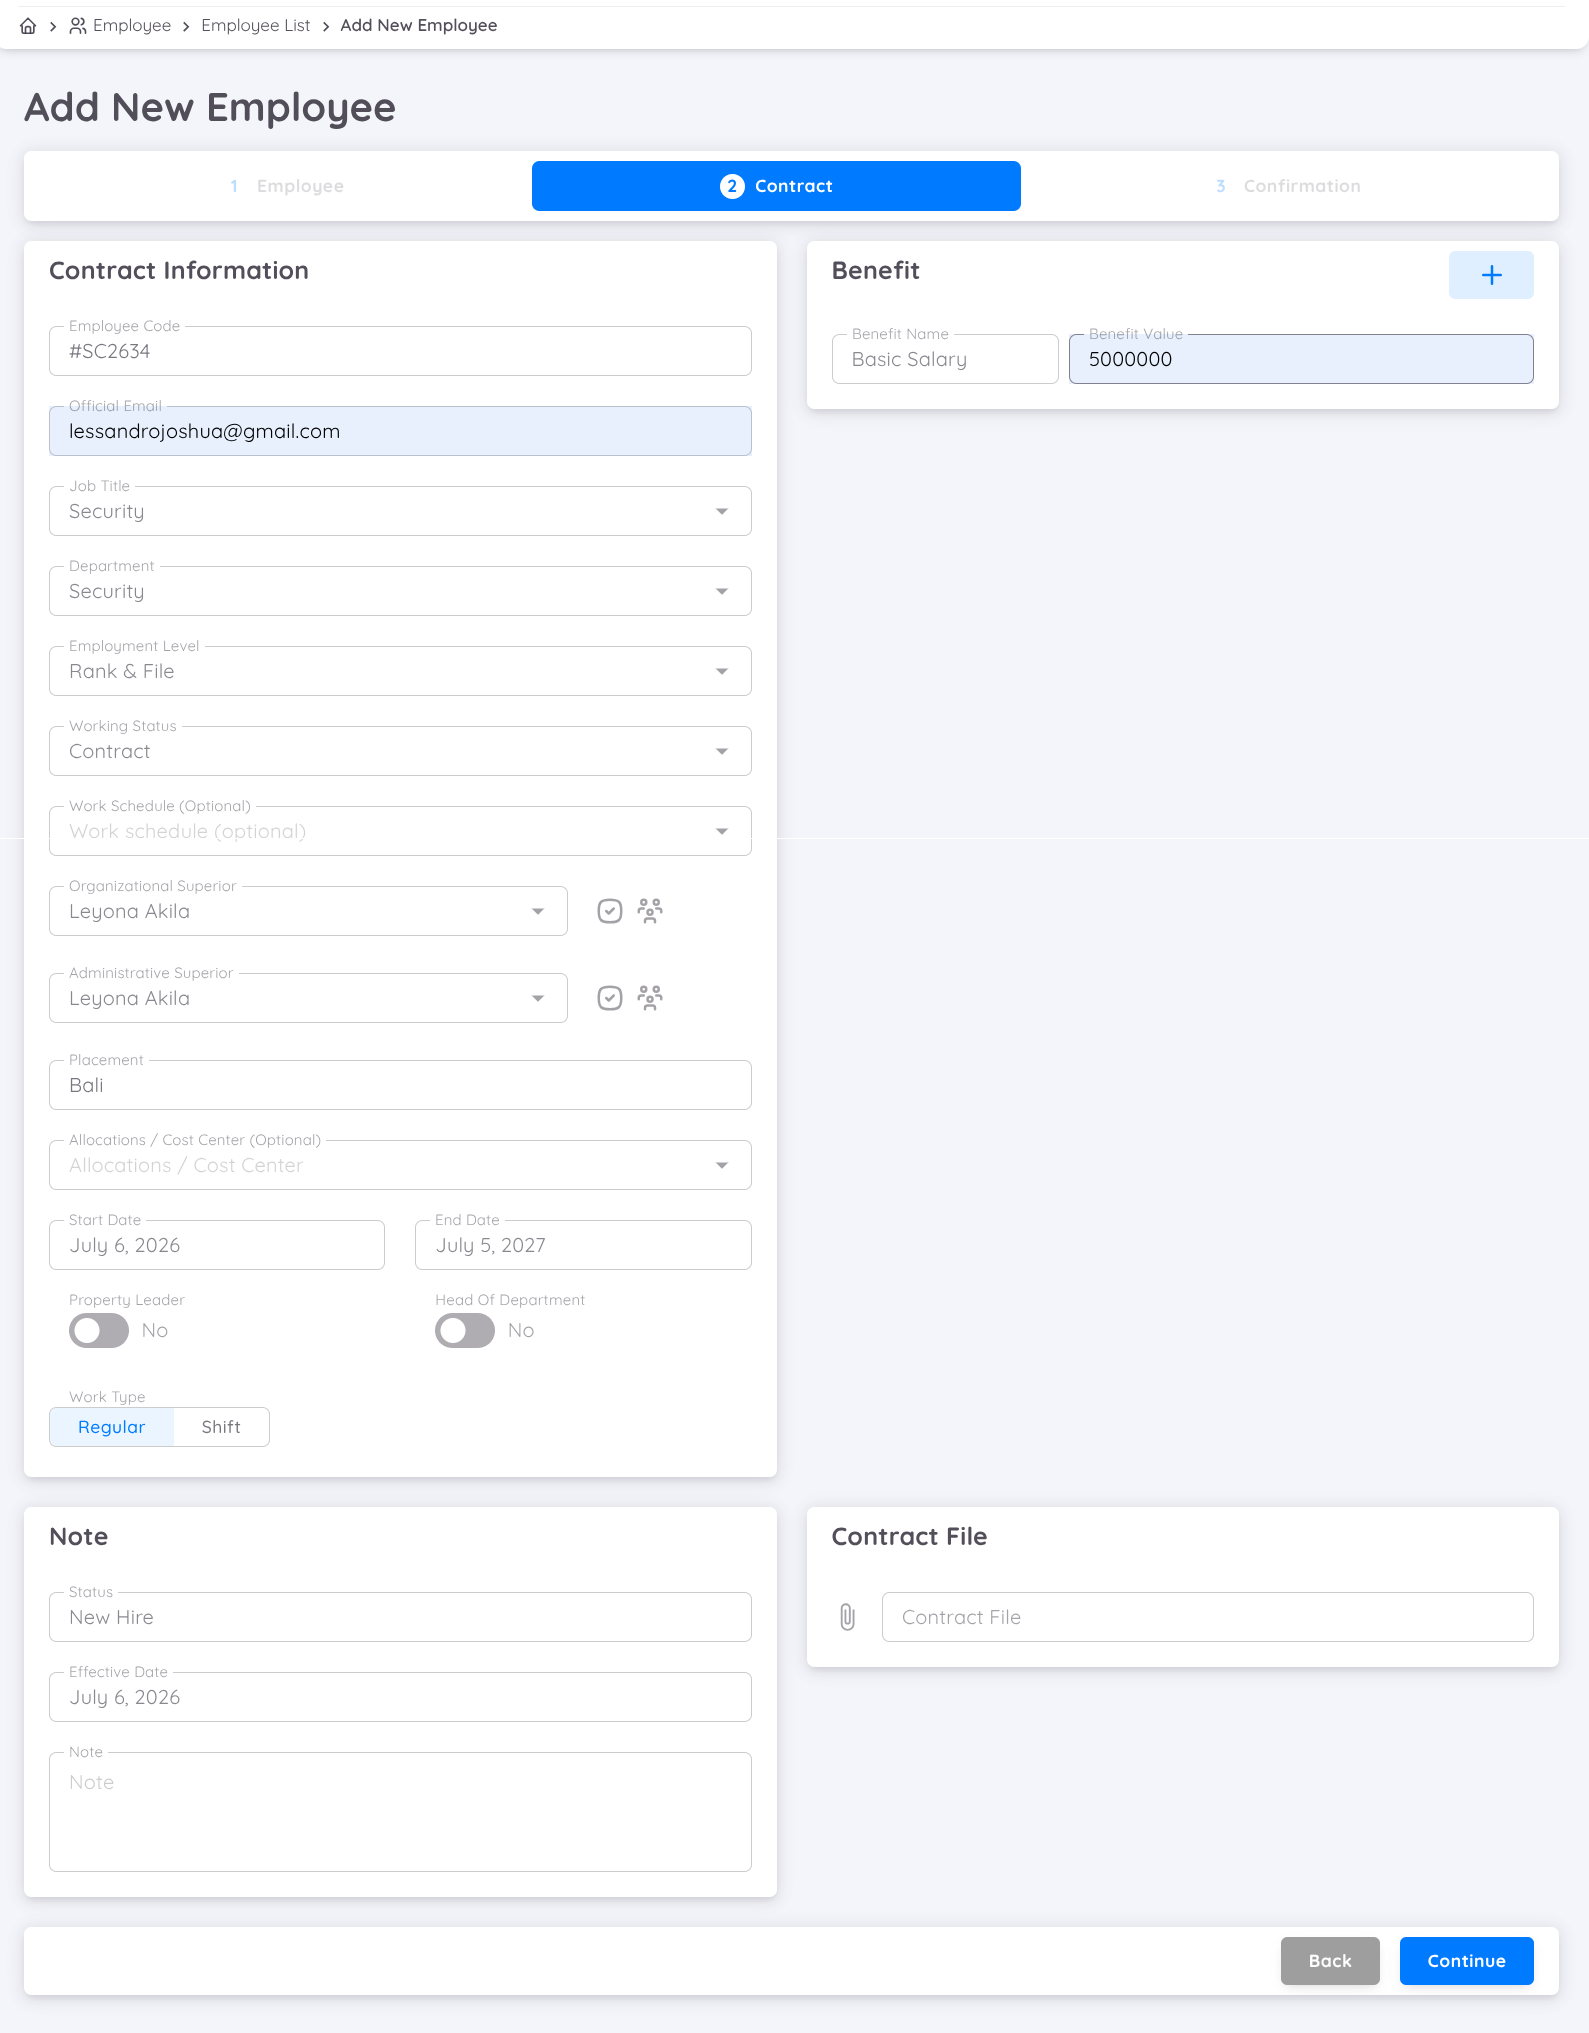
In the Contract section, complete all employee contract information according to the applicable company policies.
Ensure that all information on the Contract page is completed correctly according to the following guidelines.
| Field | Description |
|---|---|
| Employee ID | Required. The Employee ID must be unique and cannot be used by another employee. |
| Official Email | If the employee does not yet have a company email address, a personal email address may be used temporarily. |
| Job Title | Select the employee's job title. If the required job title is not available, please contact the EMS Team to have it added. |
| Department | Select the employee's department. If the department is not available, please contact the EMS Team. |
| Employment Level | Select the employee's employment level. If it is not available in the system, please contact the EMS Team. |
| Working Status | Specify the employee's working status, such as Permanent, Contract, Daily Worker, or another applicable status. |
| Work Schedule | Optional. Used when the employee is assigned to a single work schedule. Ensure that the Work Schedule has been configured in Attendance Setup. |
| Organization Superior | Select the employee's Head of Department (HOD). |
| Administrative Superior | Select the employee's direct supervisor, such as a Supervisor. If no Supervisor is available, Head of Department (HOD) may be selected. |
| Placement | Optional. Specifies the employee's work location or placement. |
| Allocation Center | Used when the organization allocates budgets based on the employee's Division or Department. Ensure that the Allocation Center has been configured beforehand. |
| Start Date | The contract start date. |
| End Date | The contract end date. |
| Property Leader | Enable this option if the employee is a General Manager or Property Leader. |
| Head of Department | Enable this option if the employee is a Head of Department (HOD). |
| Work Type | Determines the employee's work pattern, either Regular Employee or Shifting Employee. |
| Status | For new employees, the status is automatically set to New Hire. |
| Join Date | The employee's first working day. This is generally the same as the contract Start Date. |
| Effective Date | The effective date on which the employee begins onboarding or officially starts working. |
| Benefit | Required. Specify the employee's Basic Salary according to the employment type. For Daily Workers, enter the Basic Daily Rate. For Monthly Employees, enter the Monthly Basic Salary. If additional benefits, such as FPSC, apply, add them in the Benefit section. 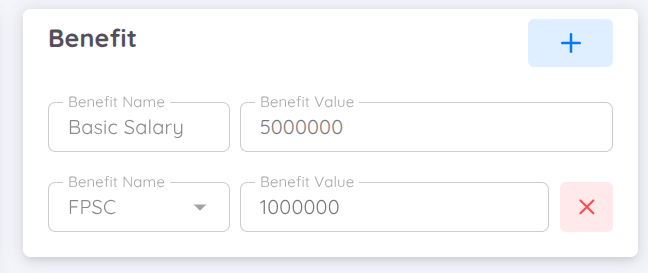 |
If required for reference or record-keeping purposes, the original employment contract can be uploaded through the Document field.
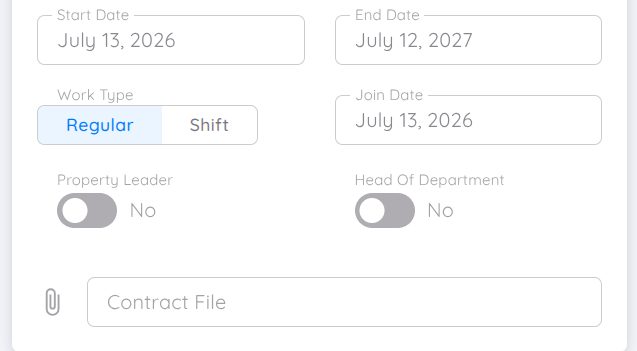
After all contract information has been completed and the attached document has been verified, click Continue to proceed to the next stage.
Confirmation Tab
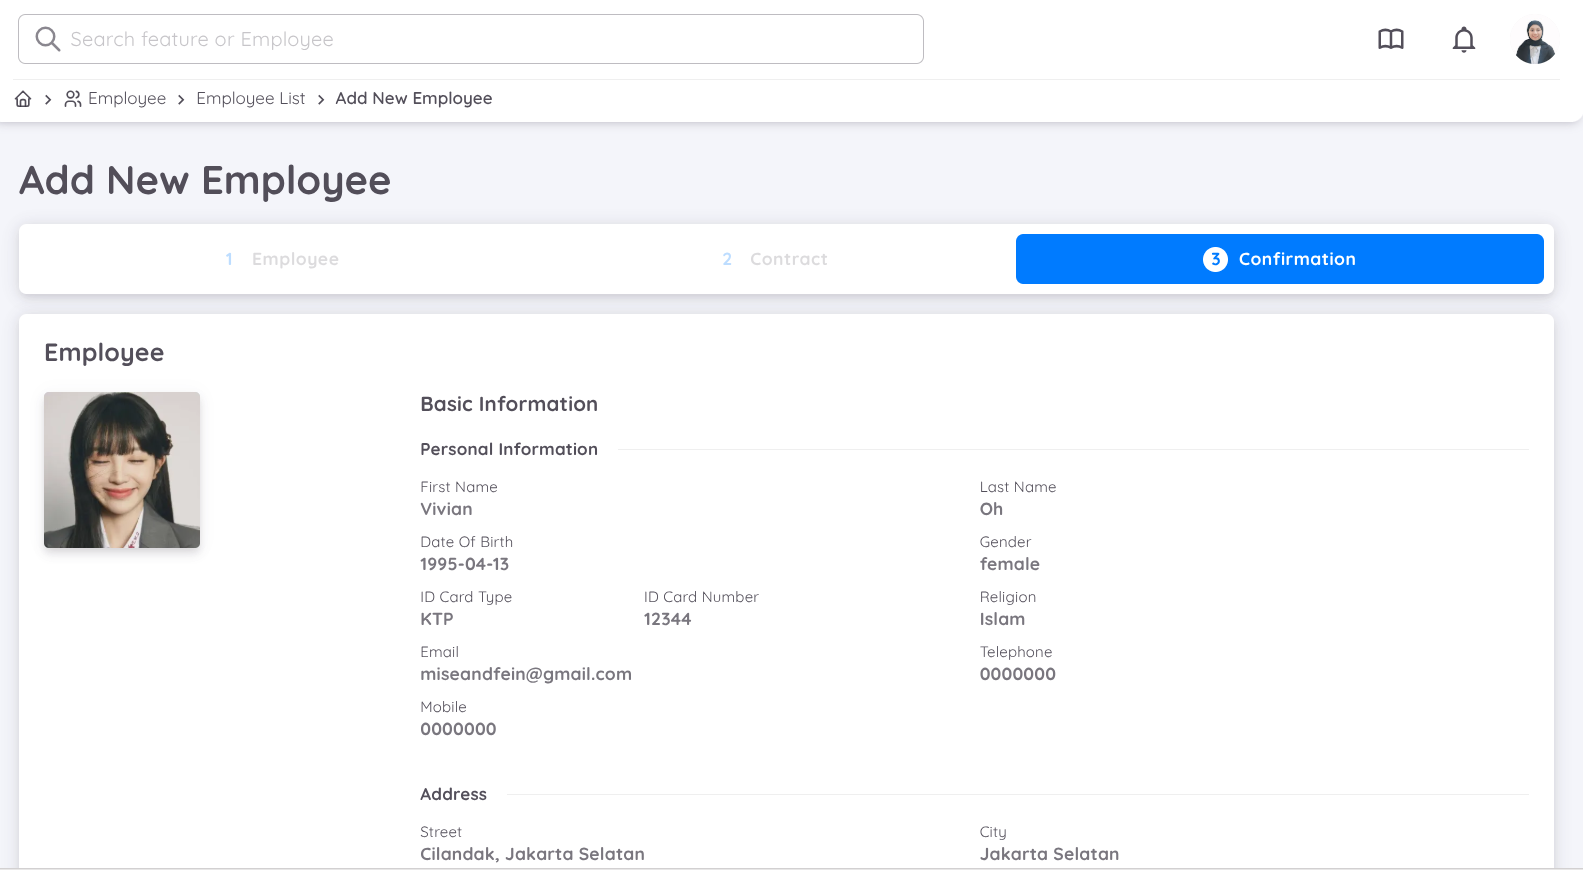
At this stage, the system displays a summary of all employee information and contract details that have been entered. Review all information carefully to ensure its accuracy before saving the data.
Three actions are available at the bottom of the page.
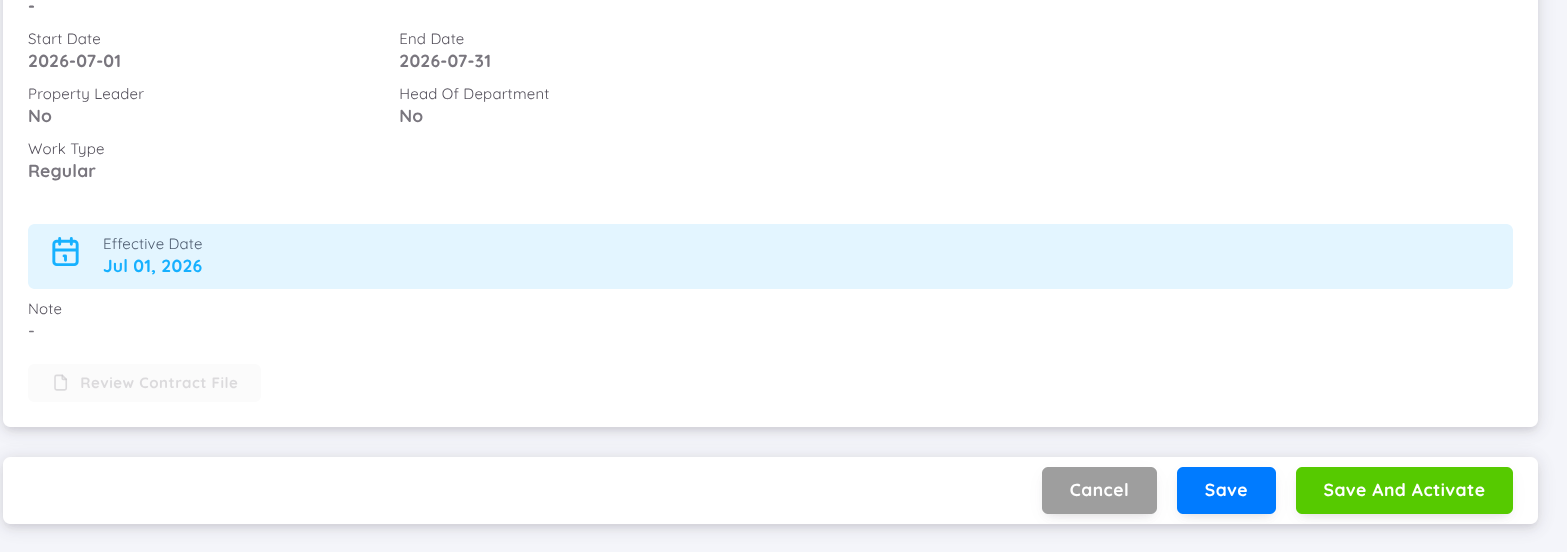
Cancel
Cancels the employee creation process and returns to the Employee and Contract tabs, allowing the information to be reviewed or updated before it is saved.
Save
Saves the employee data and contract as a Draft.
⚠️ It is recommended to use the Save button when the Effective Date is in the future (future date). Saving the contract as a Draft allows it to be reviewed, updated, or activated on the intended effective date.
After the contract is successfully saved, it will automatically appear in:
Employee → Employee Milestone → Onboarding
where the onboarding process or contract activation can be completed at the appropriate time.
Save and Activate
Use Save and Activate when the Effective Date is today or a back date, allowing the contract to be activated immediately.
Saves the employee data and activates the employment contract at the same time.
After the activation is successful:
- The contract status will change to Active.
- The employee will automatically appear in Employee → List → Current.
- The employee can immediately begin using the system based on the assigned access rights and configured settings.
Method 2: Add an Employee Through the Recruitment Process
In addition to Employee List - Current, new employees can also be added through the Recruitment process. This method is used when the company manages the candidate selection process using the Recruitment module until the candidate is marked as Hired, followed by the creation of an employment contract.
To add an employee through the recruitment process, follow these steps:
Open the following menu:
Recruitment → Vacancy
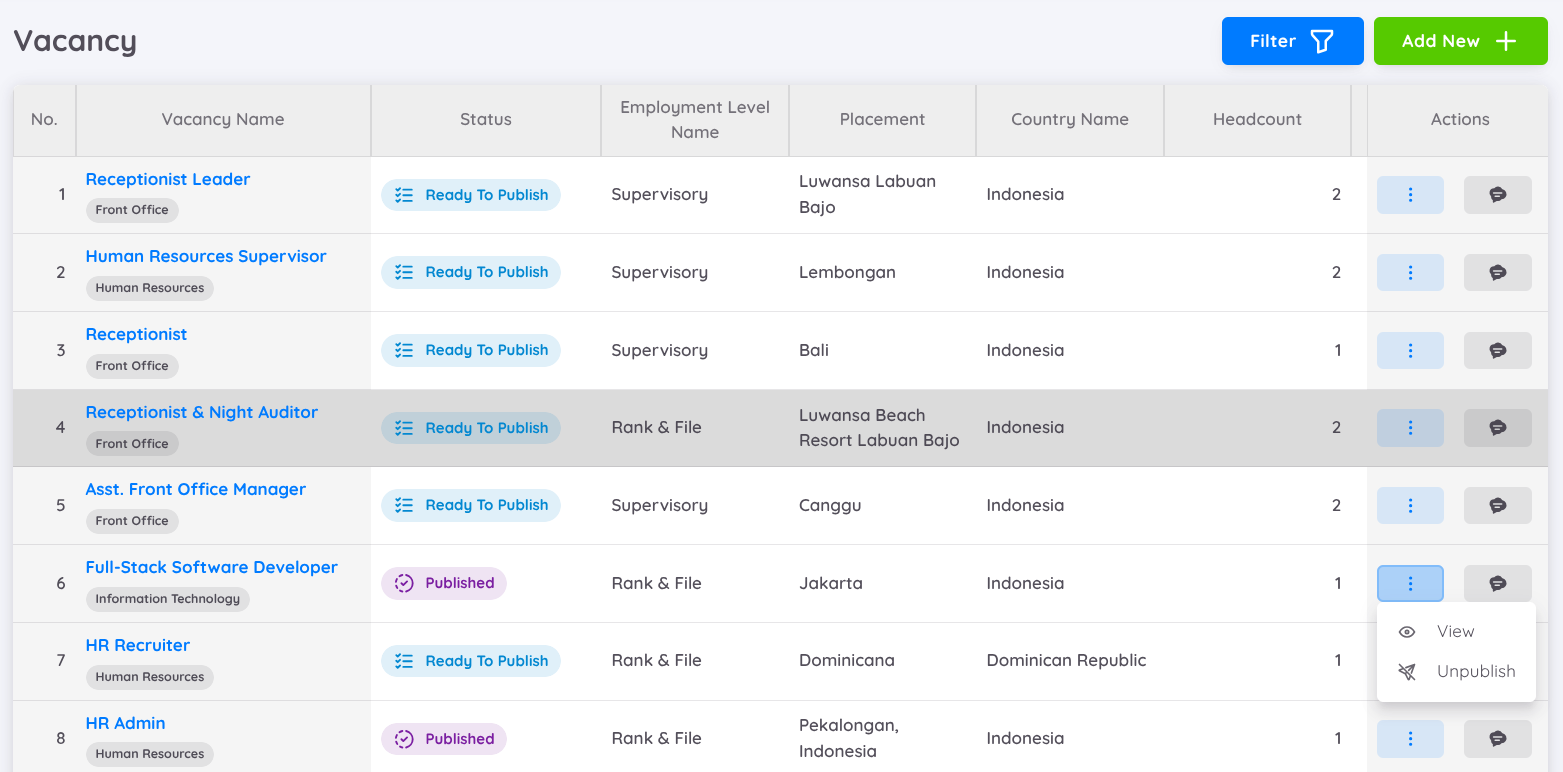
On this page, the system displays a list of all available Vacancies.
To view the details of a vacancy, click the three-dot (⋮) icon in the Action column, then select View, or click the Vacancy Name to open the vacancy details directly.
View Candidate List
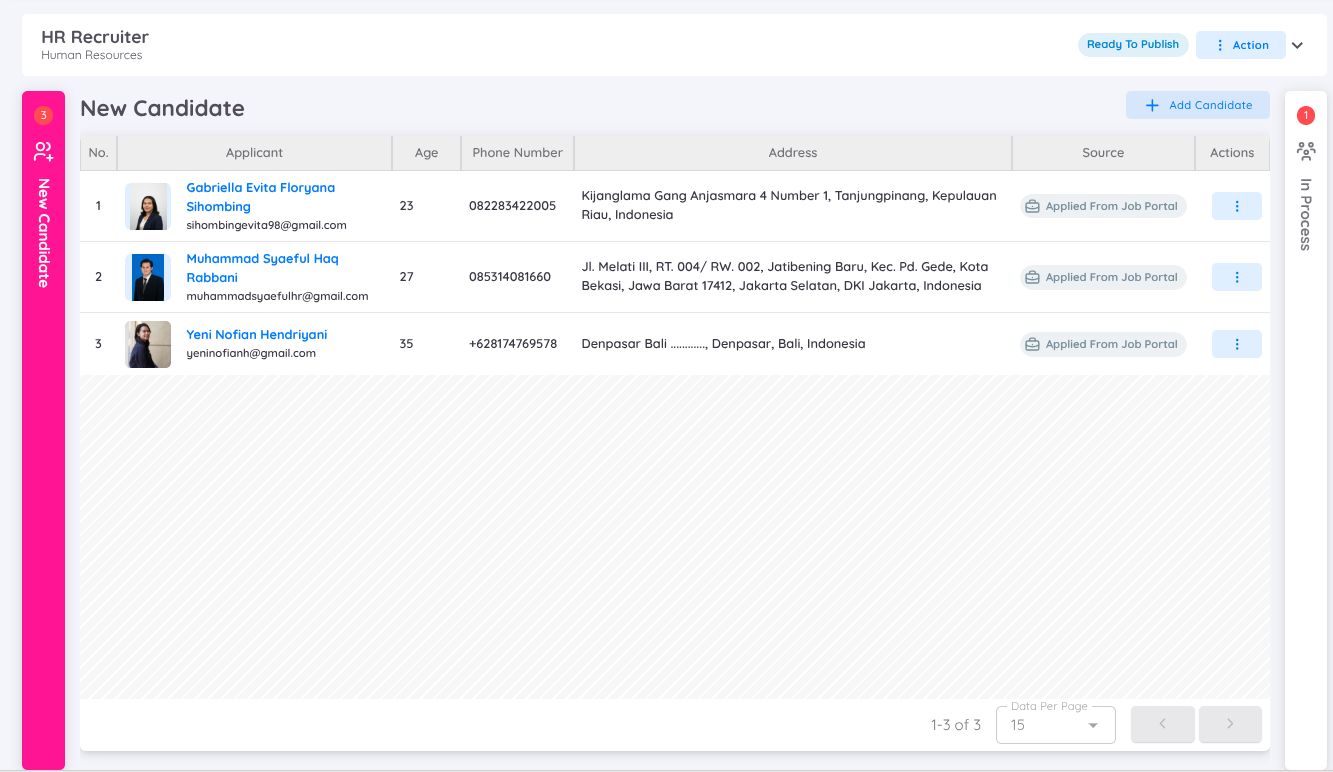
On the Vacancy page, all candidates (Applicants) who have applied for the selected vacancy are displayed.
To view the candidate list, click the New Candidate button.
The system will display candidates from:
- Applicants who applied through the Sentec EMS Job Portal.
- Candidates added manually by the user (Internal Candidates).
From this page, candidate information can be reviewed and the recruitment process can continue through the applicable recruitment stages.
Add an Internal Candidate (Optional)

If the recruitment process is conducted internally, a new candidate can be added by clicking the Add Candidate button.
Enter the candidate's email address.
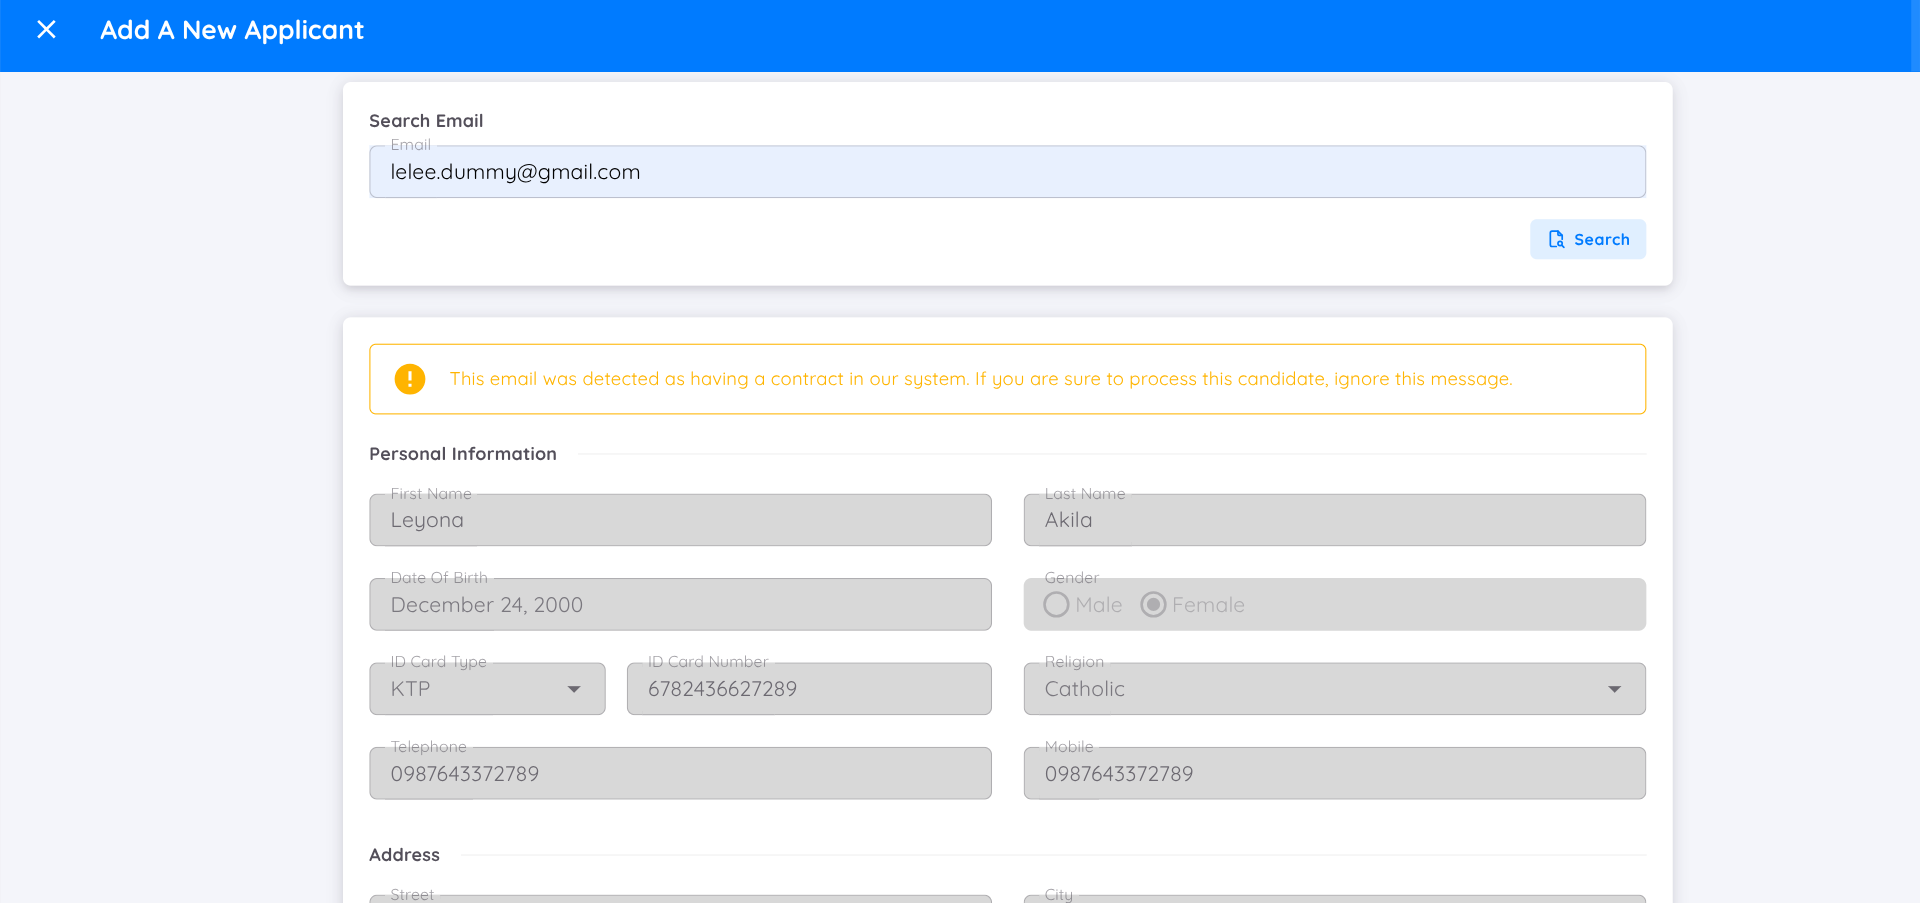
The system will validate the entered email address.
- If the email address is already registered in Sentec EMS, the system will automatically retrieve the candidate's Basic Information from the existing records.
- If the email address has not been registered, all candidate information must be entered manually.
Process a Candidate
To move a candidate to the next recruitment stage, click the three-dot (⋮) icon on the candidate row, then select Process.
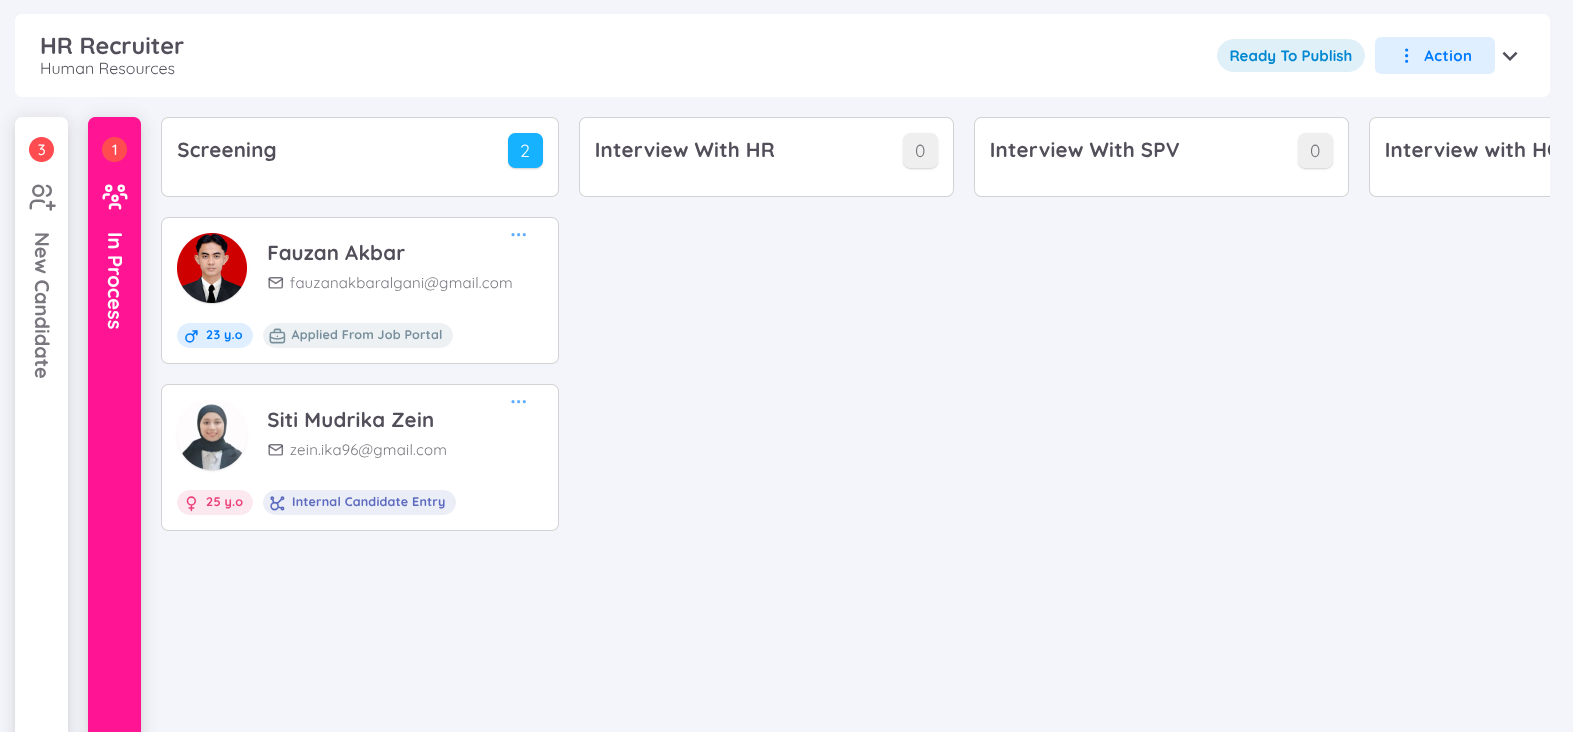
The candidate will be moved to the appropriate recruitment board based on the current recruitment stage, such as:
- Shortlisting
- Interview
- Final Review
At each recruitment stage, the following actions are available:
- Add notes or comments for the candidate.
- Assign Reviewers and schedule Interviews.
- Move the candidate to the next recruitment stage based on the evaluation results.
Create Draft Contract
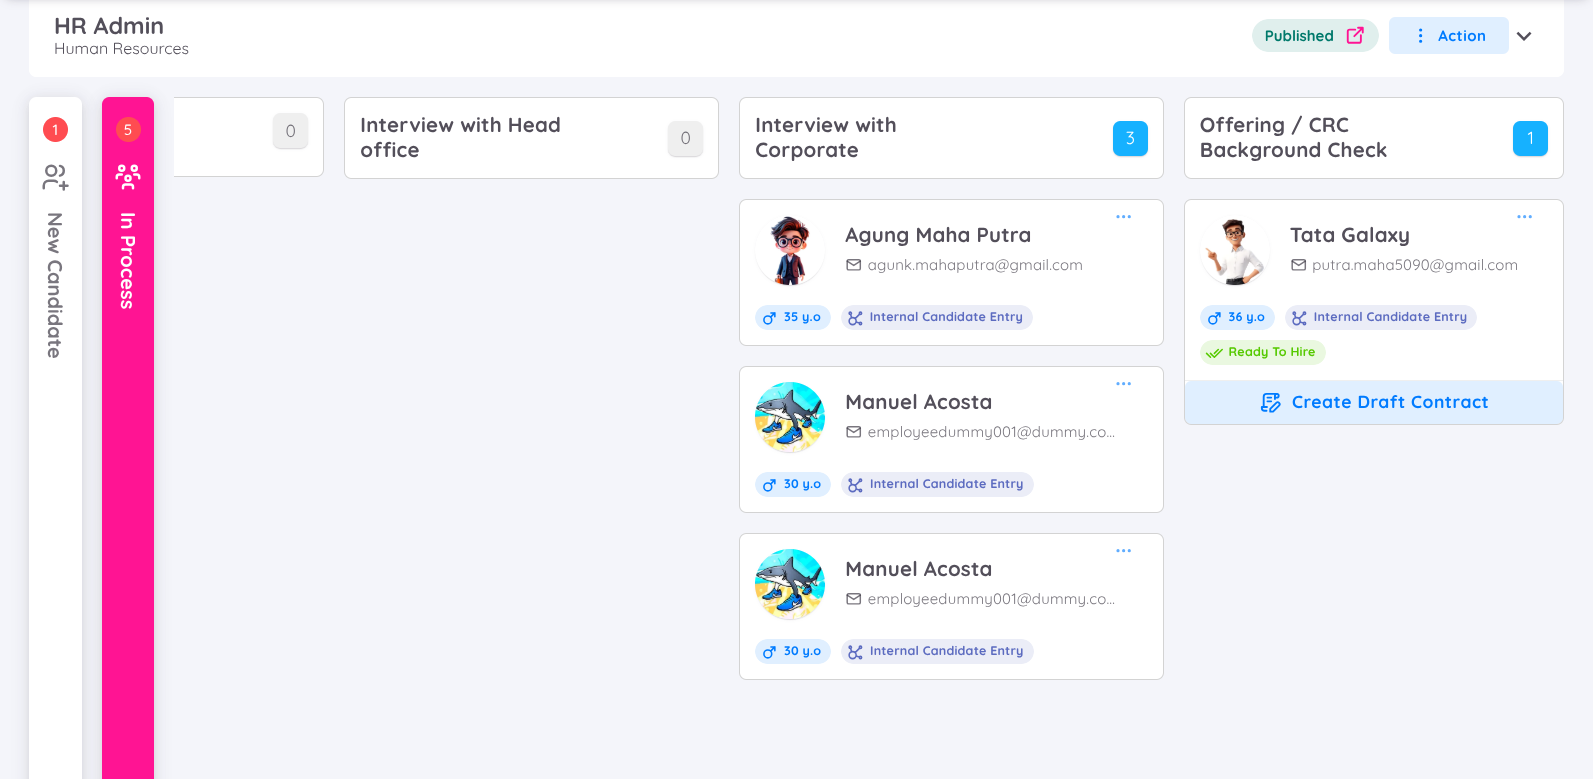
Once the candidate has successfully completed all recruitment stages and has been marked as Hired, proceed by creating a Draft Contract.
There are two available scenarios:
- Without Approval
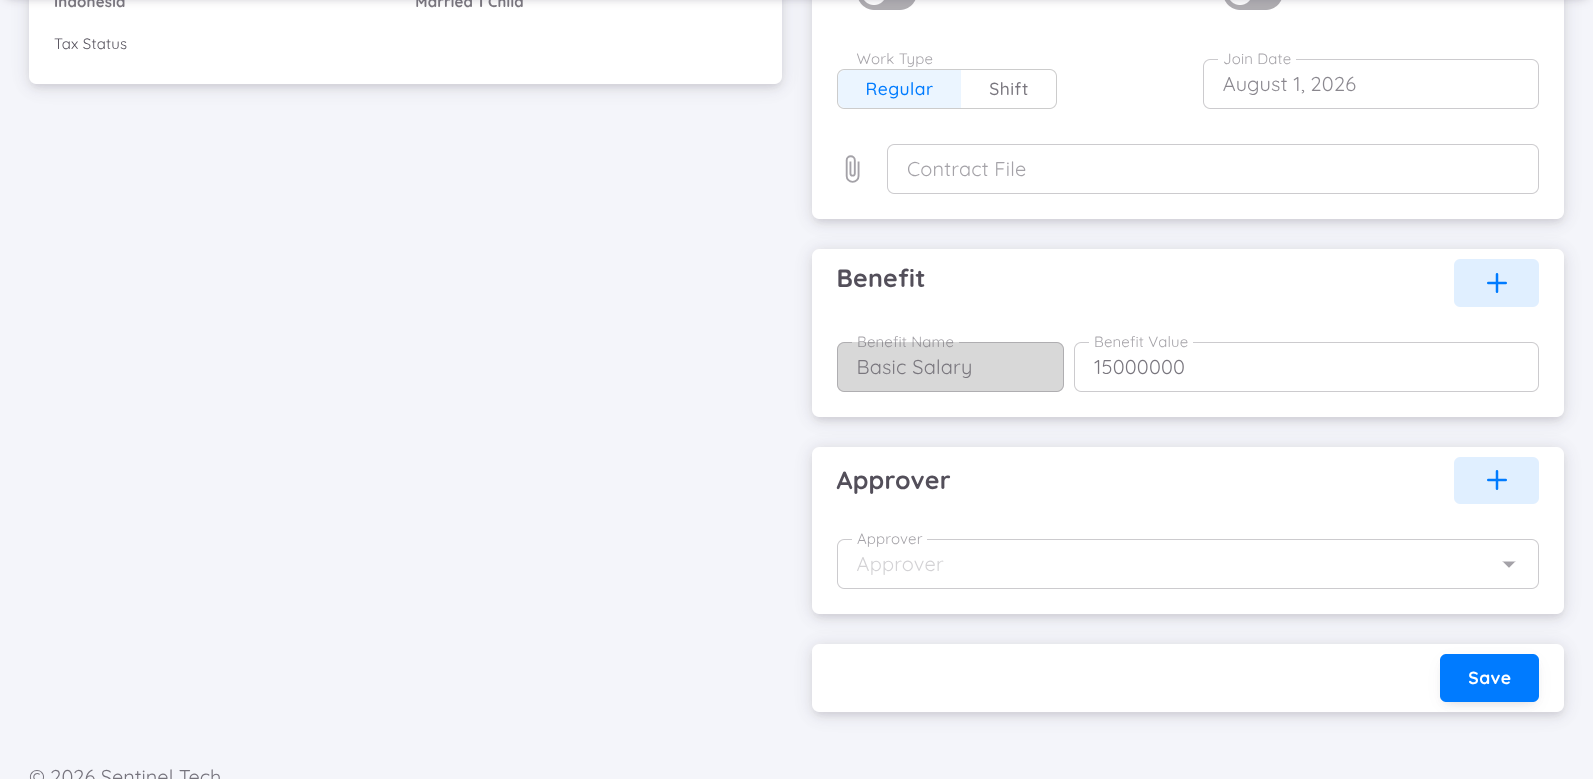
If your organization does not require a contract approval process, click Save to create the draft contract immediately.
After the draft is saved successfully, it will automatically appear under:
Employee → Contract → Draft
- With Approval
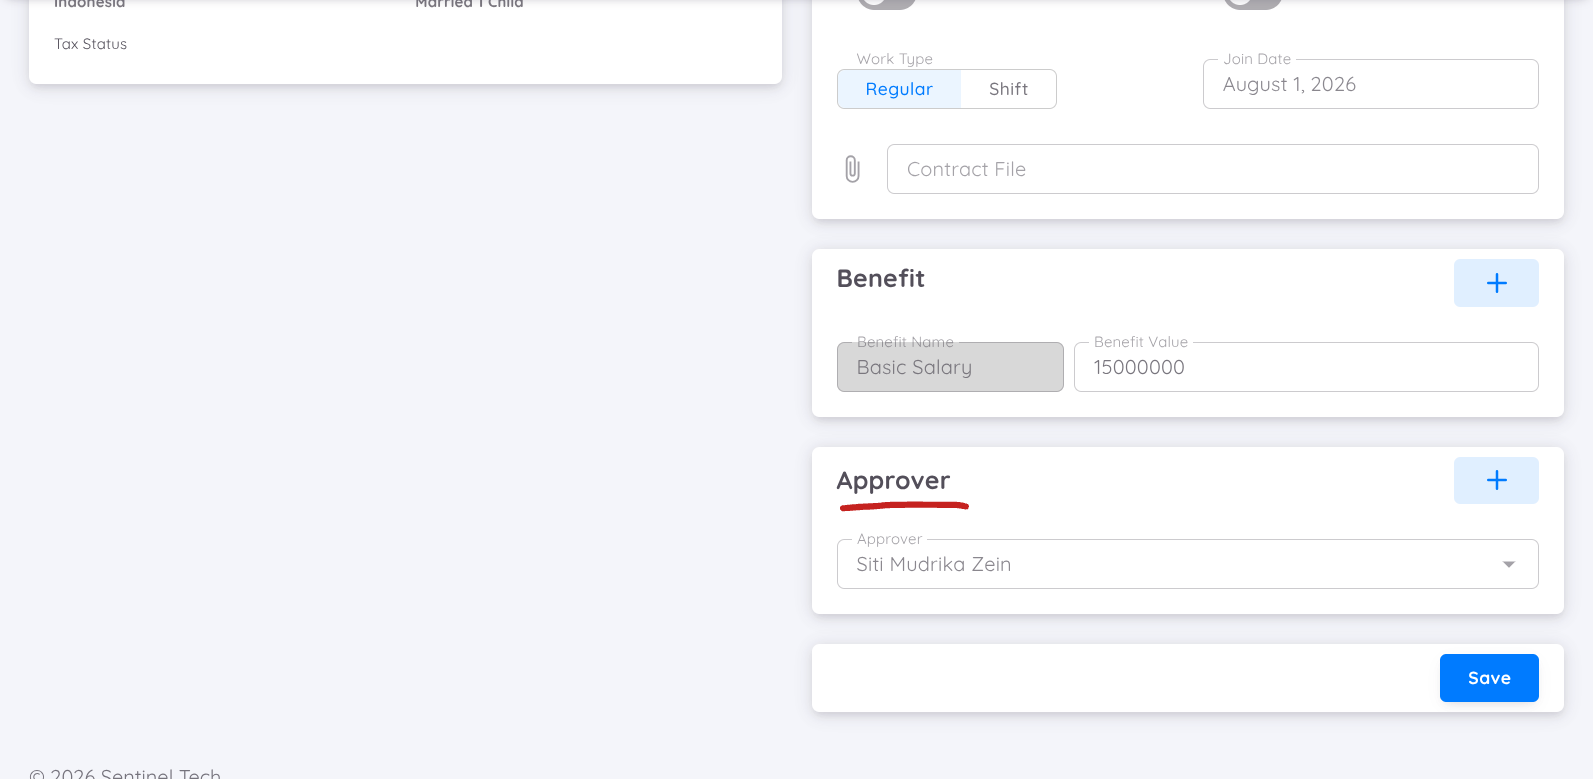
If your organization uses an Approval Workflow before a contract can be activated, assign the Approver(s) who will review and approve the contract.
If required, multiple Approvers can be assigned based on the organization's approval workflow.
Once all Approvers have been assigned, click Save.
The draft contract will be saved under:
Employee → Contract → Draft
⚠️ Contracts that require approval can only be activated after all approval steps have been completed according to the configured approval workflow.
Step 2: Activate the Employee Contract
After the employee data and contract have been created successfully, there are two methods available to activate the employee contract, depending on how the contract was created.
- Through Employee Milestone, for contracts created via Employee List - Current and saved as Draft.
- Through Contract Draft, for contracts created through the Recruitment process.
Method 1: Activate the Employee Contract Through Employee Milestone
⚠️ This method is only applicable if the contract was created using Method 1: Add an Employee Through Employee List - Current and the Save button was selected, causing the contract to be saved as a Draft.
Open the following menu:
Employee → Employee Milestone
From the Employee Milestone page, select the Onboarding tab.
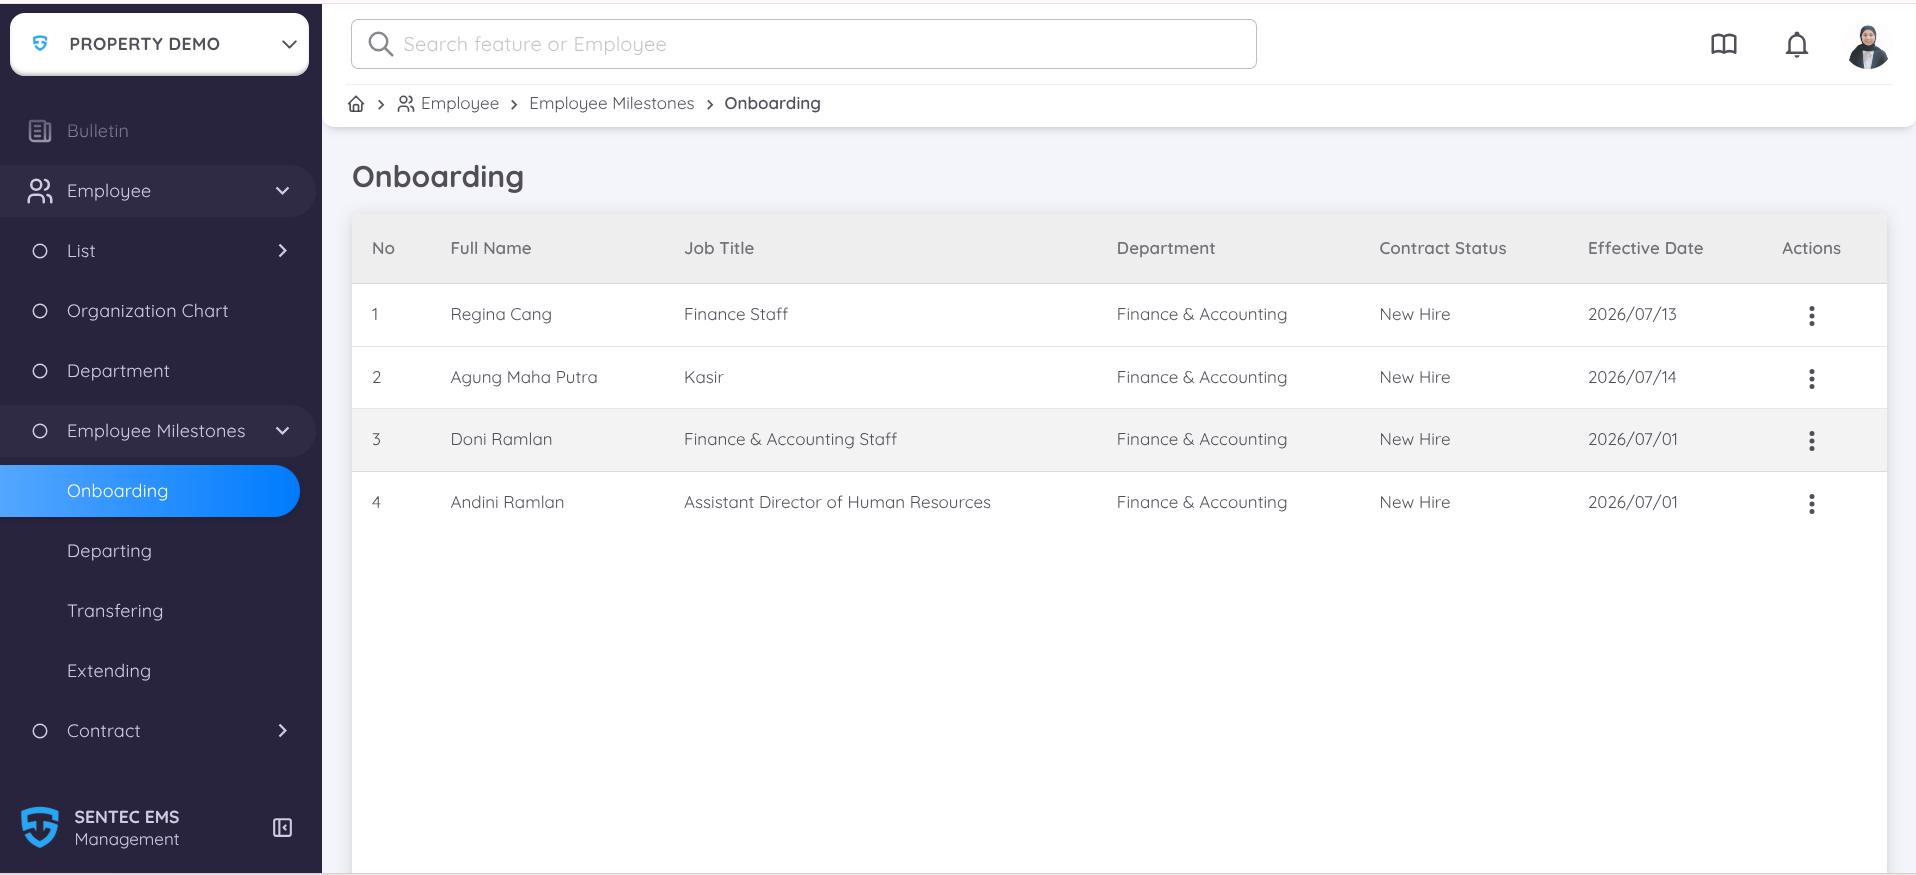
The Onboarding page displays a list of employees who were added manually through Employee → List → Current and whose contracts are still in Draft status.
To activate a contract:
- Click the three-dot (⋮) icon in the Action column.
- Select Activate.
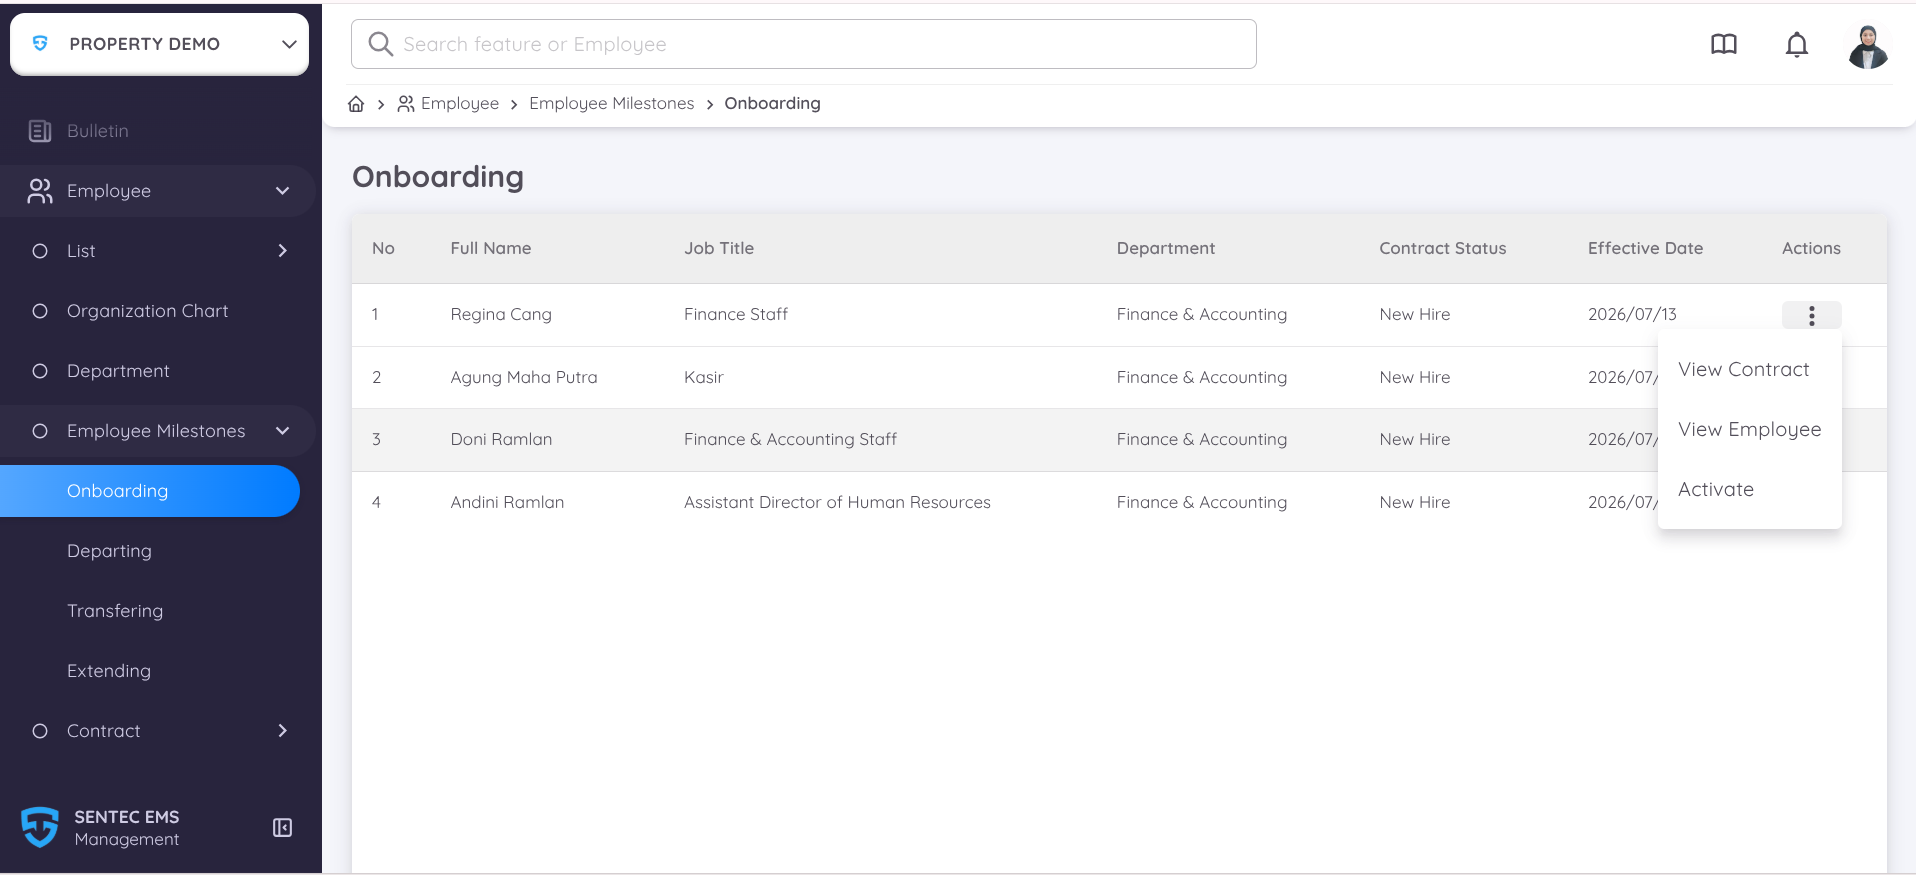
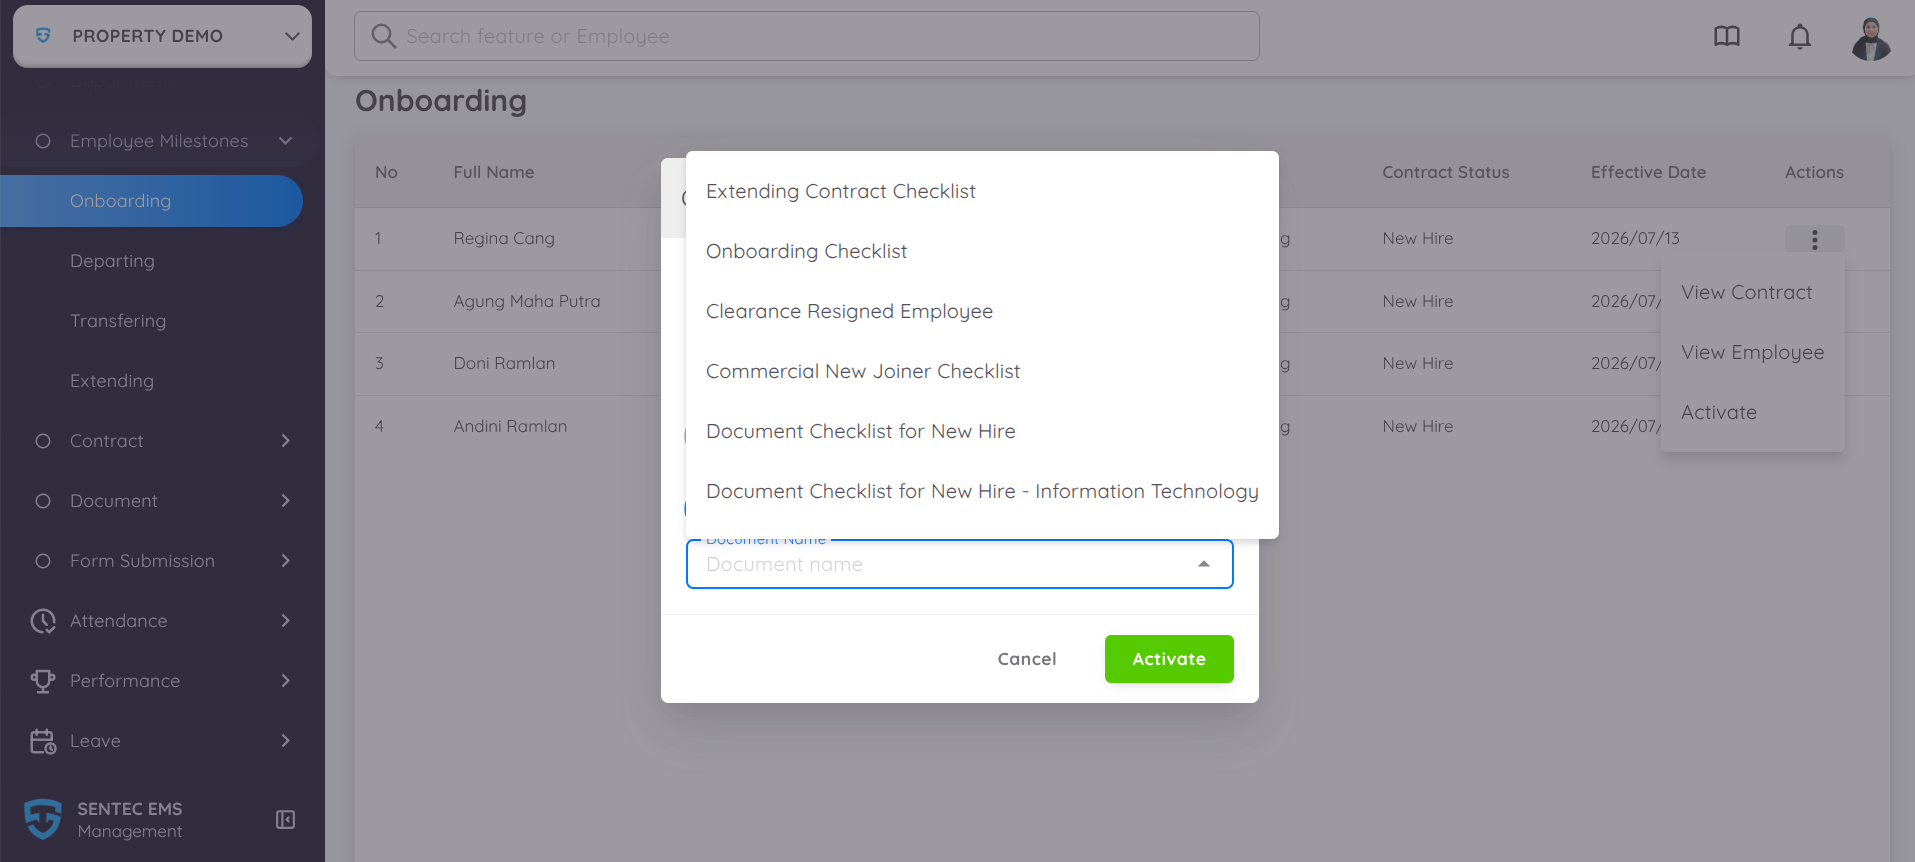
After selecting Activate, the system will display the Activation Confirmation pop-up.
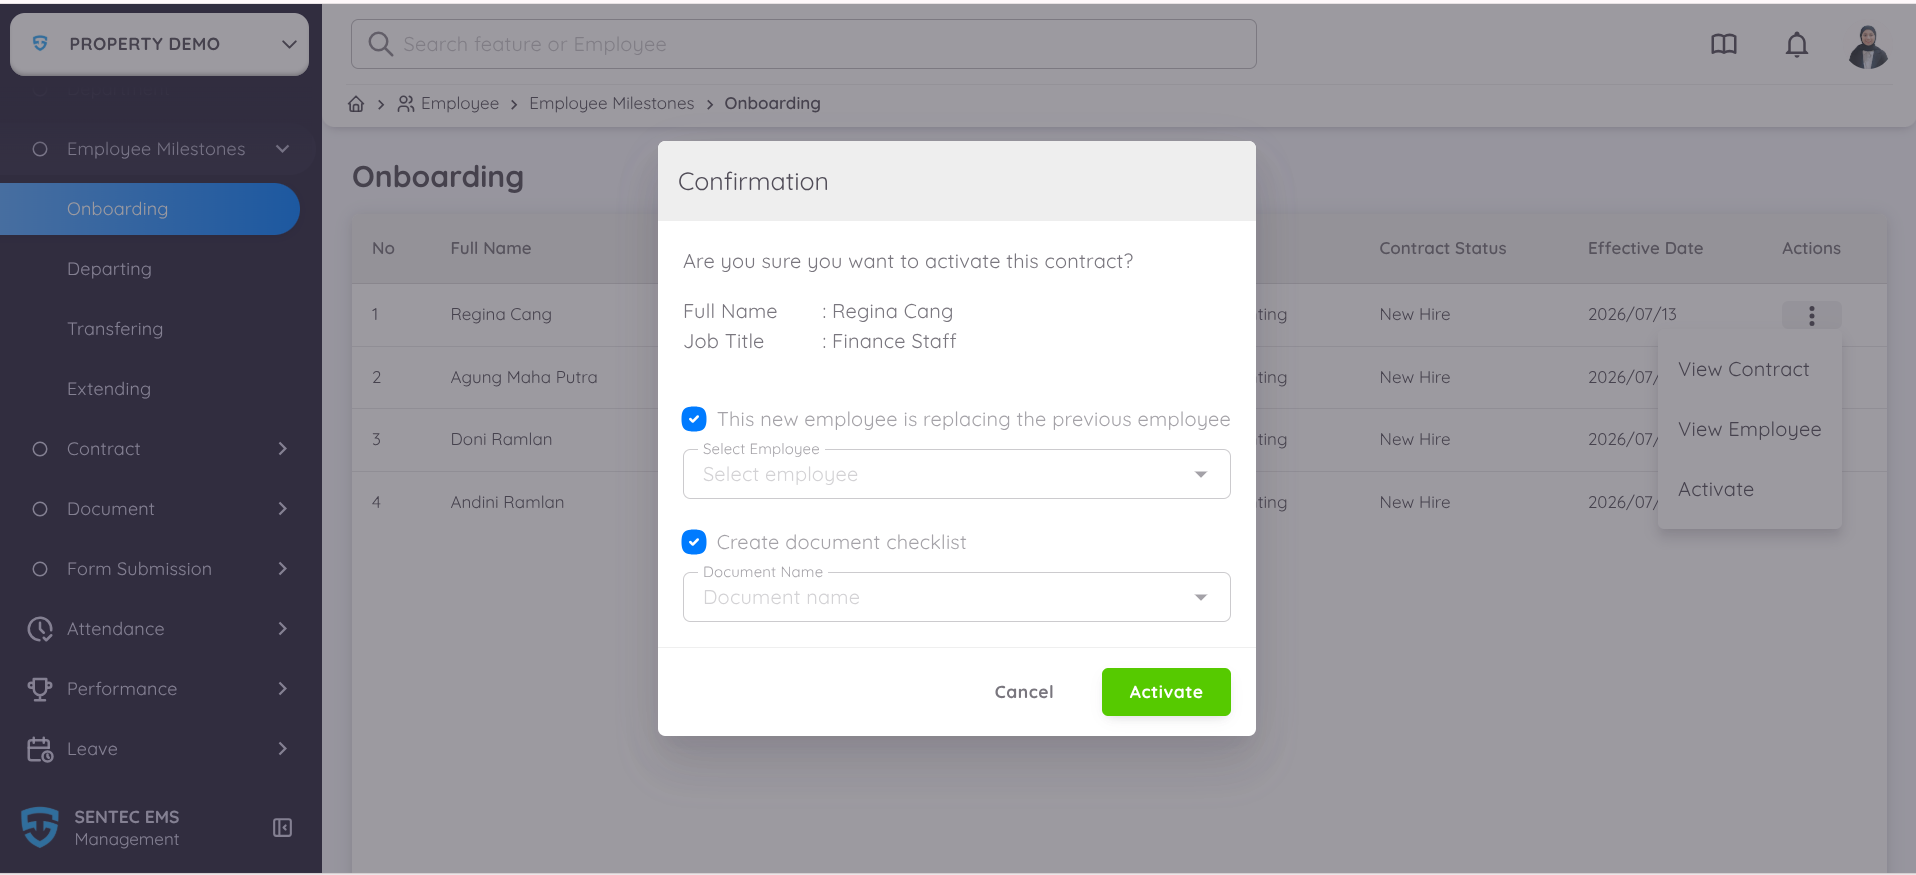
The pop-up contains two optional settings that can be enabled as needed.
| Option | Description |
|---|---|
| This new employee is replacing the previous employee | Enable this option if the employee being activated is replacing a previous employee in the same position. |
| Create Document Checklist | Enable this option if the onboarding process requires a Document Checklist. Once enabled, a document checklist can be selected based on the contract status and the checklist templates configured in the system. |
The Document Checklist can be configured through Configuration → Property → Document before activating the contract.
The Document Checklist verification process can be completed in parallel after the contract has been activated. Therefore, the contract can still be activated even if the checklist verification has not yet been completed.
Once the activation process is successful:
- The contract status will change to Active.
- The employee will automatically appear under Employee → List → Current.
- The employee is officially activated in the system.
- If Document Checklist was selected during the activation process, clicking Activate will automatically redirect the user to the Document Checklist page to continue the onboarding process.
Method 2: Activate the Employee Contract Through Contract Draft
⚠️ This method is used if the contract was created through Method 2: Add an Employee Through the Recruitment Process.
To activate a contract created through the Recruitment process, open the following menu:
Employee → Contract → Draft
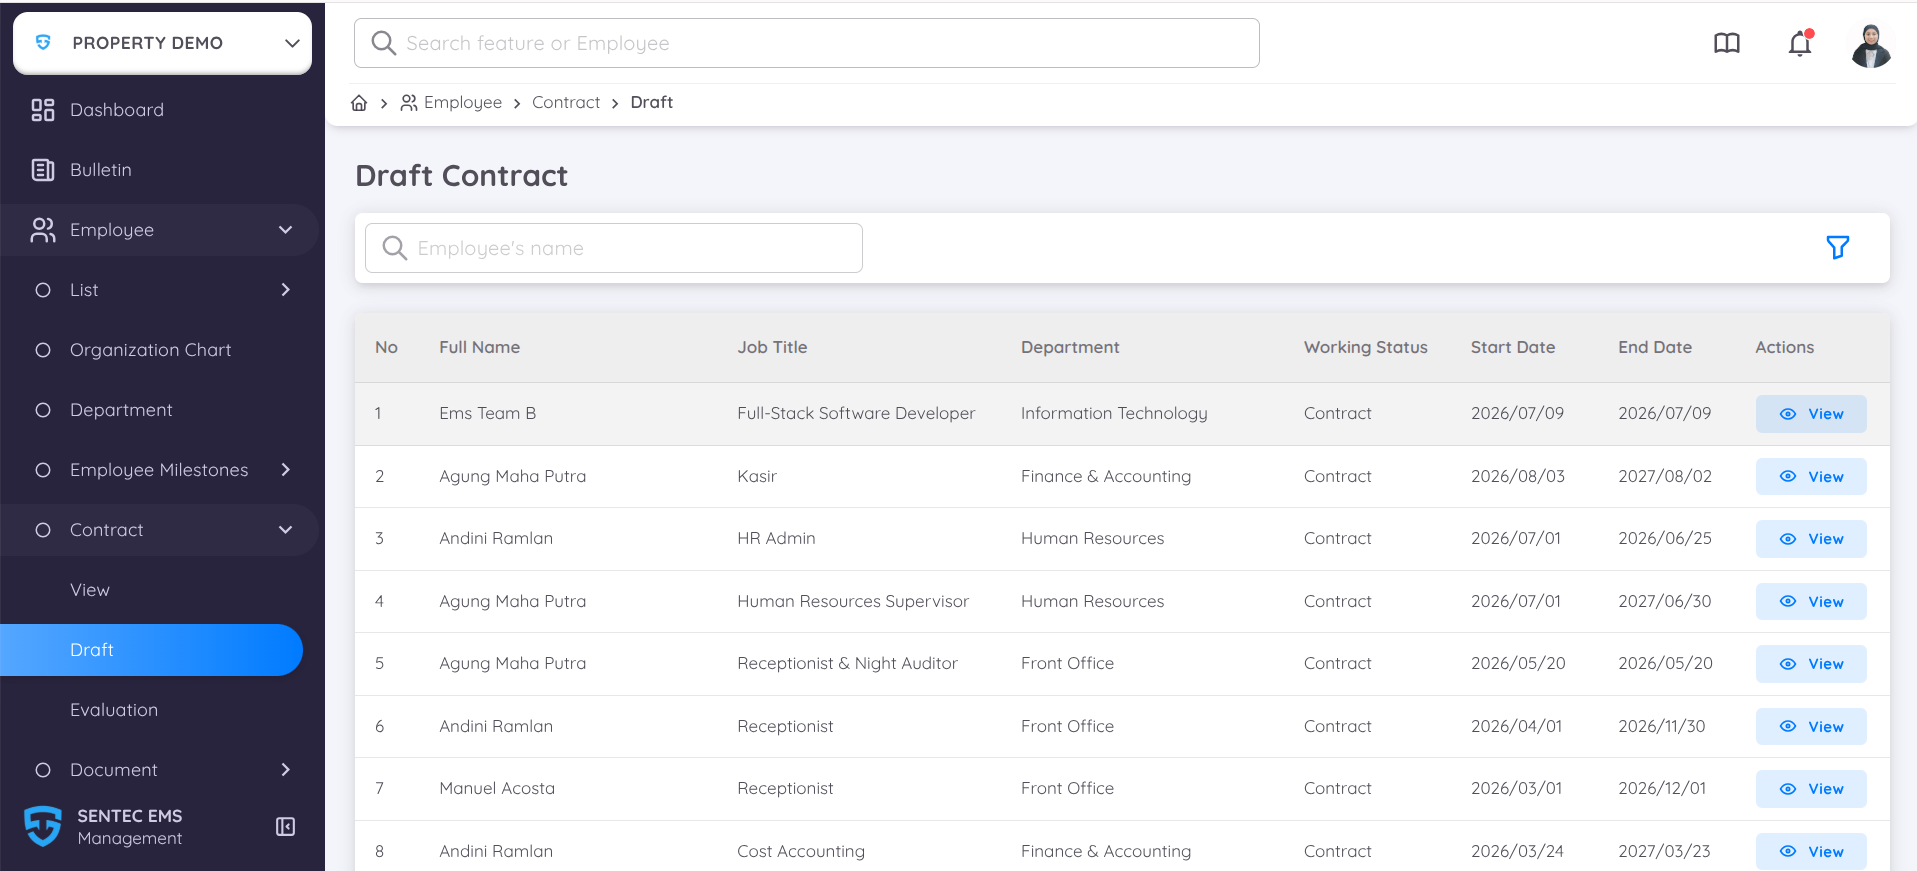
On the Contract Draft page, select the contract you want to activate, then click View to open the Contract Details page.
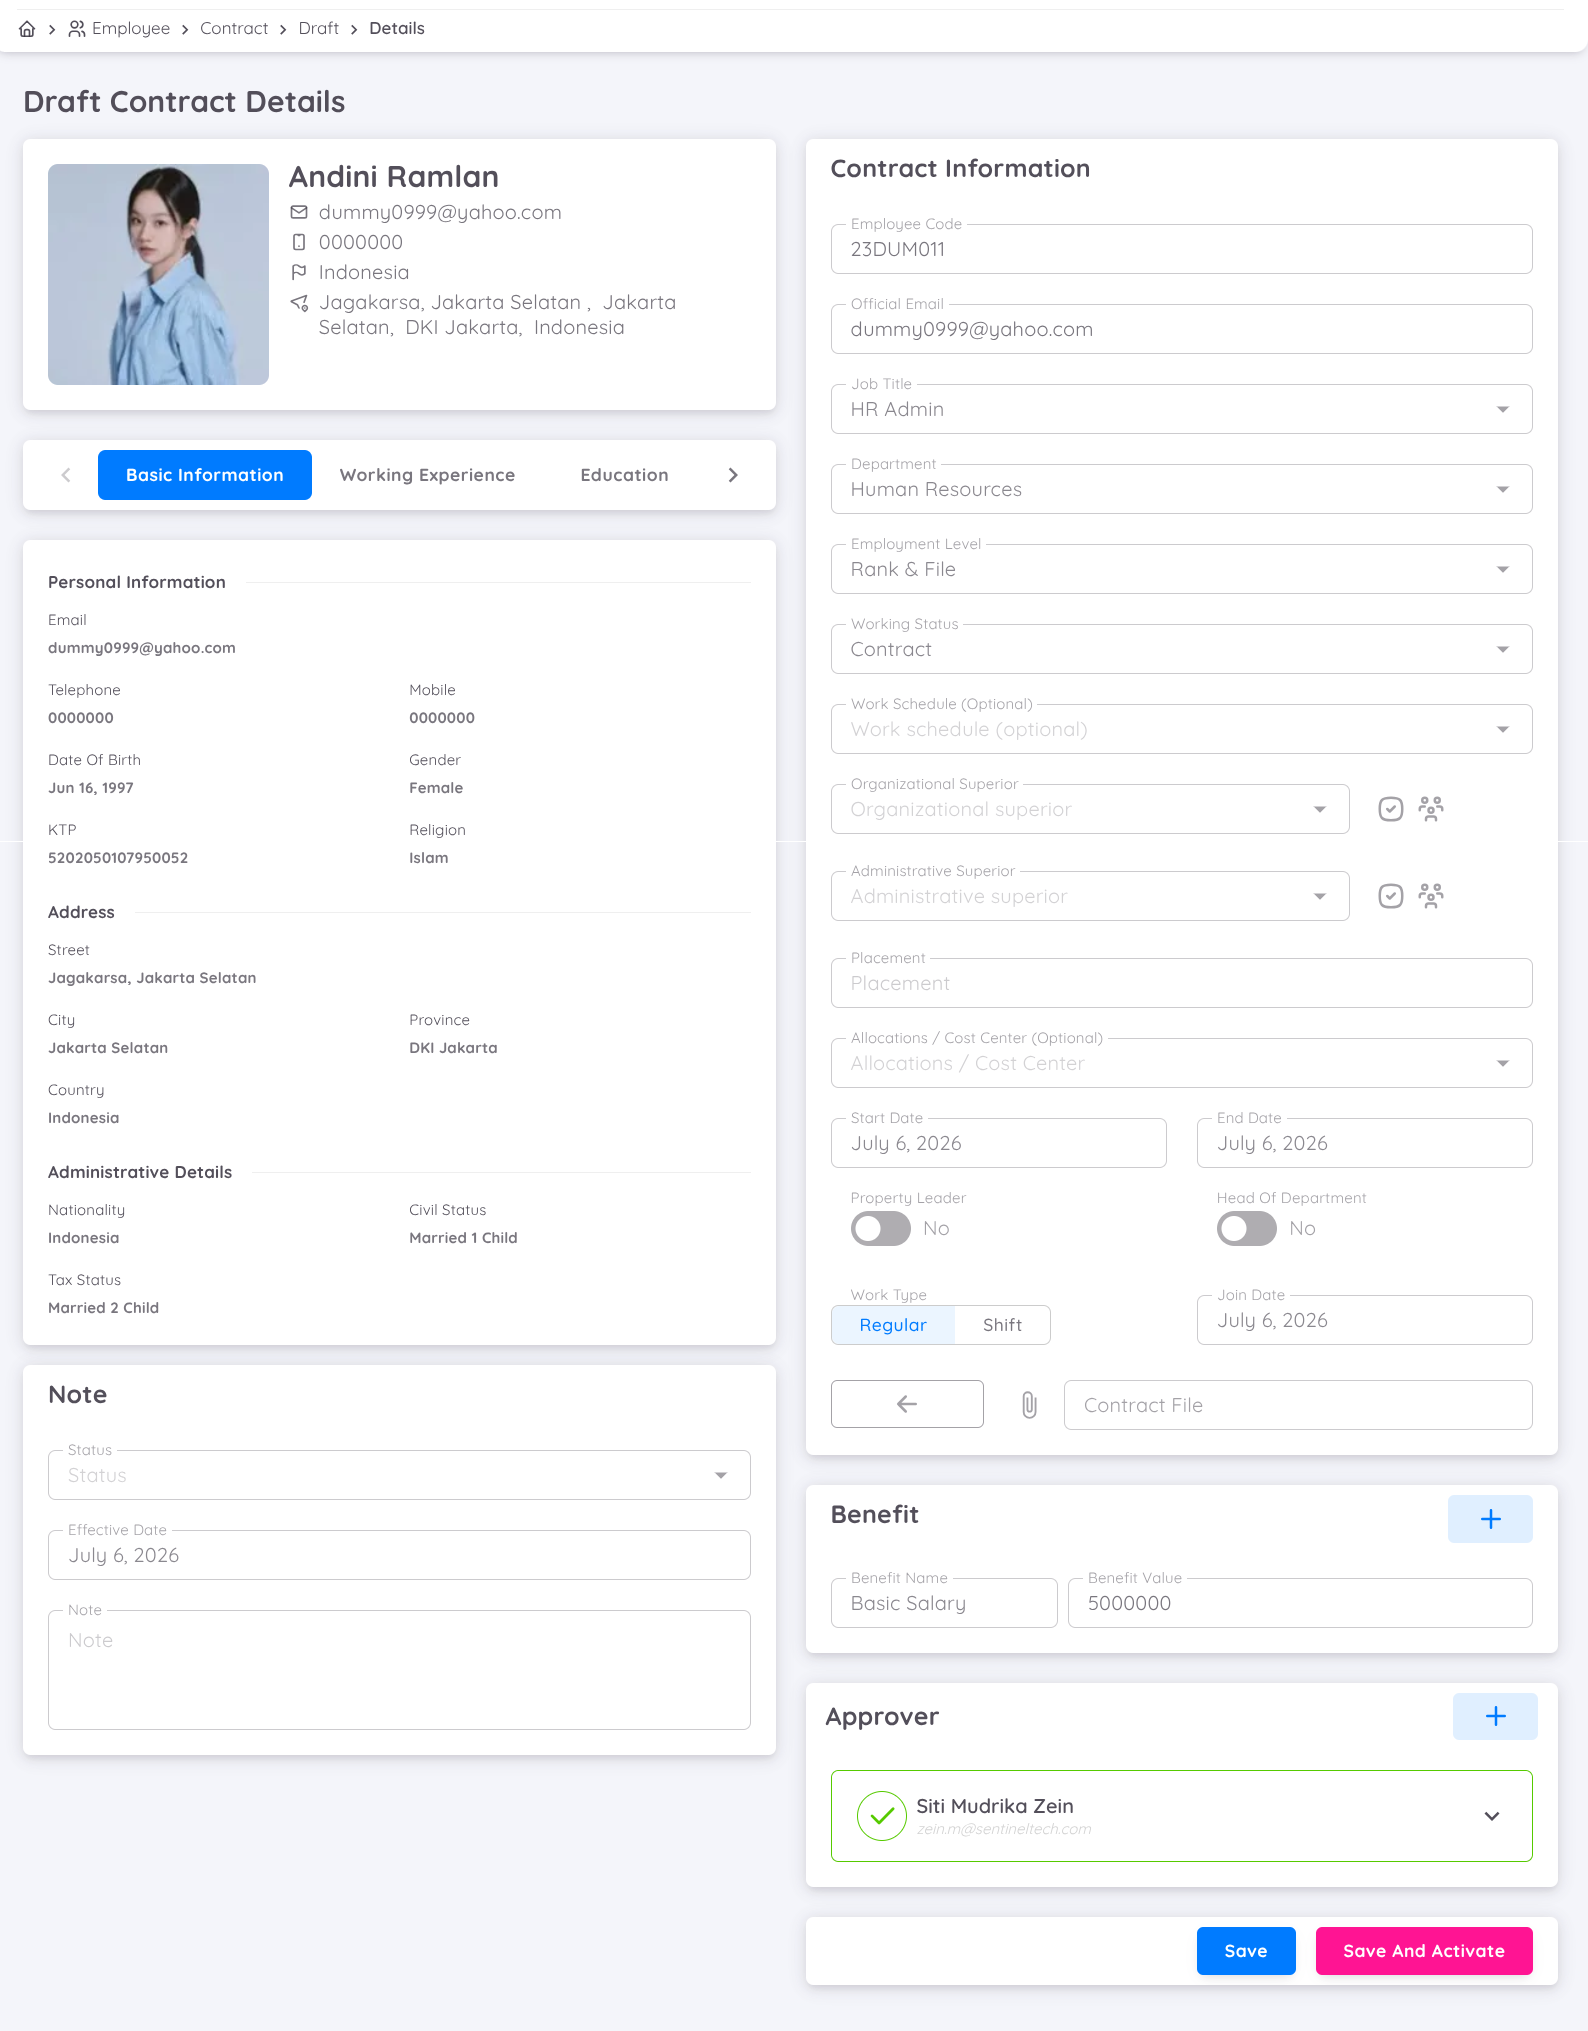
Scroll to the bottom of the page until you find the following action buttons:
- Save: Saves any changes made to the contract details while keeping the contract in Draft status.
- Save and Activate: Activates the contract. This button is only available after the entire Approval process has been completed.
After confirming that all contract information is correct, click Save and Activate to activate the contract.
Once the activation process is successful:
- The contract status will change to Active.
- The employee will automatically appear under Employee → List → Current.
- The employee is officially activated in the system and can proceed with the onboarding process and perform operational activities according to the assigned access rights.
Step 3: Process the Document Checklist
After the contract has been successfully activated, the onboarding process can continue by selecting and completing the Document Checklist, if this feature is used as part of the employee onboarding process.
Method 1: Select the Document Checklist During Contract Activation
⚠️ This method is available when the contract is activated through Method 1: Activate the Employee Contract Through Employee Milestone.
If the Document Checklist option is enabled during the contract activation process, the system will automatically display the Document Checklist page after the contract has been activated. The selected Document Checklist will be displayed and can be used immediately to continue the onboarding process.
Method 2: Add the Document Checklist After Contract Activation
If a Document Checklist was not selected during the contract activation process, it can still be added later from the Contract Details page after the contract has been activated.
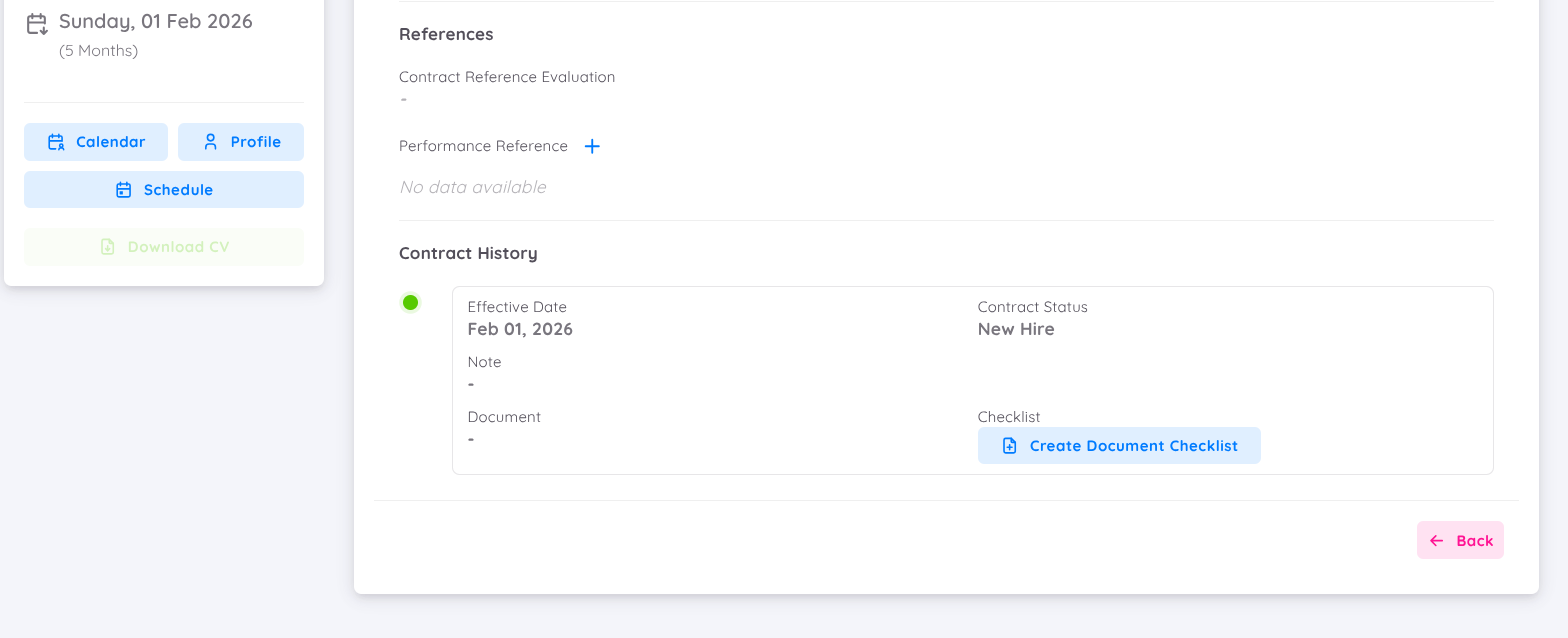
⚠️ This method is available when the contract is activated through Method 2: Activate the Employee Contract Through Contract Draft, since the contract is activated directly from the Contract Draft menu without using Employee Milestone.
⚠️ Ensure that the selected Document Checklist matches the contract status change to ensure the onboarding or employee administration process follows the appropriate procedures.
Example:
| Contract Status Change | Document Checklist |
|---|---|
| Onboarding | Onboarding Checklist |
| Contract Extension | Contract Extension Checklist (if available) |
| Promotion | Promotion Checklist (if available) |
After the Document Checklist has been assigned, the system will send a notification to the designated Reviewer(s) to begin the checklist verification process.
The checklist completion progress can then be monitored through Employee → Document → Checklist until the onboarding process or contract status change has been fully completed.
Reviewer Verifies the Document Checklist
After the Document Checklist has been created successfully, the system will send a notification to the reviewer(s) configured under Configuration → Property → Document.
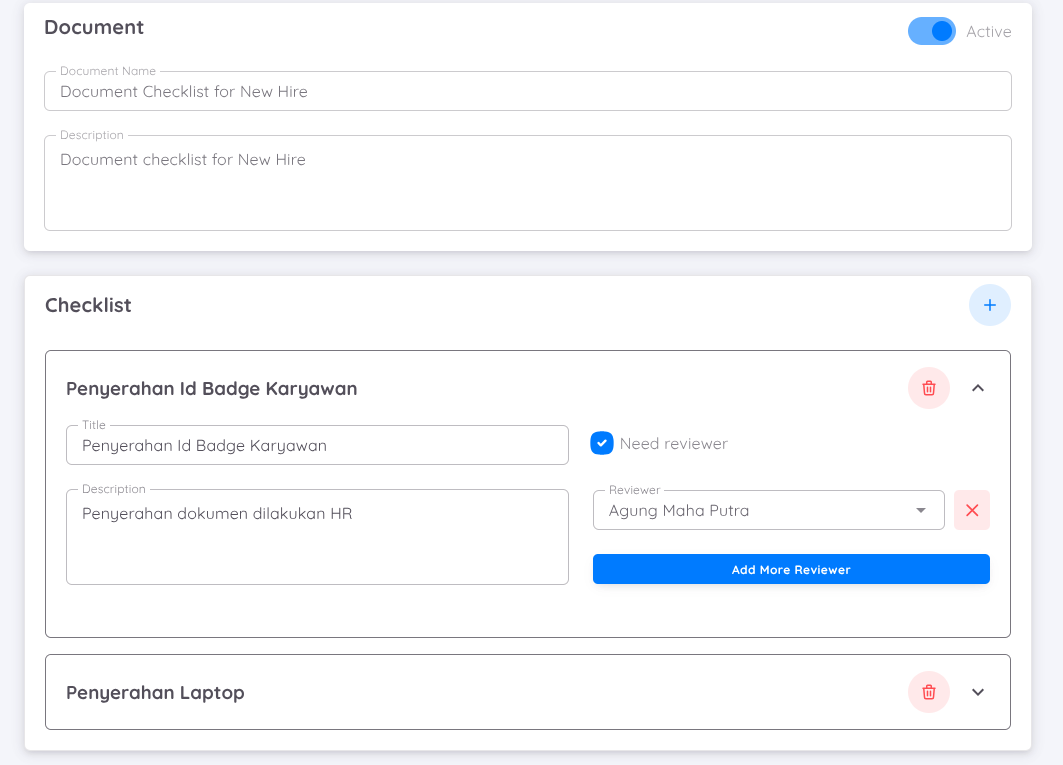
The assigned reviewer(s) will receive notifications through:
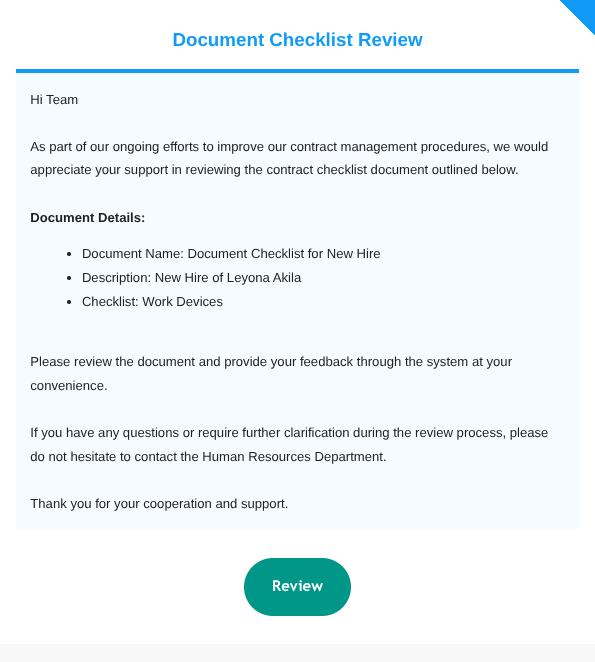
- Employee Portal via the Approval menu
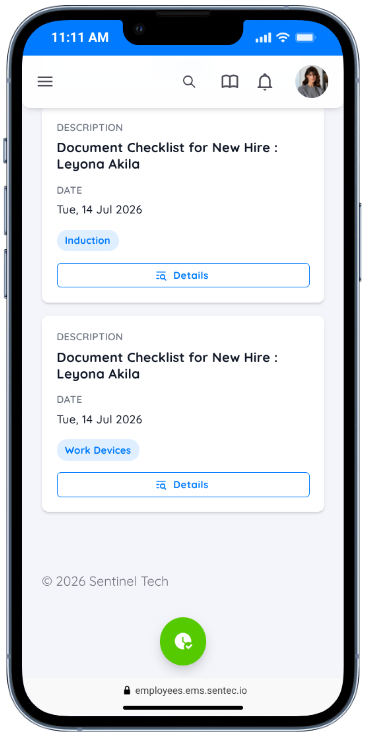
The reviewer can then open the Document Checklist details to begin the verification process.
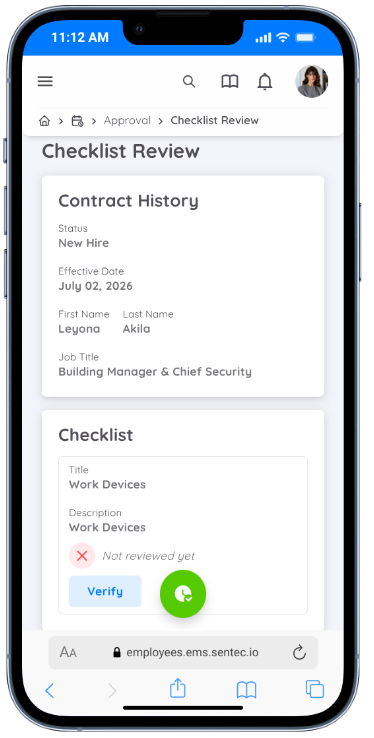
During the verification process, the reviewer can:
- Add Remarks.
- Upload Attachments as supporting documents.
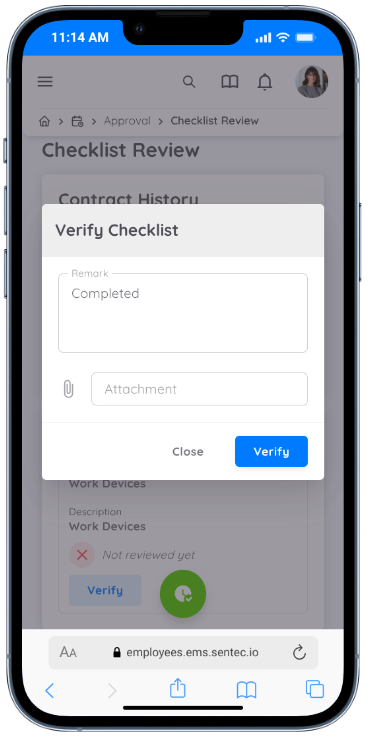
Each checklist item can be assigned to a different reviewer based on the organization's configuration. The Verify button is displayed only to the assigned reviewer and becomes available once the checklist item is ready for verification.
Completing the Document Checklist
After all reviewers have completed the verification process, Management can complete the Document Checklist through:
Employee → Document → Checklist
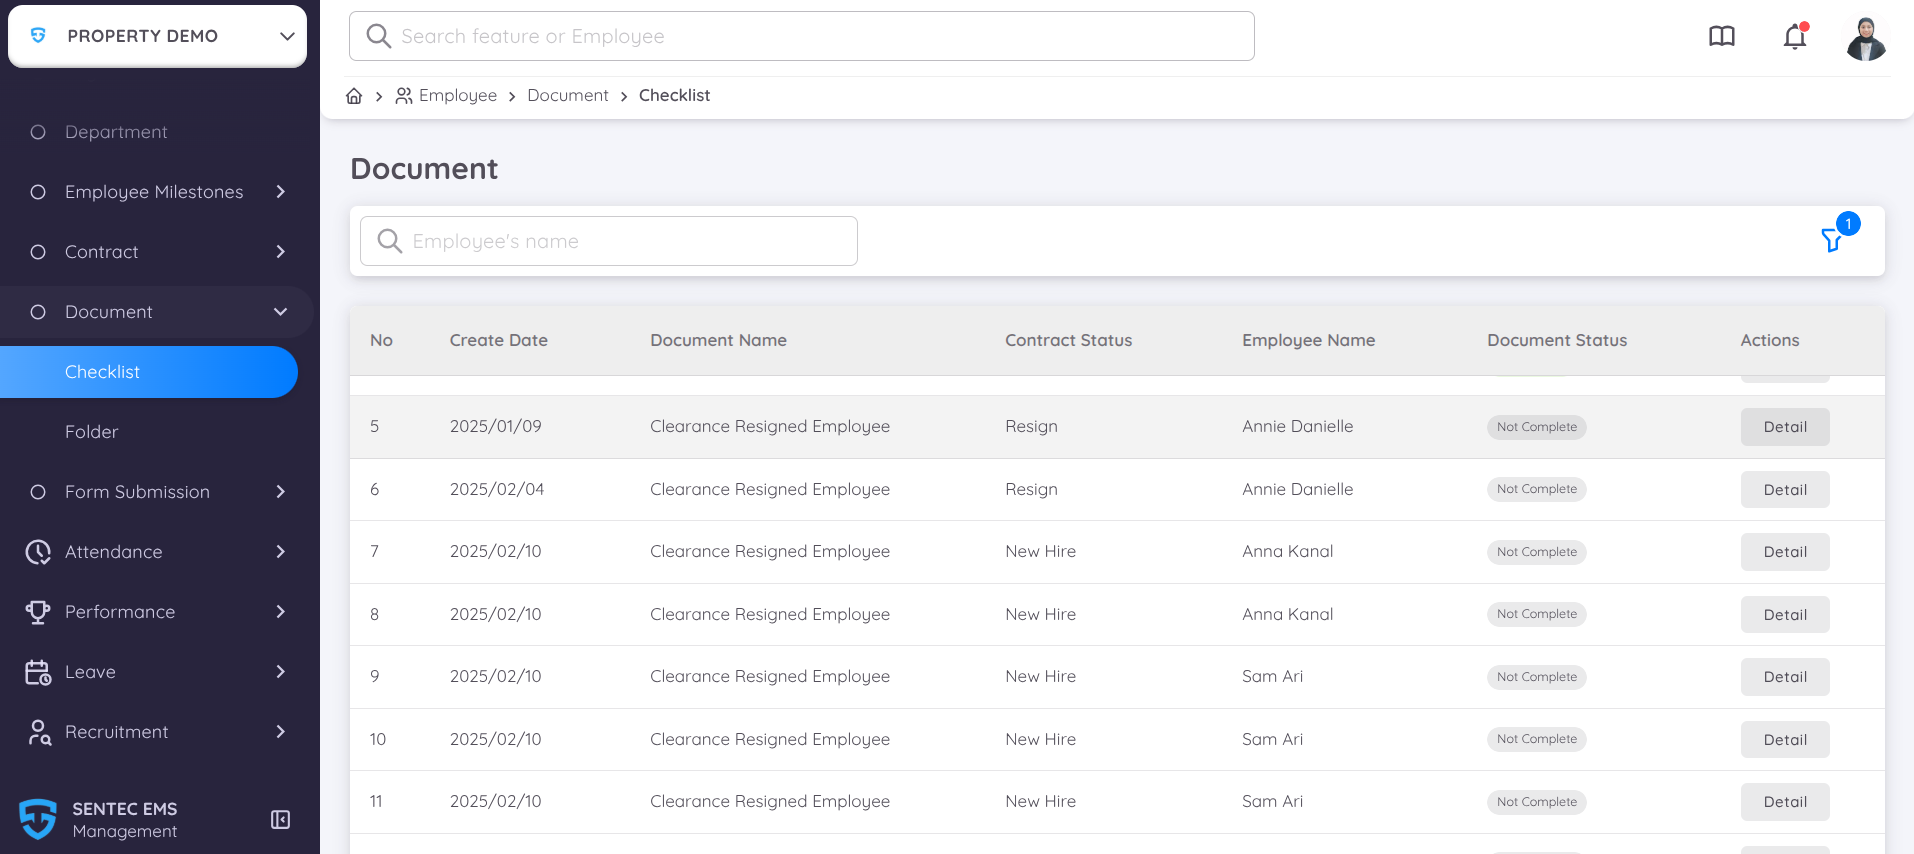
Select the Document Checklist to be completed, then click Detail to open the Document Checklist page.
The Document Checklist page consists of the following sections:
- Contract History, which displays the employee's contract history.
- Checklist, which contains the list of documents, company assets, or activities that must be verified before the onboarding process is considered complete.
If a checklist item does not have an assigned reviewer, users with access to the Document Checklist Management page can perform the verification. In this case, the Verify button will be available for any checklist item that has not yet been verified.
Click Verify to complete the verification for each checklist item.
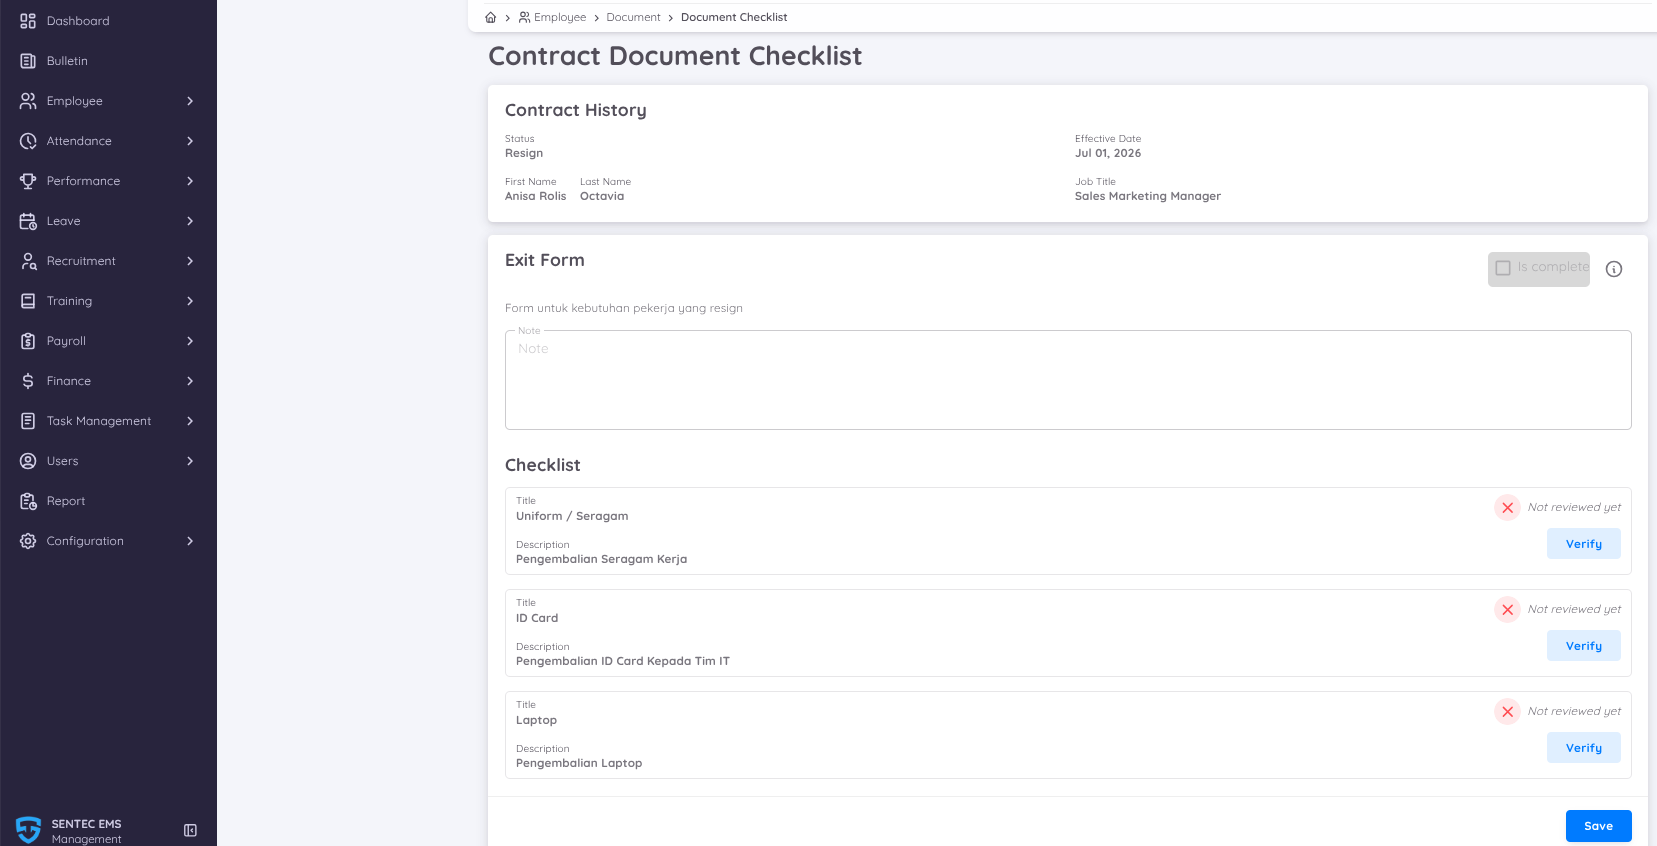
Note
The Document Checklist can only be completed after all checklist items have been verified.
As long as there are checklist items that have not been verified, the Is Complete option will remain disabled, preventing the Document Checklist from being completed.
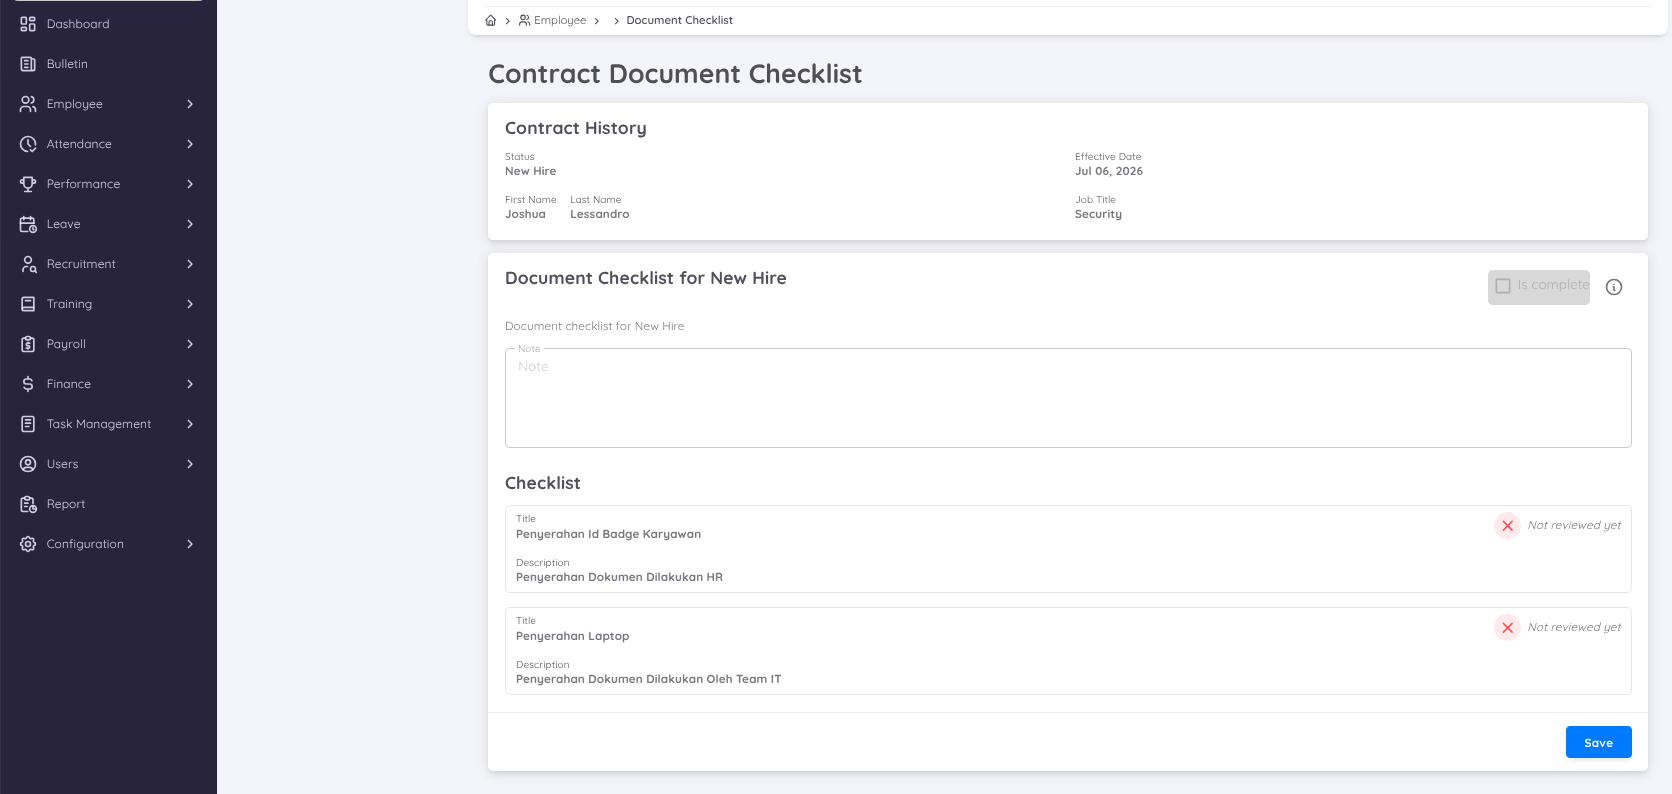
Once all checklist items have been verified, the Is Complete option will be enabled automatically.
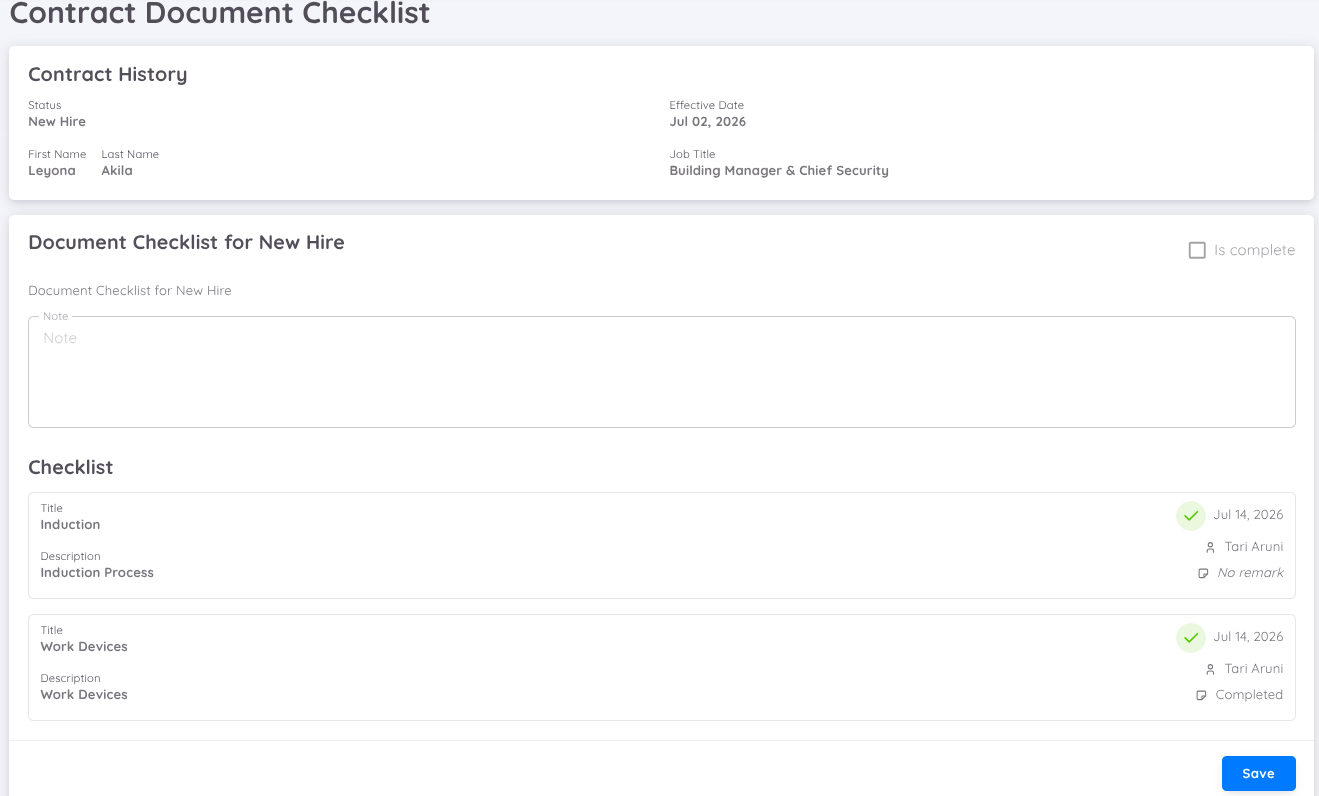
Enable the Is Complete checkbox, then click Save to complete the Document Checklist.
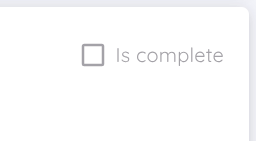
After the changes have been saved successfully, the Document Checklist status will change to Complete, indicating that the entire verification process has been completed.
Once the status is Complete, the Download button will become available, allowing the Document Checklist to be downloaded for record-keeping and documentation purposes.
Step 4: Announce a New Employee
⚠️ Before using the Announce New Employee feature, ensure that New Staff Onboarding has been enabled under Setup Notification in Property Configuration, and that at least one recipient email address has been configured.
Once the notification feature has been enabled and the employee's contract has been successfully activated, a New Employee Announcement can be sent through the system.
Open the following menu:
Employee → Contract
Select the contract to be announced, then click the three-dot (⋮) icon in the Action column and select View to open the Contract Details page.
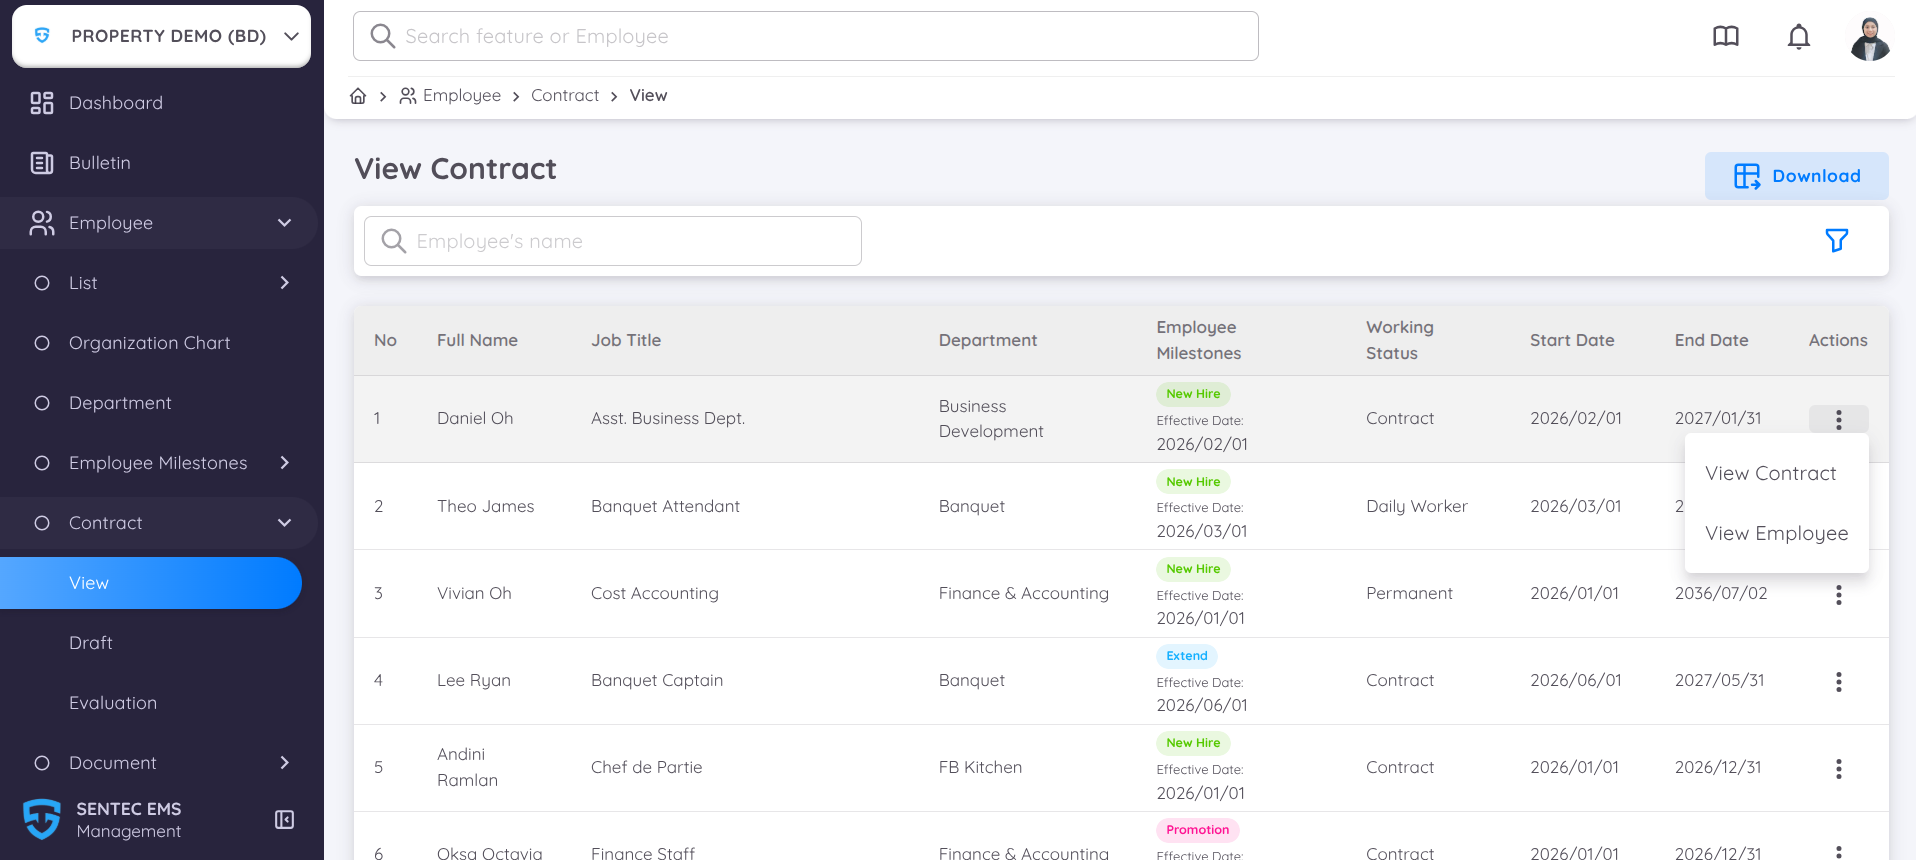
The Contract Details page can also be accessed through Employee → List → Current or Employee → Profile, then open the Contract List page.
At the top of the Contract Details page, click the green speaker icon, then select Announce New Employee.
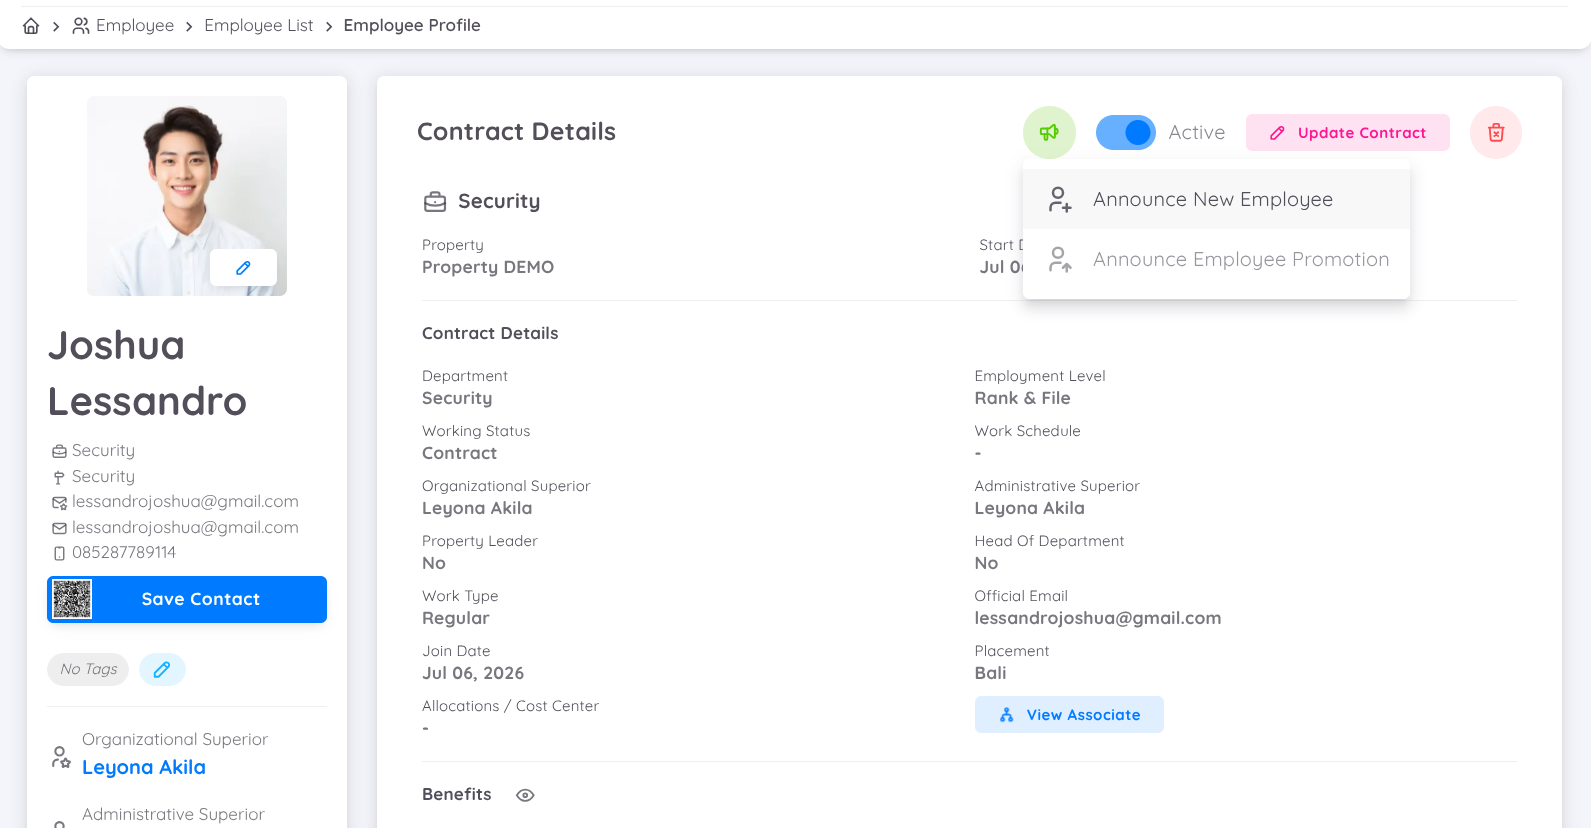
The Announce New Employee icon is only available for contracts with the New Hire or Promotion status, and remains available for up to 30 days after the Effective Date once the contract has been activated.
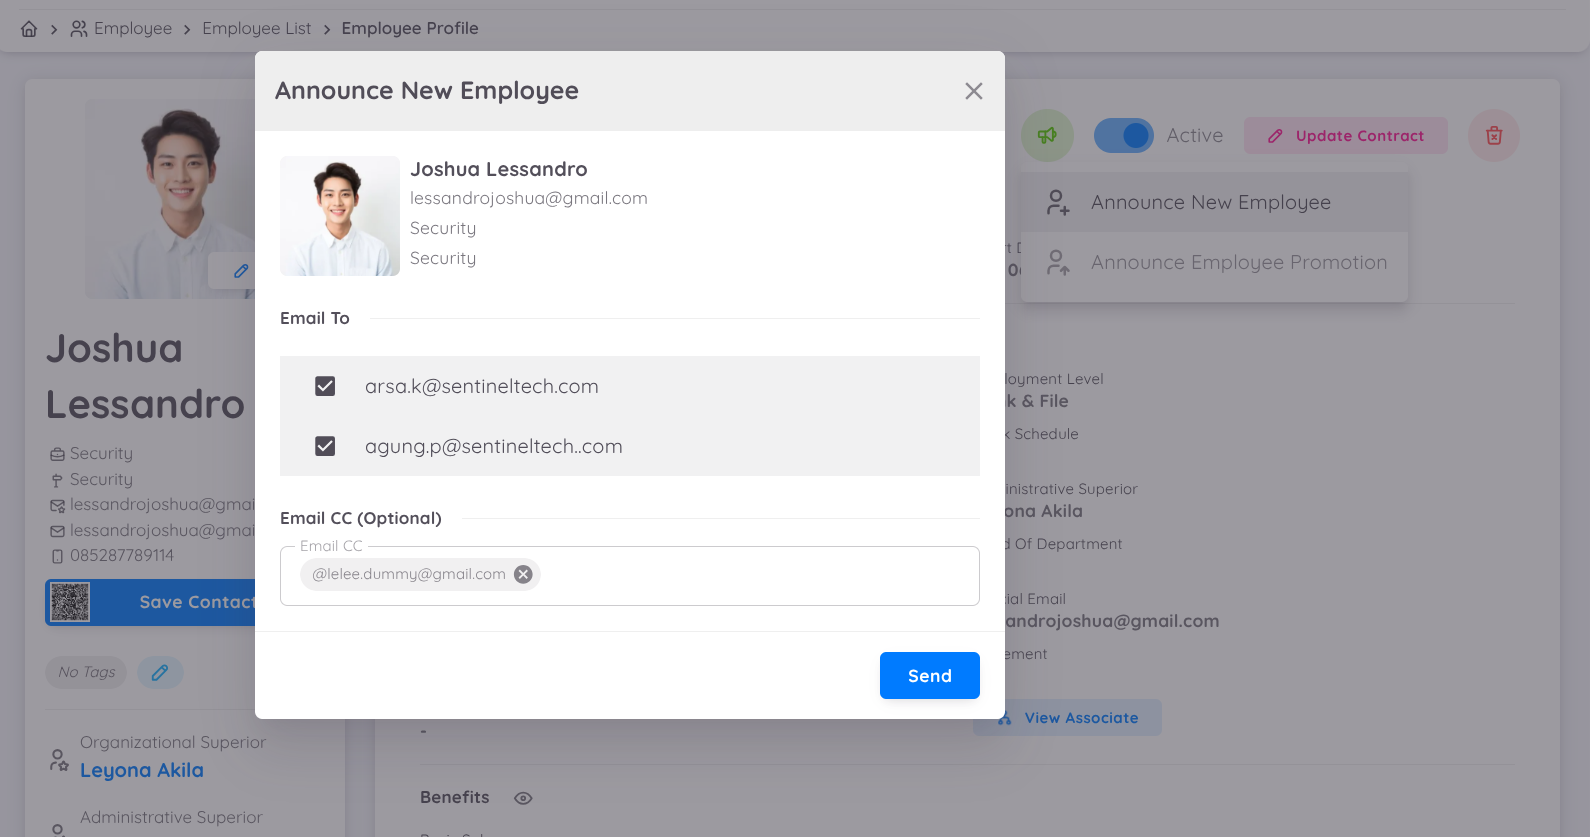
The system will display the Announce New Employee pop-up, which contains:
- Recipient Email, automatically populated based on the New Staff Onboarding notification configuration in Property Configuration.
- CC Email (optional), if the announcement also needs to be sent to additional recipients.
Verify that all email addresses are correct, then click Send.
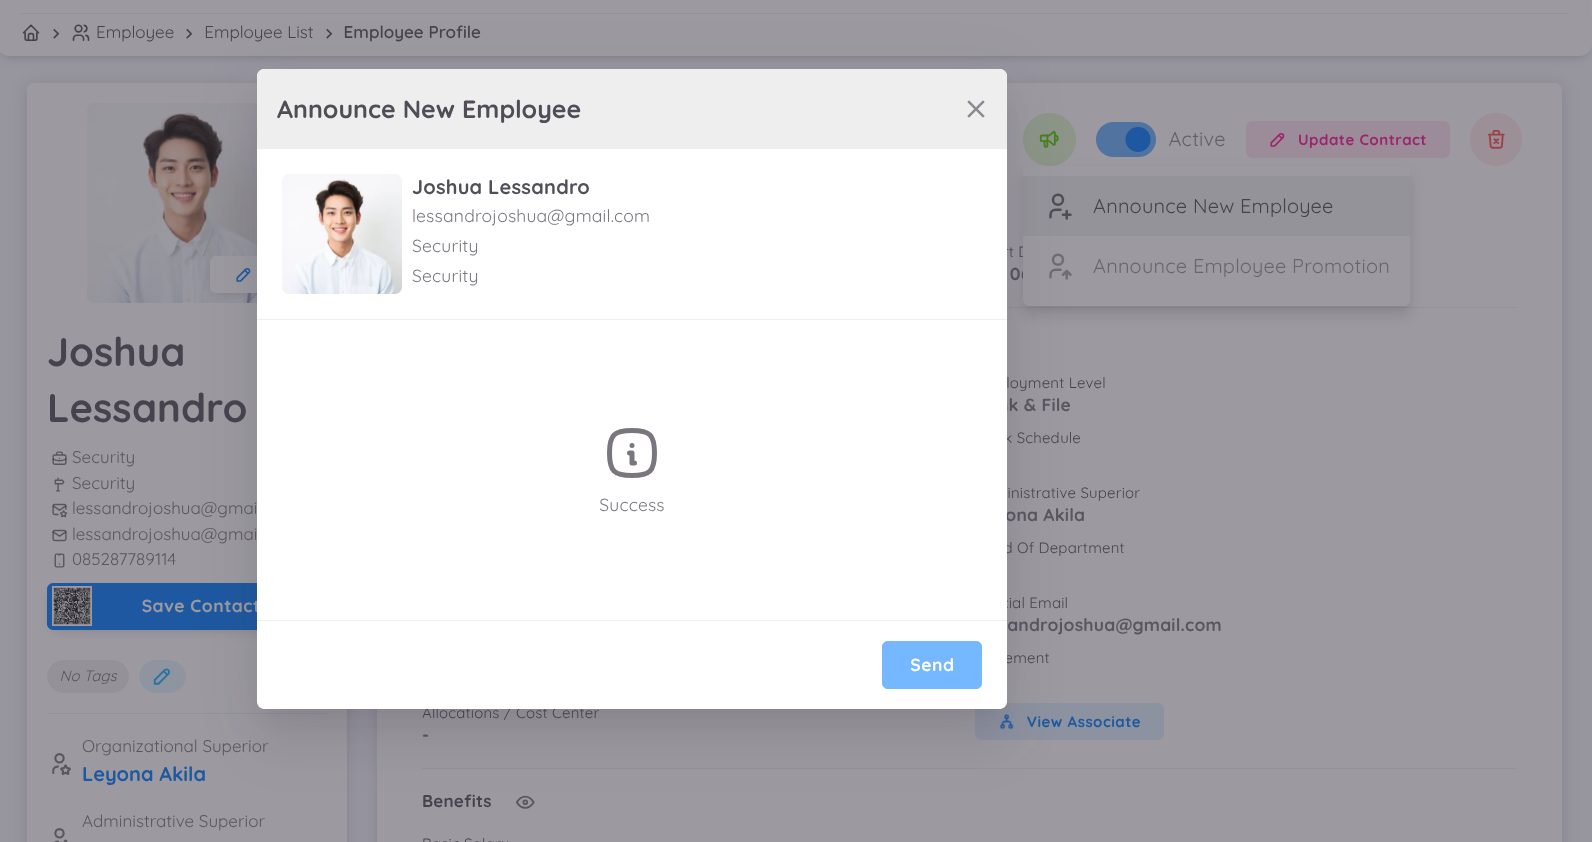
Once the process is completed successfully, the system will display a Success notification confirming that the email has been sent.
The New Employee Announcement email will then be delivered to all recipients listed in the To and CC fields.
Step 5: Complete the Employee Profile
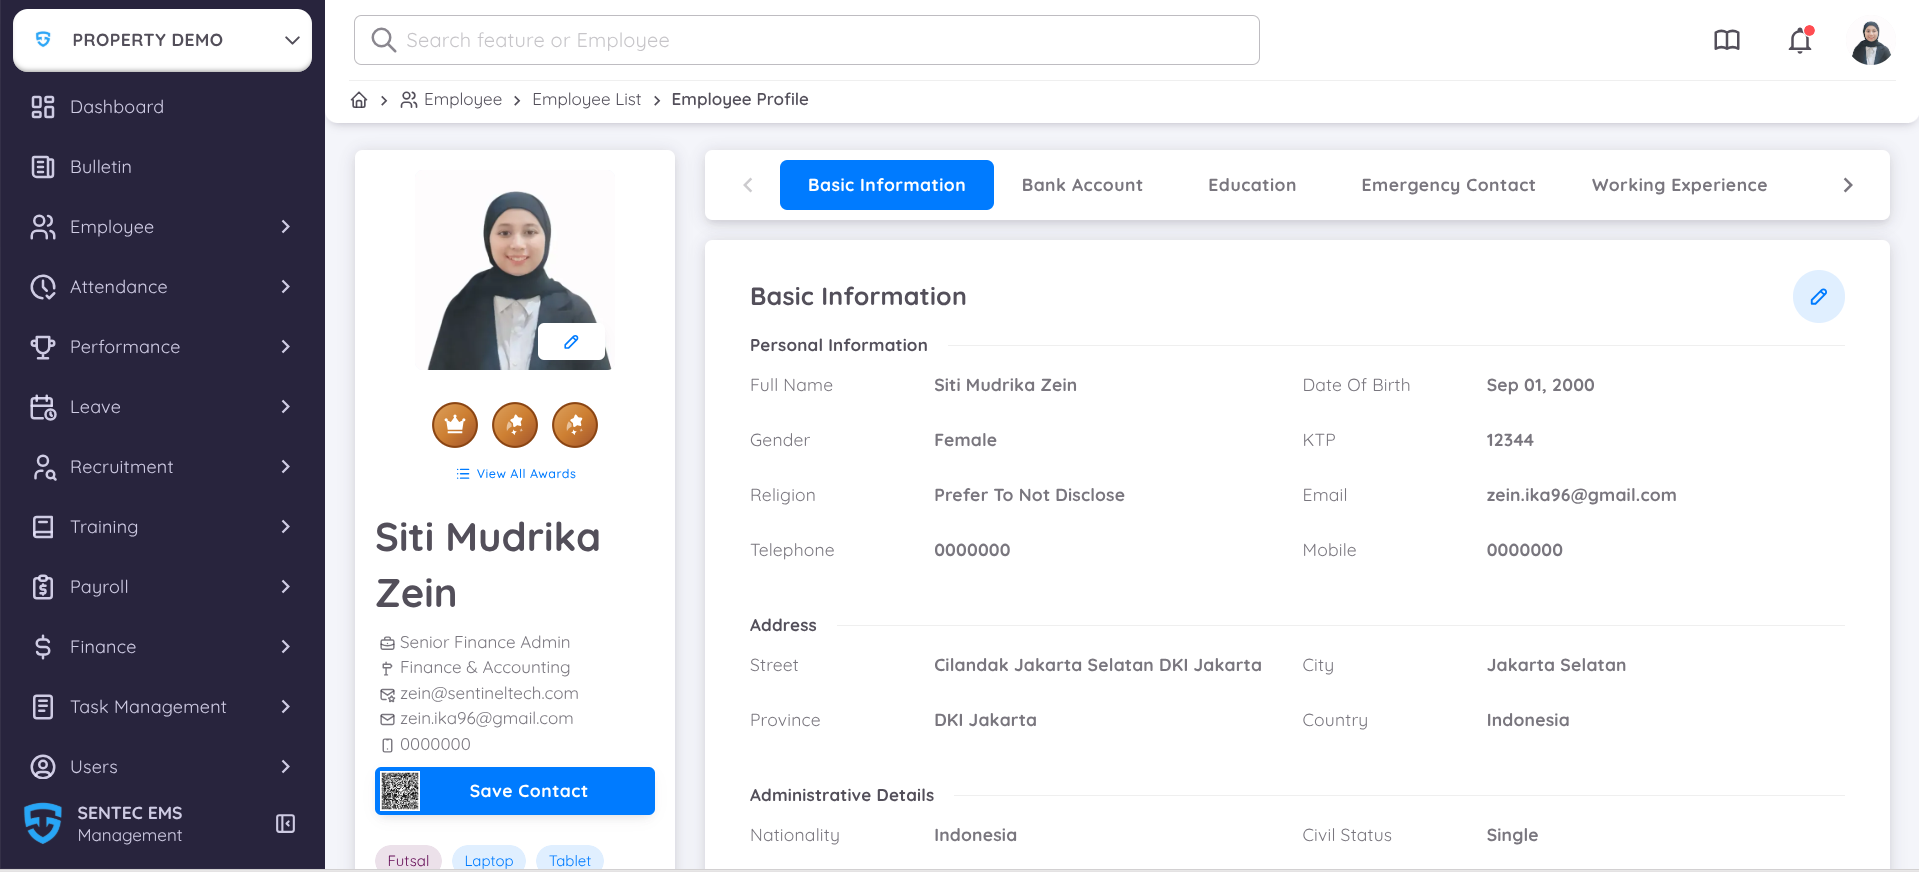
After the employee contract has been activated, complete all required information in the Employee Profile.
The information in the Employee Profile can be managed by Management and/or the Employee, depending on the access rights and system configuration.
The following menus are available in the Employee Profile.
| Menu | Description | Access |
|---|---|---|
| Basic Information | Contains the employee's basic information, such as personal details and identification information. | Management & Employee* |
| Bank Account | Used to add one or more bank accounts. One account must be set as the Default account to be used during the payroll process. | Management & Employee* |
| Education | Used to record the employee's educational history. | Management & Employee* |
| Emergency Contact | Used to store emergency contact information that can be contacted in case of an emergency. | Management & Employee* |
| Skill | Used to record employee skills and proficiency levels. | Employee |
| Folder | Used to upload supporting documents to the configured folders. Uploaded documents must be in PDF format. | Management & Employee* |
| Leave | Used to manage the employee's Leave Administration. | Management |
| Payroll | Used to configure payroll components, such as Additional Benefits (Fixed Allowances) that will be used during payroll processing. | Management |
| Training | Displays the employee's training history as a Participant, Trainer, or Co-Trainer. | Automatically available if the employee participates in training through the system |
| Compensation | Used to configure compensation settings, such as Overtime, according to the configured policies. | Management |
Access rights marked with (*) depend on the Employee Permission configuration. If employee profile editing is disabled, only Management can modify the information.
Step 6: Activate Employee Leave
After the employee's contract has been activated, the next step is to activate the employee's Leave Administration so that leave entitlements can be used according to the policies configured in Leave Setup.
Employee leave can be activated in two ways:
- Employee Profile
- Leave Administration
Method 1: Through Employee Profile
Open the following menu:
Employee → List → Current → Profile → Leave
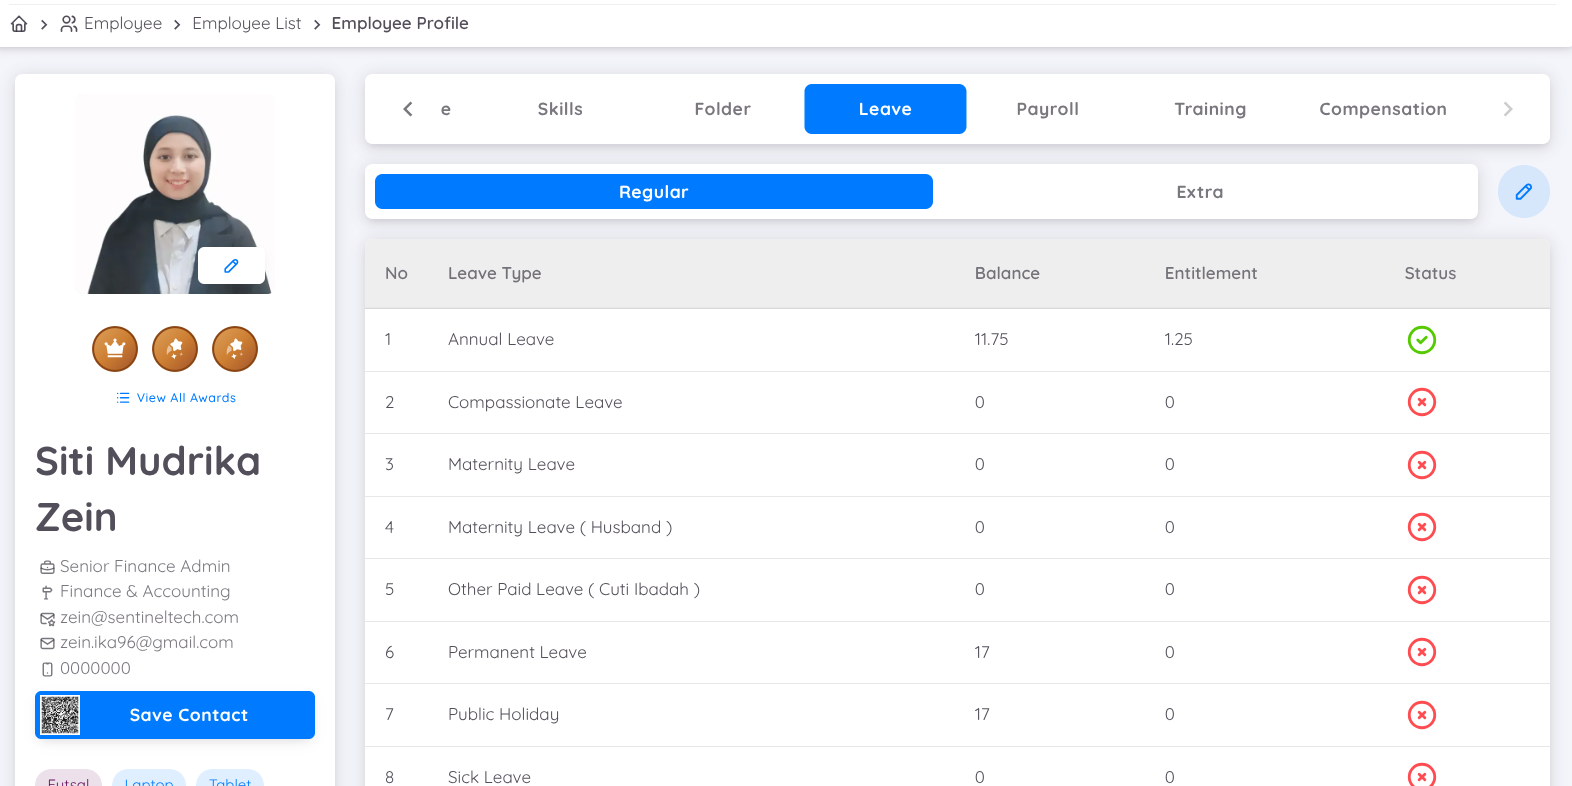
On the Leave tab, click the Edit (pencil) icon to manage the employee's Leave Administration.
Configure the leave settings according to the applicable policy, then activate Leave Administration by changing its status to Active.
Method 2: Through Leave Administration
Open the following menu:
Leave → Administration
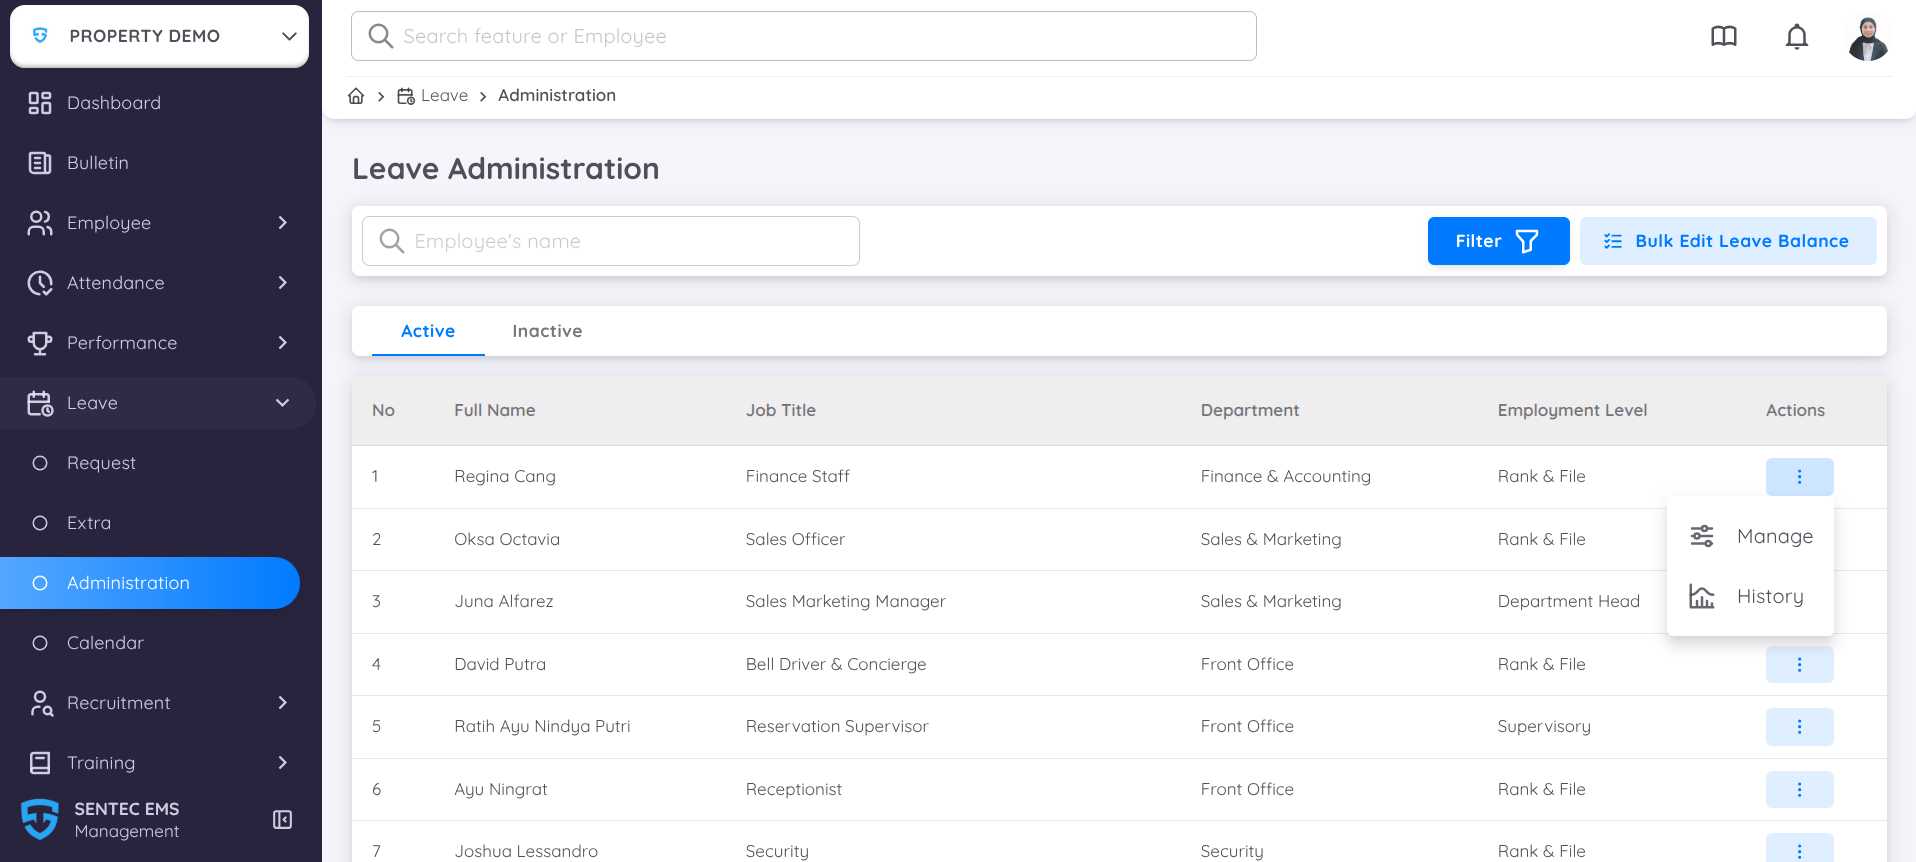
Select the employee, then click the three-dot (⋮) icon in the Action column and choose Manage.
Manage Leave
Whether Leave Administration is accessed through Employee Profile or Leave → Administration, both methods will open the same Leave Administration page.
This page displays all Leave Administration records assigned to the employee.
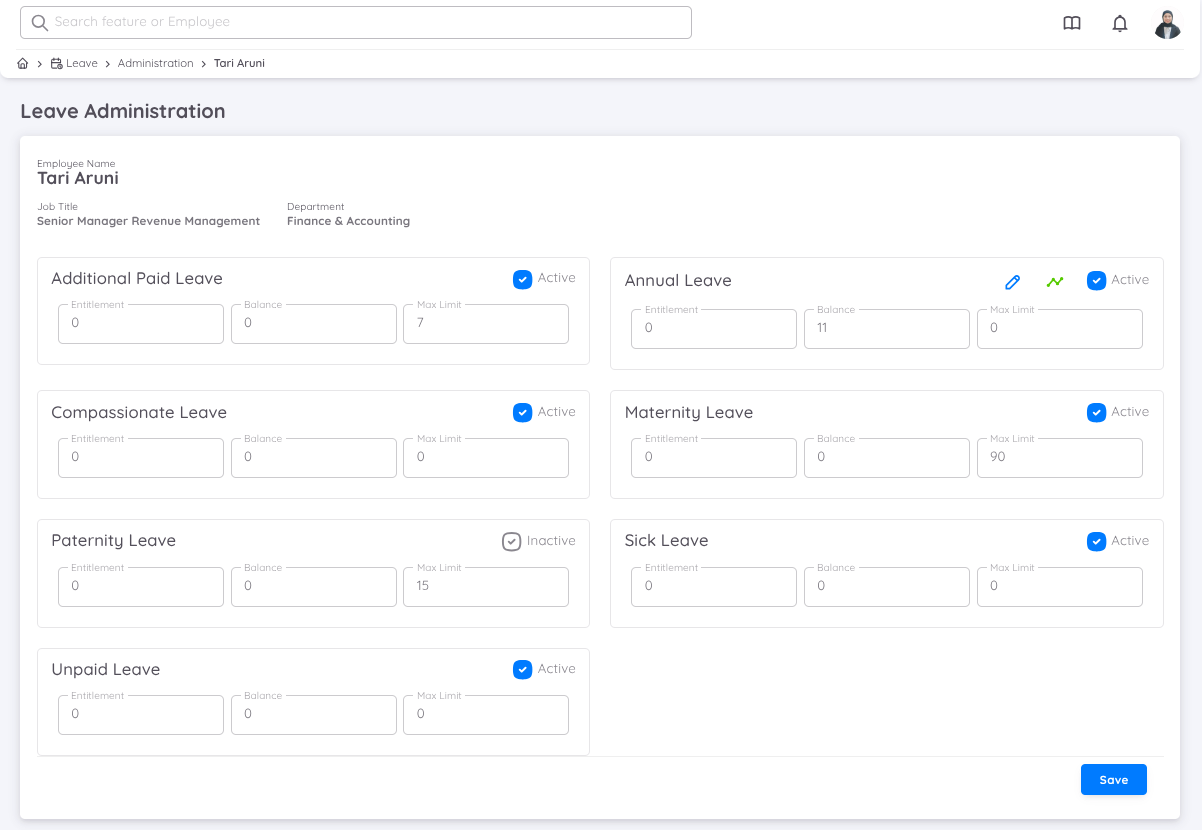
To activate a leave type, change its Active status until the toggle turns blue.
In addition to activating the leave type, ensure the following information has been configured correctly:
| Field | Description |
|---|---|
| Entitlement | The number of leave days granted to the employee according to the applicable leave policy. |
| Balance | The employee's available leave balance. If a new employee receives leave balance during onboarding, enter the appropriate Balance value. If no leave balance is granted initially, set the Balance to 0. The system will automatically update the leave balance based on the configured leave rules and the defined Entitlement. |
| Max Limit | The maximum leave balance the employee is allowed to accumulate according to the company's policy. |
⚠️ In most cases, only Annual Leave uses the Entitlement and Balance settings. Other leave types can be configured according to the organization's policies and requirements.
After all settings have been configured and the Active status has been enabled, the leave entitlement can be used according to the configured policy.
Employees can view their available leave through:
Leave → Balance → Personal
Management can view and manage the employee's leave through:
Employee → List → Current → Profile → Leave
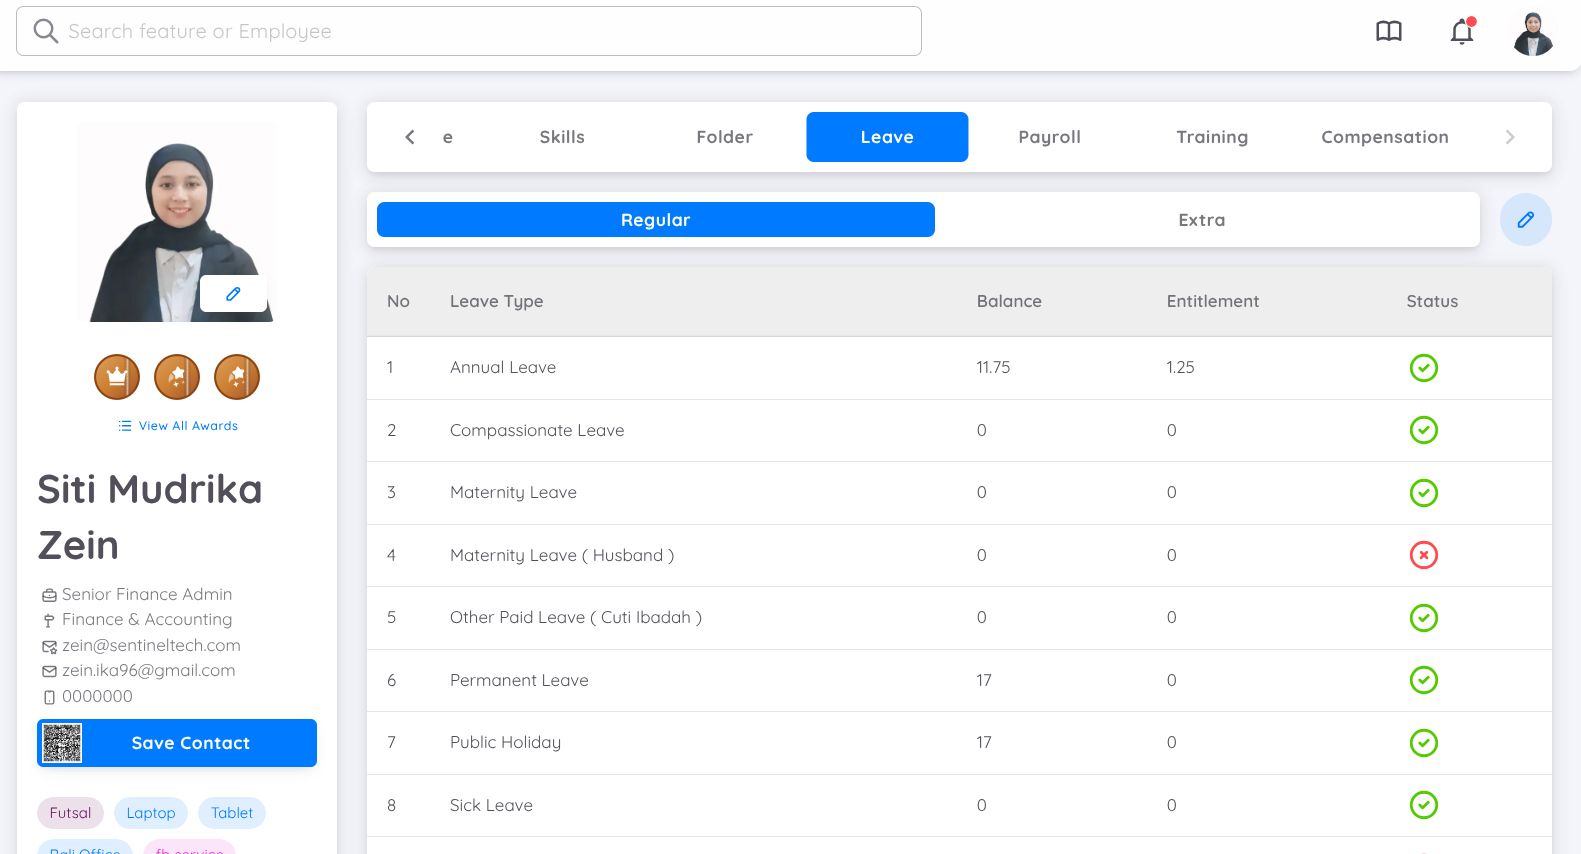
This page displays all activated leave types along with their Entitlement, Balance, and Active status for each leave type.
Step 7: Configure the Employee Payroll Profile
After the employee's contract has been activated, the Payroll Profile can be configured through the Employee Profile according to the organization's payroll requirements.
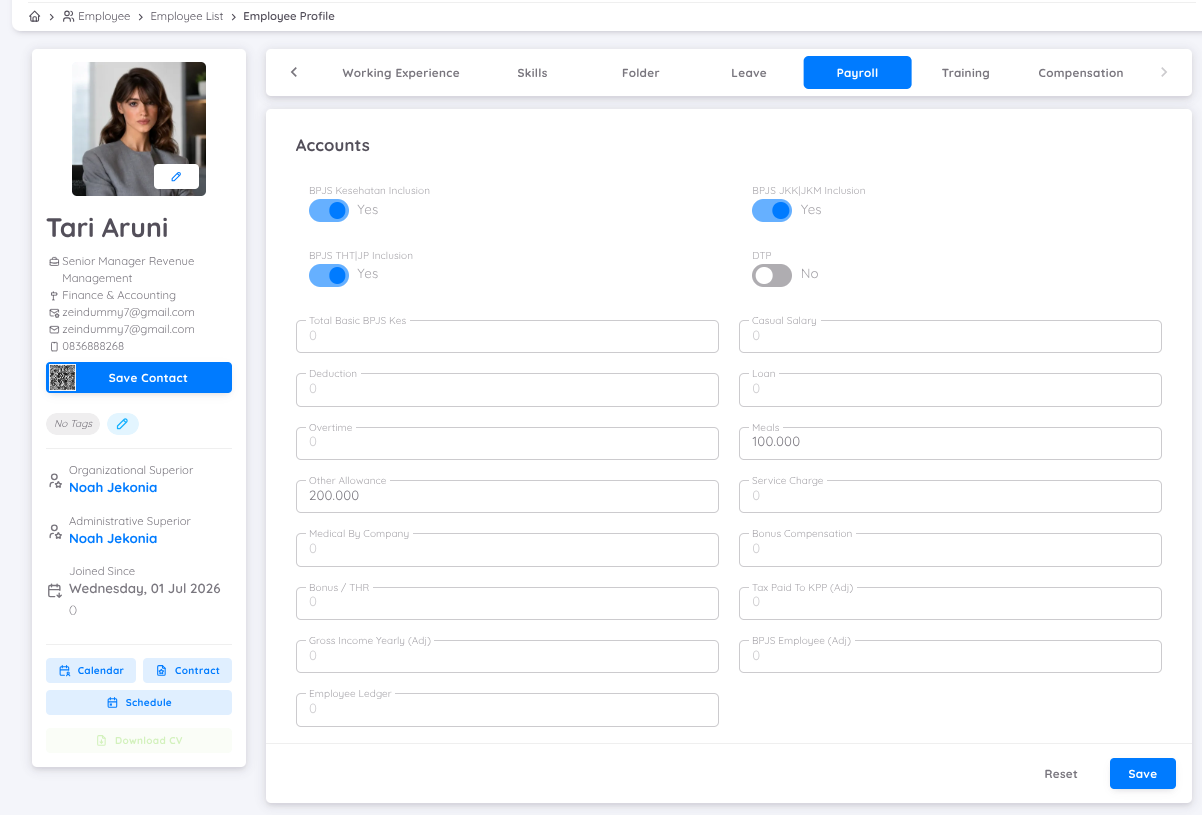
The Payroll tab is used to configure payroll components that are specific to each employee.
If an employee receives Additional Benefits (Fixed Allowances) with amounts that differ from other employees, these components can be configured through the Payroll Profile, for example:
- Meal Allowance
- Transport Allowance
- Communication Allowance
- Other Fixed Allowances
For certain payroll components that are calculated automatically by the system, a toggle is available to enable or disable the automatic calculation of those components according to the applicable policy. This toggle is only available for specific payroll components and does not apply to all payroll accounts.
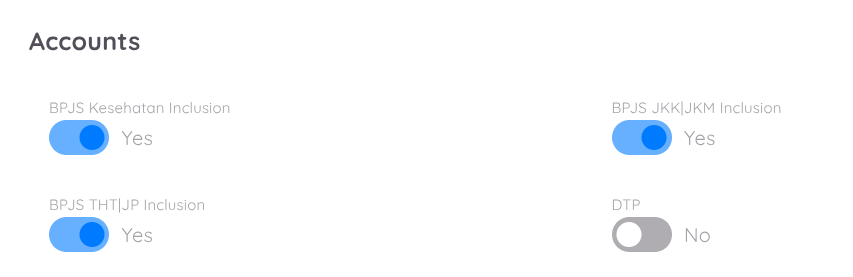
These components can be added through the Payroll tab in the Employee Profile. Once configured, the benefit components will be automatically retrieved and calculated when the payroll process is executed.
⚠️ Basic Salary and FPSC do not need to be added again in the Payroll Profile, as both components have already been configured during the employee's Contract creation.
Note
The payroll accounts displayed in the Payroll Profile are based on the configuration defined in Payroll Configuration. As a result, each organization may have different payroll accounts, calculation methods, and benefit components according to its own payroll policies.
Step 8: Enable the Employee's Overtime Profile and Compensation Mapping
If the organization implements an Overtime policy and the employee is eligible for overtime, the employee's Overtime Profile must be enabled before overtime requests can be submitted.
In addition to enabling the Overtime Profile, the overtime calculation result can also be configured through Compensation Mapping to determine how the employee will receive overtime compensation.
The overtime calculation can be mapped to:
- Payroll, if overtime will be paid as part of the employee's payroll.
- Leave, if overtime will be converted into leave entitlement according to the applicable policy.
The Overtime Profile and Compensation Mapping should be configured according to the organization's policies before overtime can be submitted and processed by the system.
Enable the Employee's Overtime Profile
⚠️ Before an Overtime Profile can be assigned to an employee, ensure that the Overtime Profile has already been configured and is in Active status under Configuration → Setup → Attendance → Overtime Profiles.
Once the Overtime Profile is available, open the following menu:
Attendance → Overtime → Administration
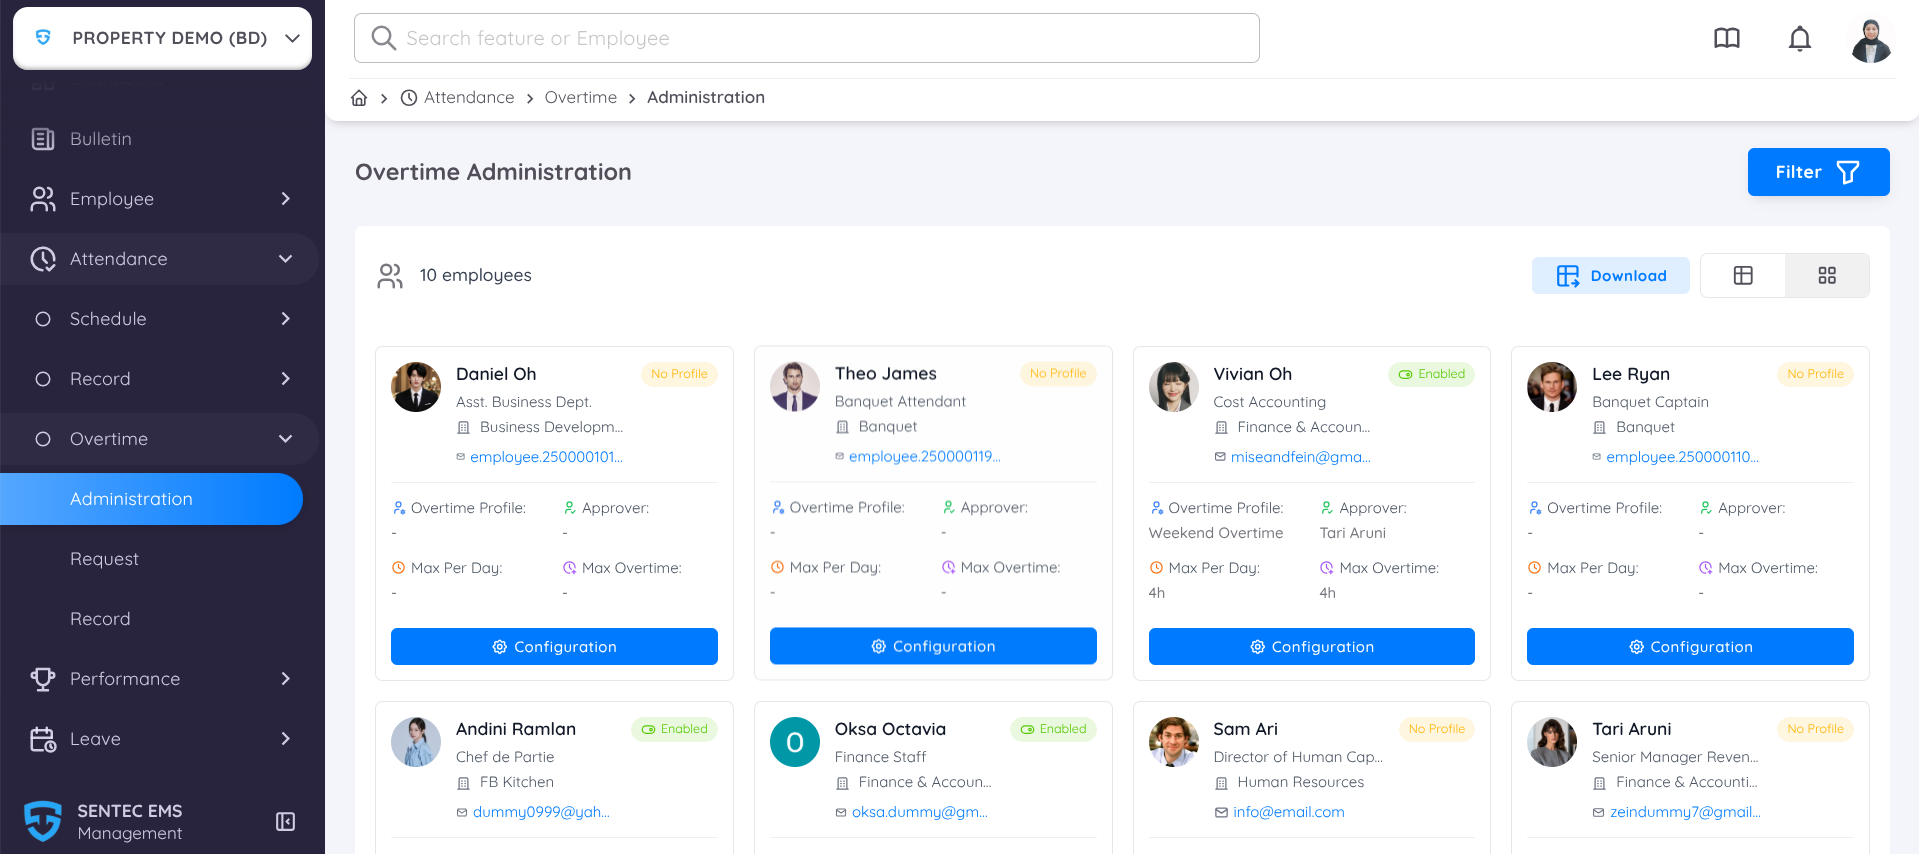
Select the employee, then click the Configuration button.
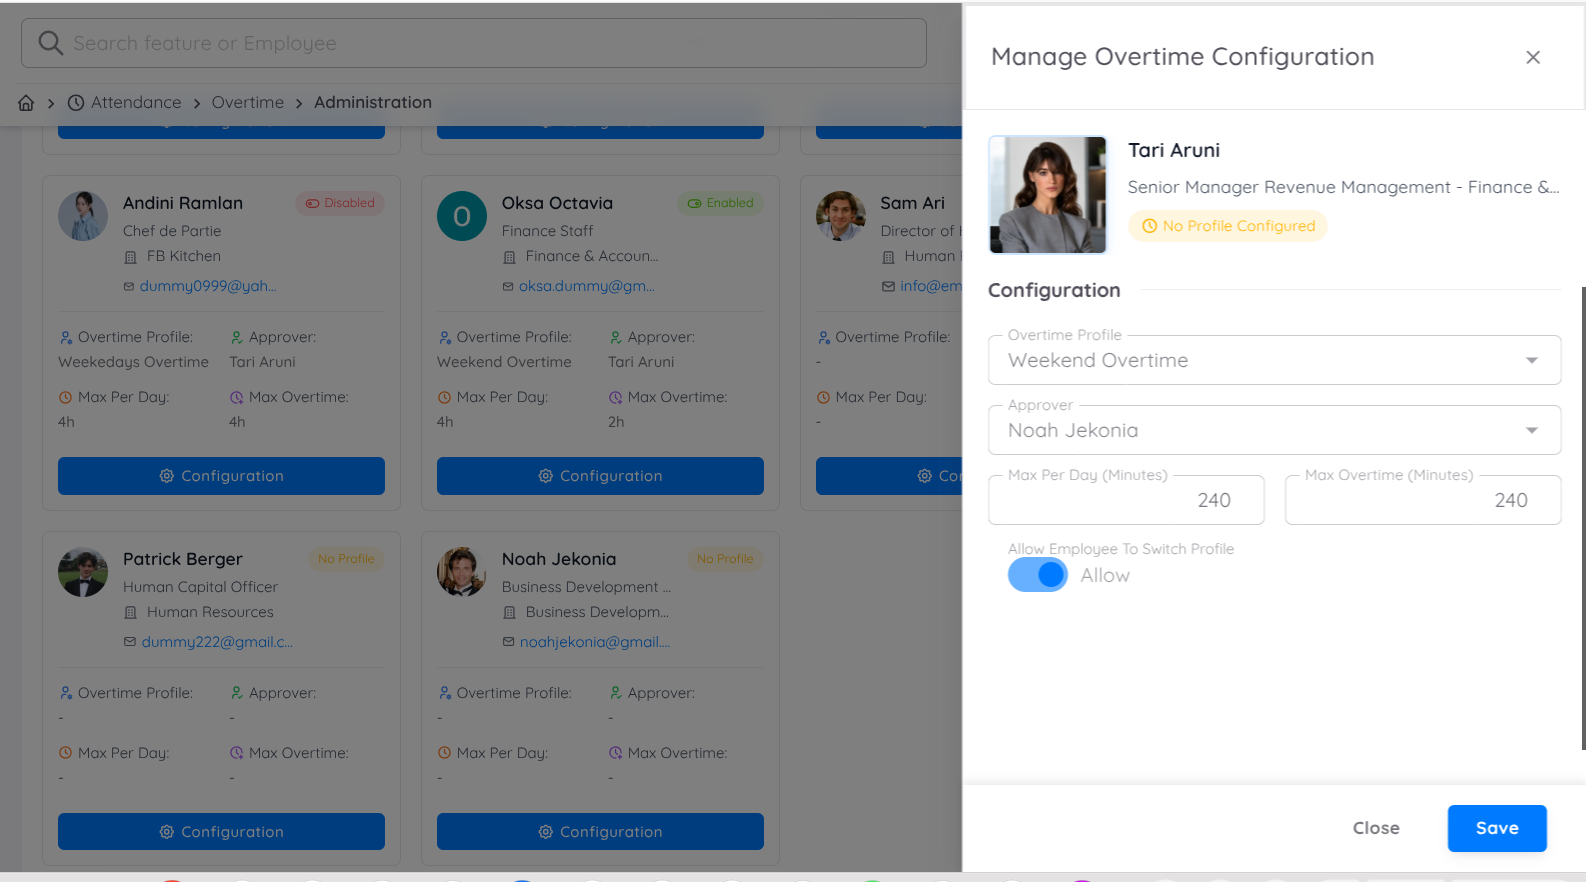
Complete the following configuration:
| Field | Description |
|---|---|
| Overtime Profile | Select the Overtime Profile that will be assigned to the employee according to the applicable policy. |
| Approver | Specify the approver responsible for approving overtime requests. The approver can be assigned to the Direct Supervisor, Head of Department, or another authorized person. |
| Max Per Day | Defines the maximum overtime duration that can be requested within a single day. |
| Max Overtime | Defines the maximum accumulated overtime allowed according to the applicable policy. |
| Enable Profile Selection | Enable this toggle if multiple Overtime Profiles are available and employees are allowed to choose which profile to use when submitting overtime requests. |
After completing the configuration, click Save.
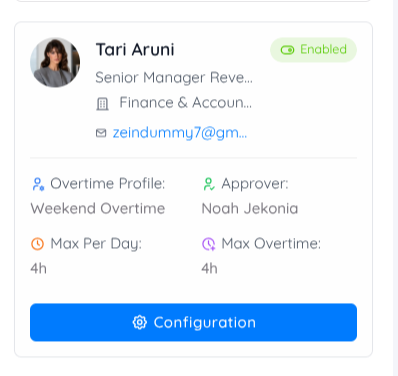
If the process is successful, the Overtime Profile status will become Enabled. The employee can then submit overtime requests according to the applicable policy, and the system will use the assigned Overtime Profile for overtime calculations and the configured Compensation Mapping.
Configure Employee Compensation Mapping
⚠️ After the Overtime Profile has been enabled, ensure that the required Compensation Mapping has been configured and is in Active status under Configuration → Setup → Finance → Compensation.
Once the Compensation Mapping is available, open the Employee Profile, then select the Compensation tab.
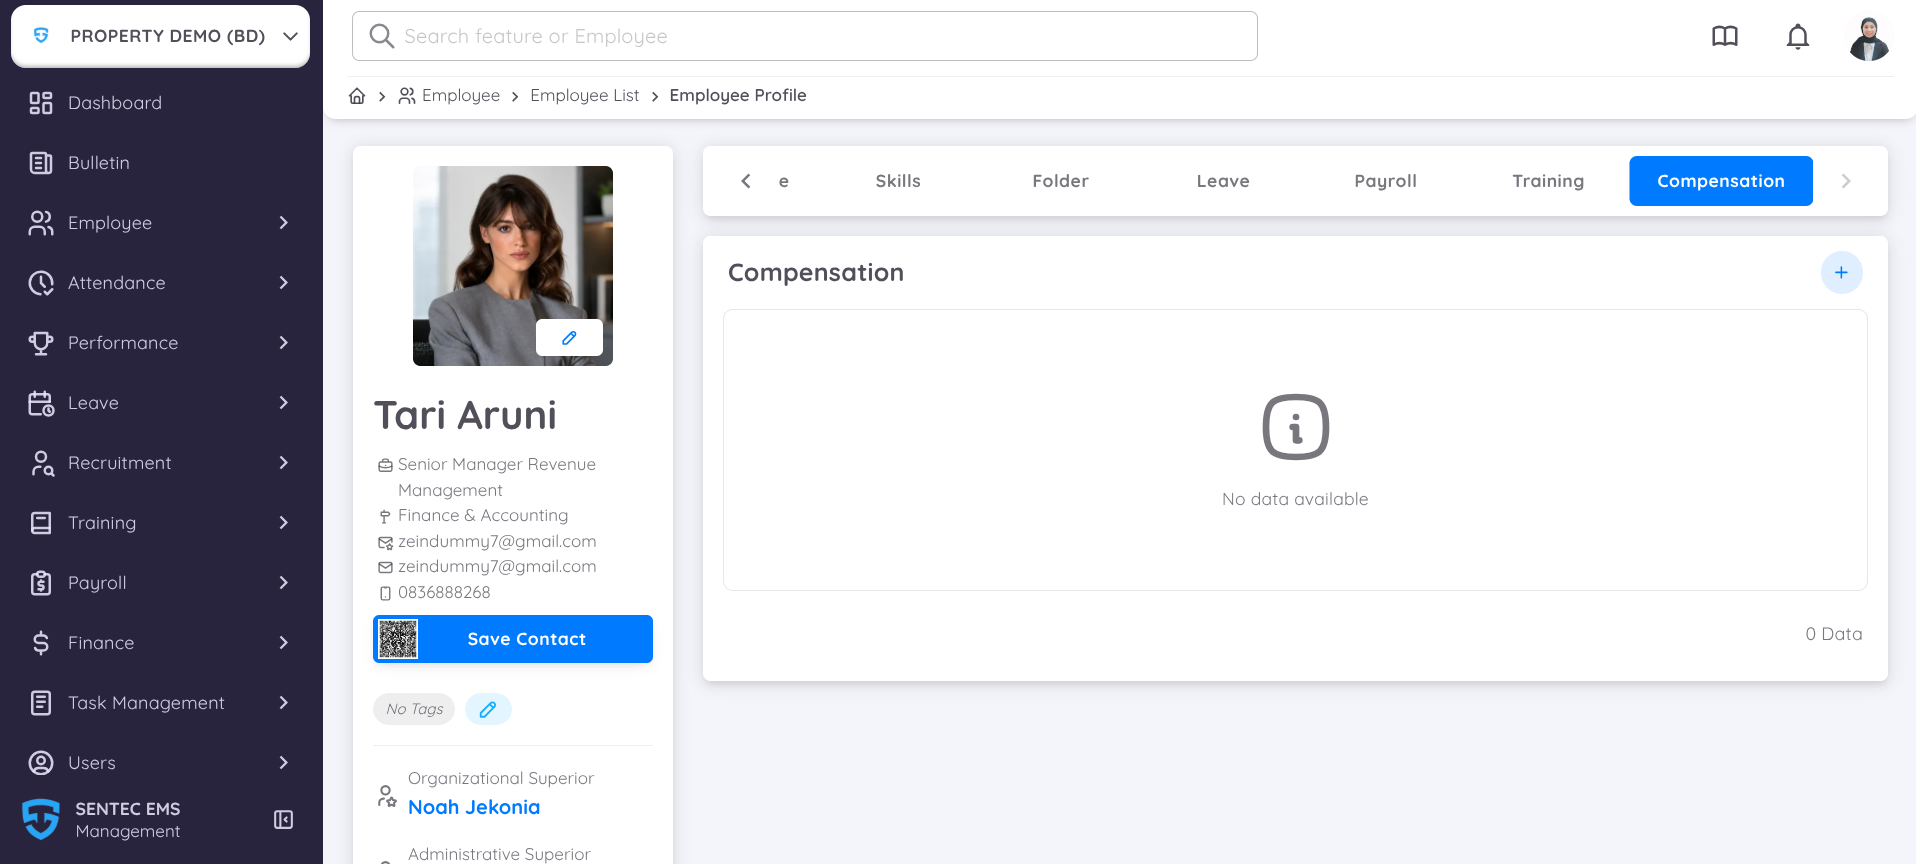
On this page, select the Compensation Mapping that will be applied to the employee according to the applicable policy.
For example, if Overtime should be converted into Leave, select the Compensation Mapping that maps overtime to Leave.
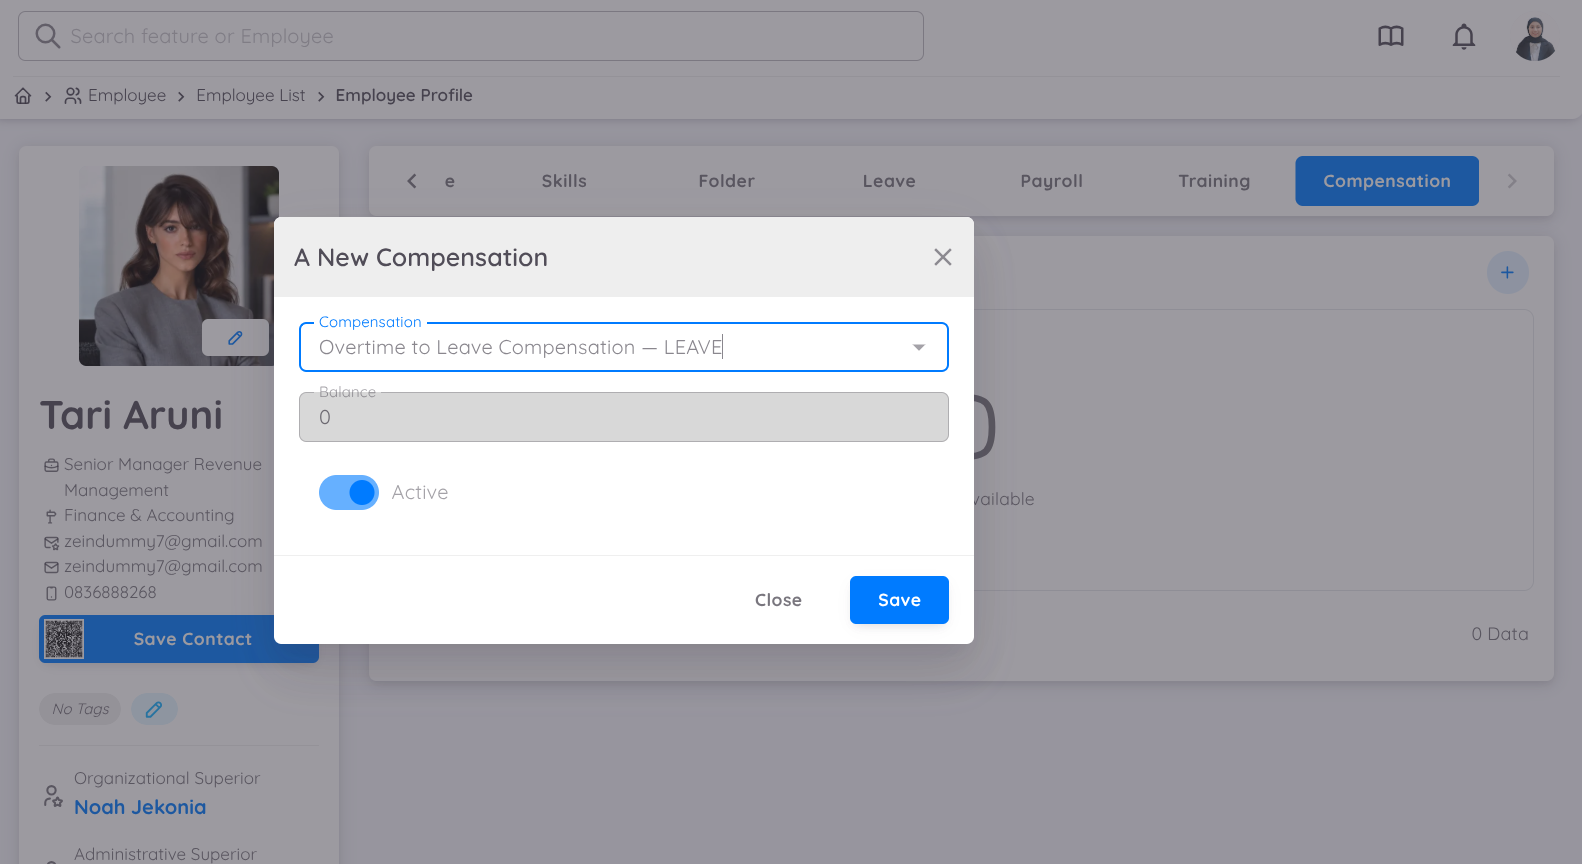
After the configuration has been saved, every approved Overtime request processed using the assigned Overtime Profile will automatically follow the selected Compensation Mapping, such as being converted into Leave.
If the organization applies multiple compensation methods, an employee can also have Multiple Compensation Mappings. This allows overtime to be mapped to Payroll, Leave, or other available compensation options according to the organization's policy.
To add another Compensation Mapping, click the (+) button, then select the Compensation Mapping that should be enabled for the employee.
Step 9: Assign the Employee Work Schedule
Before the employee can record attendance, first ensure that the correct Work Type has been assigned in the employee's contract.
The Work Type can be found in Contract Details.
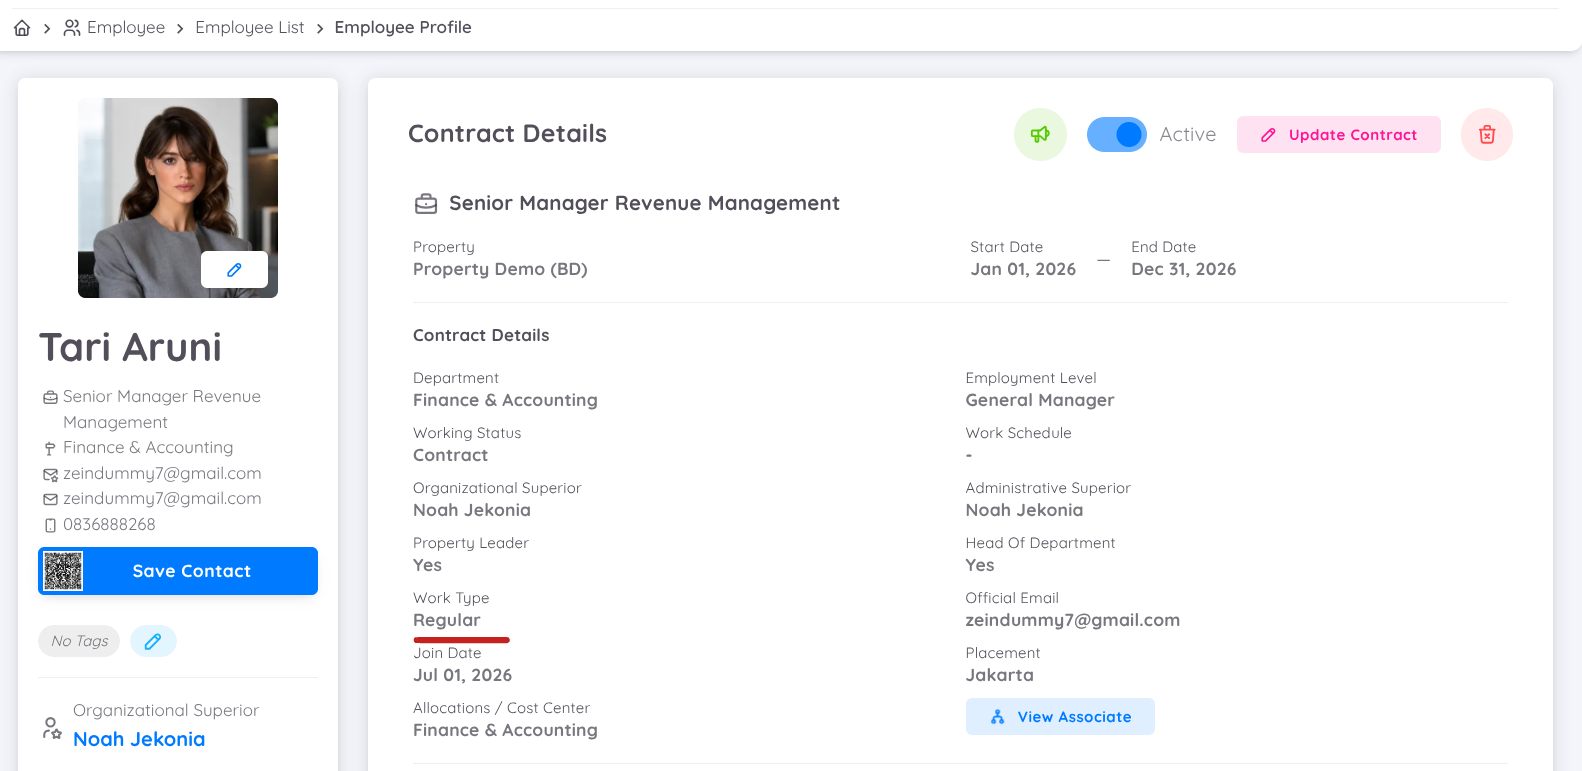
There are two Work Types available:
- Regular Employee
- Shifting Employee (Non-Regular Employee)
Regular Employee
If the employee is a Regular Employee, they can immediately record attendance using the assigned Default Work Schedule.
Shifting Employee (Non-Regular Employee)
If the employee is a Shifting Employee (Non-Regular Employee), a Work Schedule must be assigned before the employee can record attendance.
Work schedules for Shifting Employees can be assigned through the Scheduling feature.
⚠️ Shifting Employees cannot record attendance until a work schedule has been assigned.
Note
All attendance rules follow the configuration defined in Attendance Setup, including work schedules, late tolerance, attendance locations, and other attendance-related settings.
For more information about creating and assigning work schedules, refer to the Schedule documentation.
Step 10: Employee Is Ready to Use the System
Once all steps in this guide have been completed, the employee onboarding process in Sentec EMS is complete.
The employee can now start using the system according to the assigned Role, Permissions, and configured settings, including:
- Logging in to Sentec EMS.
- Recording Attendance according to the assigned work schedule.
- Submitting Leave, Overtime, and other requests based on the assigned permissions.
- Accessing features that have been granted based on the assigned Role and Permissions.
- Performing other operational activities according to the configured system settings.
⚠️
The features available to each employee depend on the assigned Role, Permissions, and system configuration. If certain features are unavailable, ensure that all required configurations have been completed and the appropriate access permissions have been assigned.