How to Deactivate an Employee Contract (Deactivate Employee)
Overview
This guide explains the process of deactivating an employee contract in Sentec EMS. This process is required when an employment relationship has ended or when an employee's employment status changes, requiring the contract to be deactivated, such as:
- Resignation
- Termination
- End of Contract
- Deceased or Other
Before an employee account can be deactivated through Employee Milestone, the employee's contract must first be updated so that the system can recognize the status change and execute the offboarding process according to the established workflow.
⚠️ Important Notes
Before deactivating an employee contract, make sure the following guidelines are understood and followed to ensure that employee records and history are properly maintained in the system.
Do not deactivate the contract using the Active (Toggle) button.
This action only changes the contract's active status and does not execute the proper deactivation (Deactivate Employee) process according to the system workflow. As a result, employee data and contract history may become inconsistent.
Do not delete the contract using the Remove Contract icon.
Deleting a contract will permanently remove the employee's contract history from the system and may affect historical records, reporting, and other record-keeping requirements.
Update the employee's contract status before the employee leaves the company.
The Deactivate Employee process must be performed on the Effective Date or on the employee's last working day to ensure that the offboarding process follows the proper workflow and that all employee status changes are accurately recorded.
Follow every step in this guide in the order provided.
Skipping any step or using a method other than the one described in this guide may result in an incomplete offboarding process, causing employee records, contract history, and the Document Checklist to be incomplete.
⚠️ Do Not Deactivate the Contract Using the Active Toggle
Do not deactivate an employee contract by switching the Active toggle to Inactive on the Contract Details page.
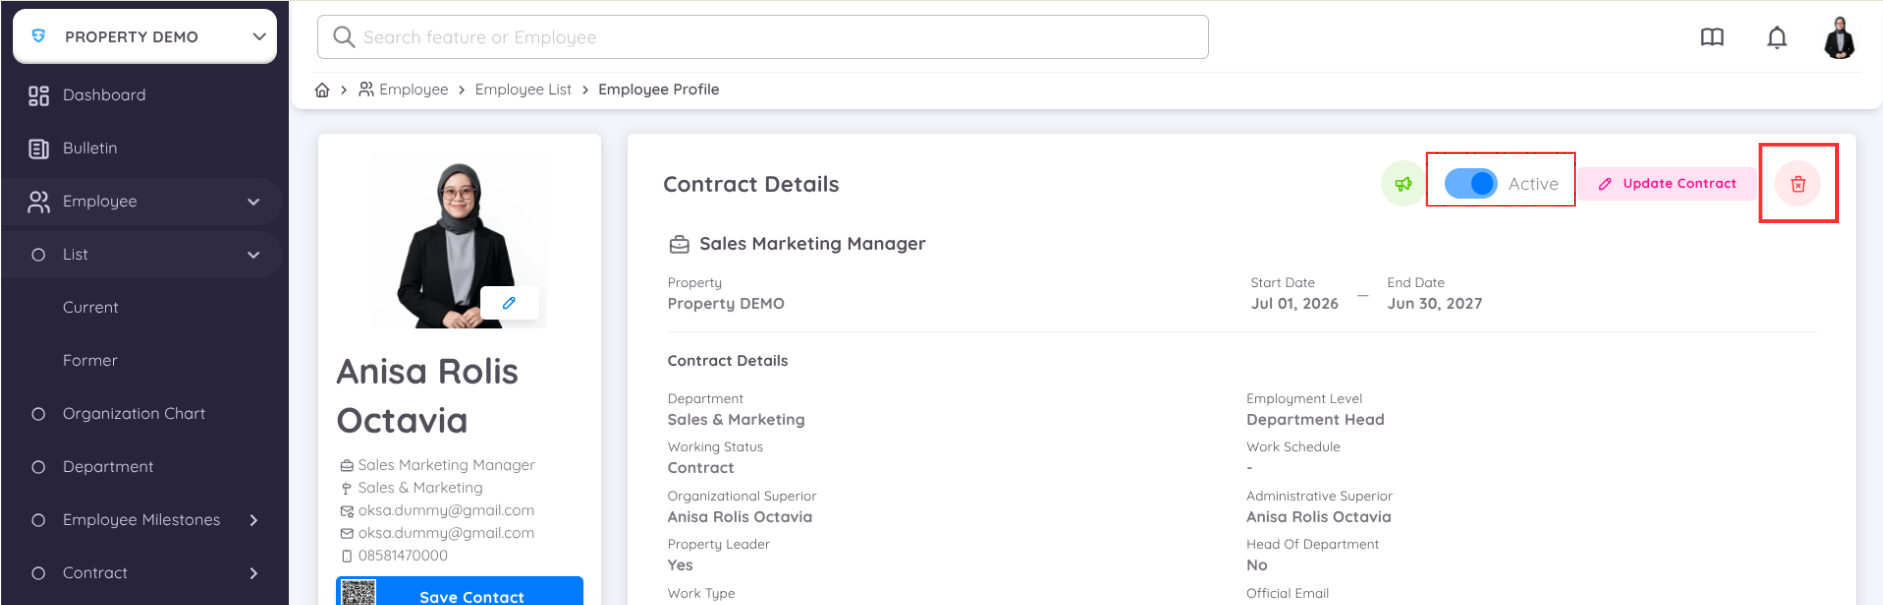
If the contract is deactivated using the Active toggle:
- The employee contract will not be processed through the Employee Milestone workflow.
- The employee's contract history and offboarding process cannot be tracked in Sentec EMS.
- The employee will not appear under Employee > List > Former as a former employee.
Therefore, contract deactivation for employees with the status Resignation, Termination, End of Contract, or Deceased or Other must be performed through the Update Contract process followed by Employee Milestone, as described in this guide.
⚠️ Do Not Delete the Contract Using the Remove Contract Icon
Do not delete a contract by clicking the Remove Contract icon (trash icon) on the Contract Details page.
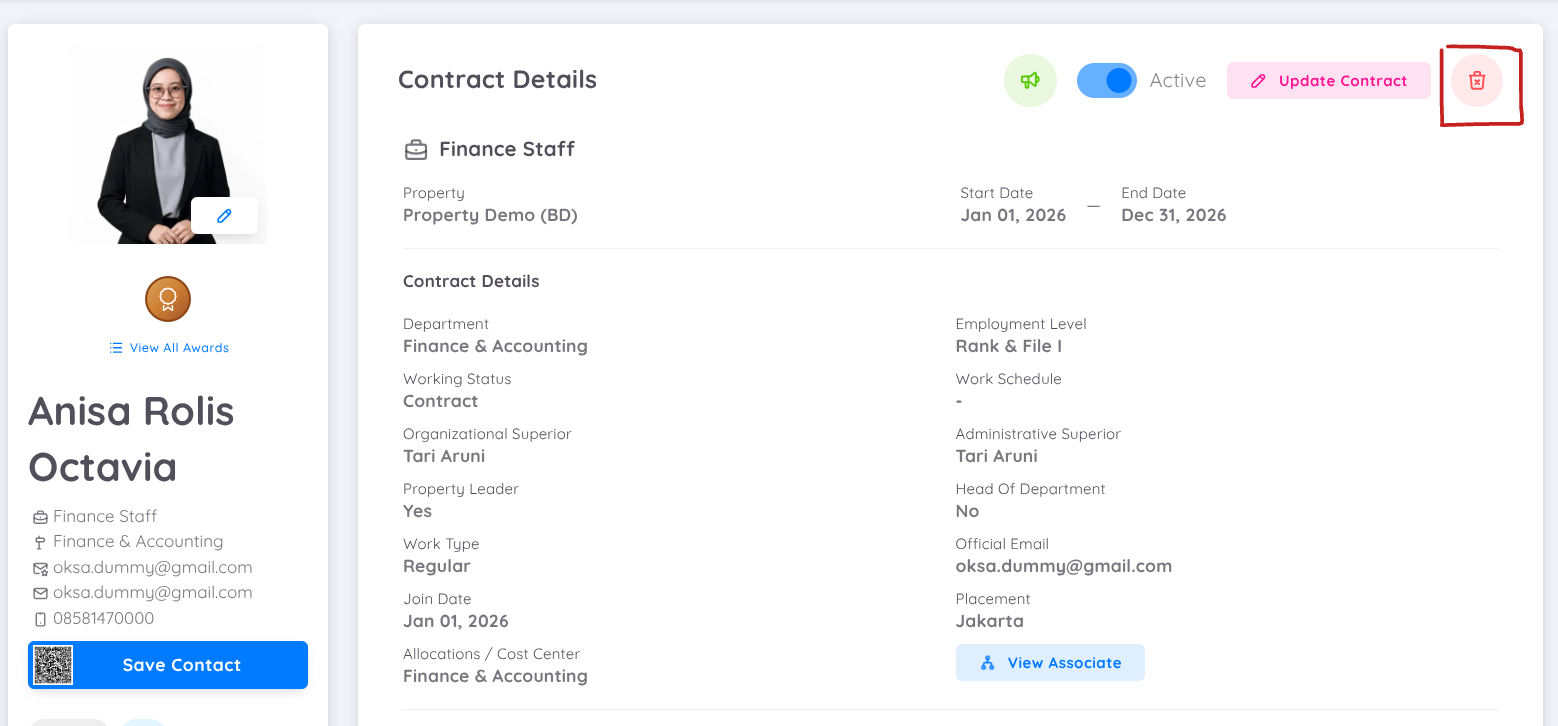
Deleting a contract using this button will permanently remove the employee's personal information and contract details from the system. As a result, the data can no longer be accessed or referenced.
For Resignation, Termination, End of Contract, and Deceased or Other processes, always update the employee contract first, then continue the Deactivate Employee process through Employee Milestone as described in this guide.
Deactivate Contract
To ensure the contract deactivation process is completed correctly, follow each step in this guide in sequence. The process begins by updating the employee's contract information and continues through Employee Milestone until the employee is successfully moved to the Former Employee list.
Step 1: Update the Employee Contract
The first step is to update the employee's contract information according to the employee's final employment status. This update is required before the employee can be processed through Employee Milestone.
Important Note
The Update Contract process should be completed as soon as the company receives the employee's resignation, confirms a termination decision, or becomes aware that the employee's contract has reached its end date.
The contract must be updated no later than the employee's last working day or the last day the employee remains with the company. This ensures that the deactivation and offboarding processes follow the correct system workflow and that the employee's status history is recorded accurately.
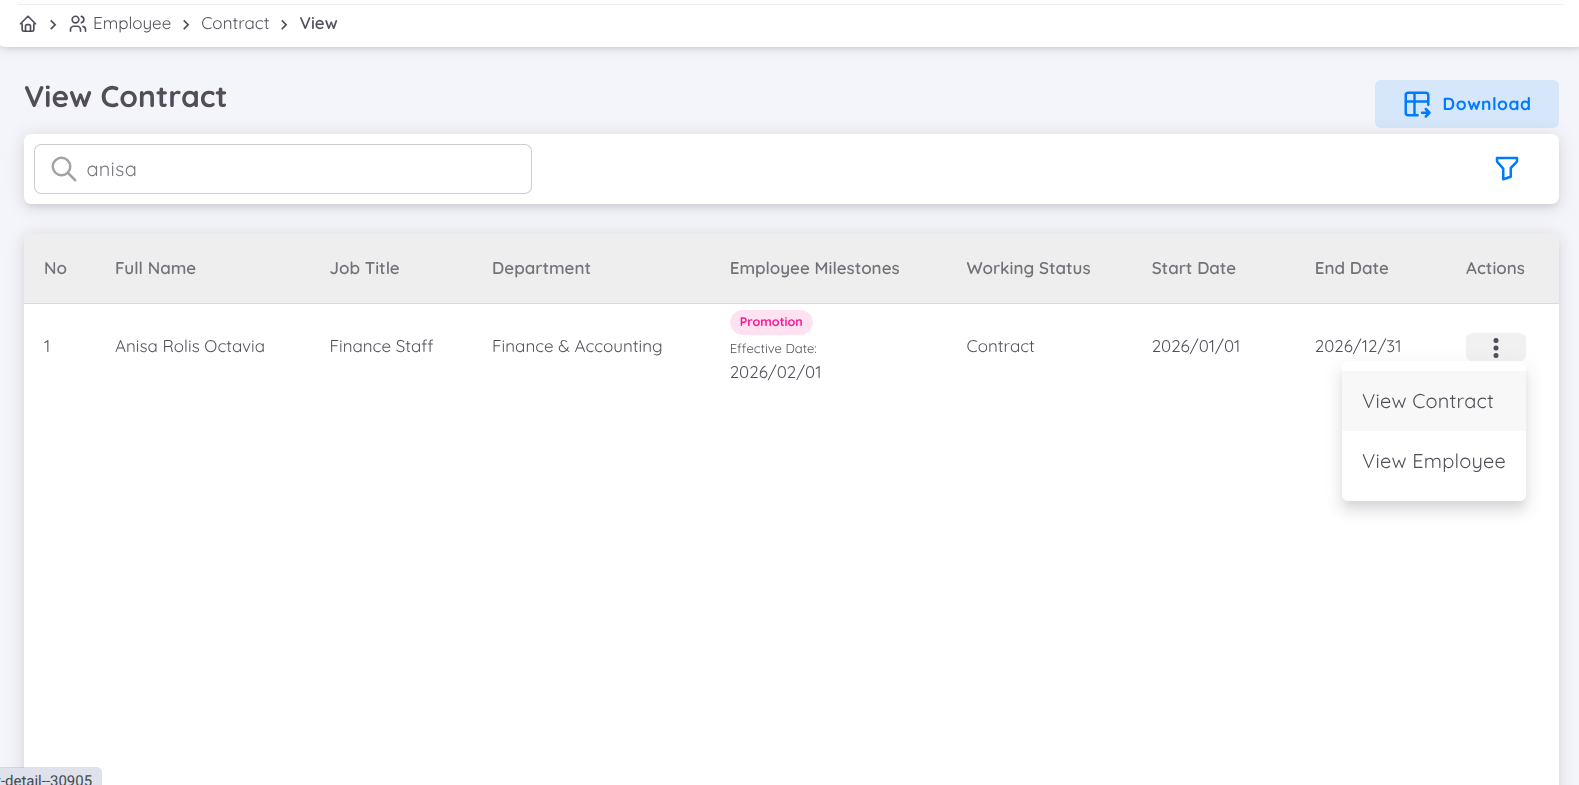
- Open Employee → List → Current, then search for the employee whose contract status needs to be updated. Alternatively, open Contract → View to access the employee's current contract details.
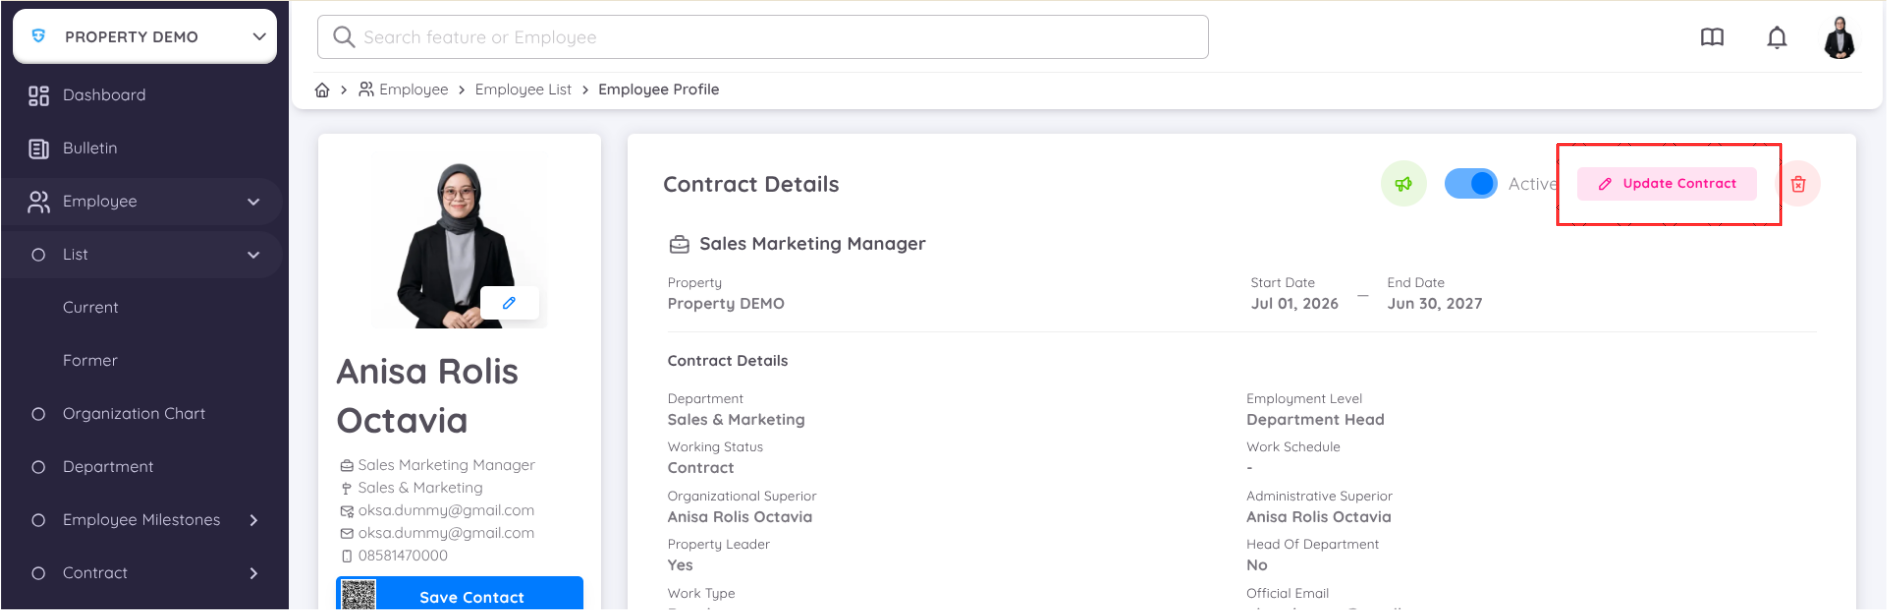
- Once the Contract Details page opens, click Update Contract in the upper-right corner to begin updating the contract.
- Scroll to the bottom of the page until you reach the Notes section. This section is used to record changes to the employee's contract status.
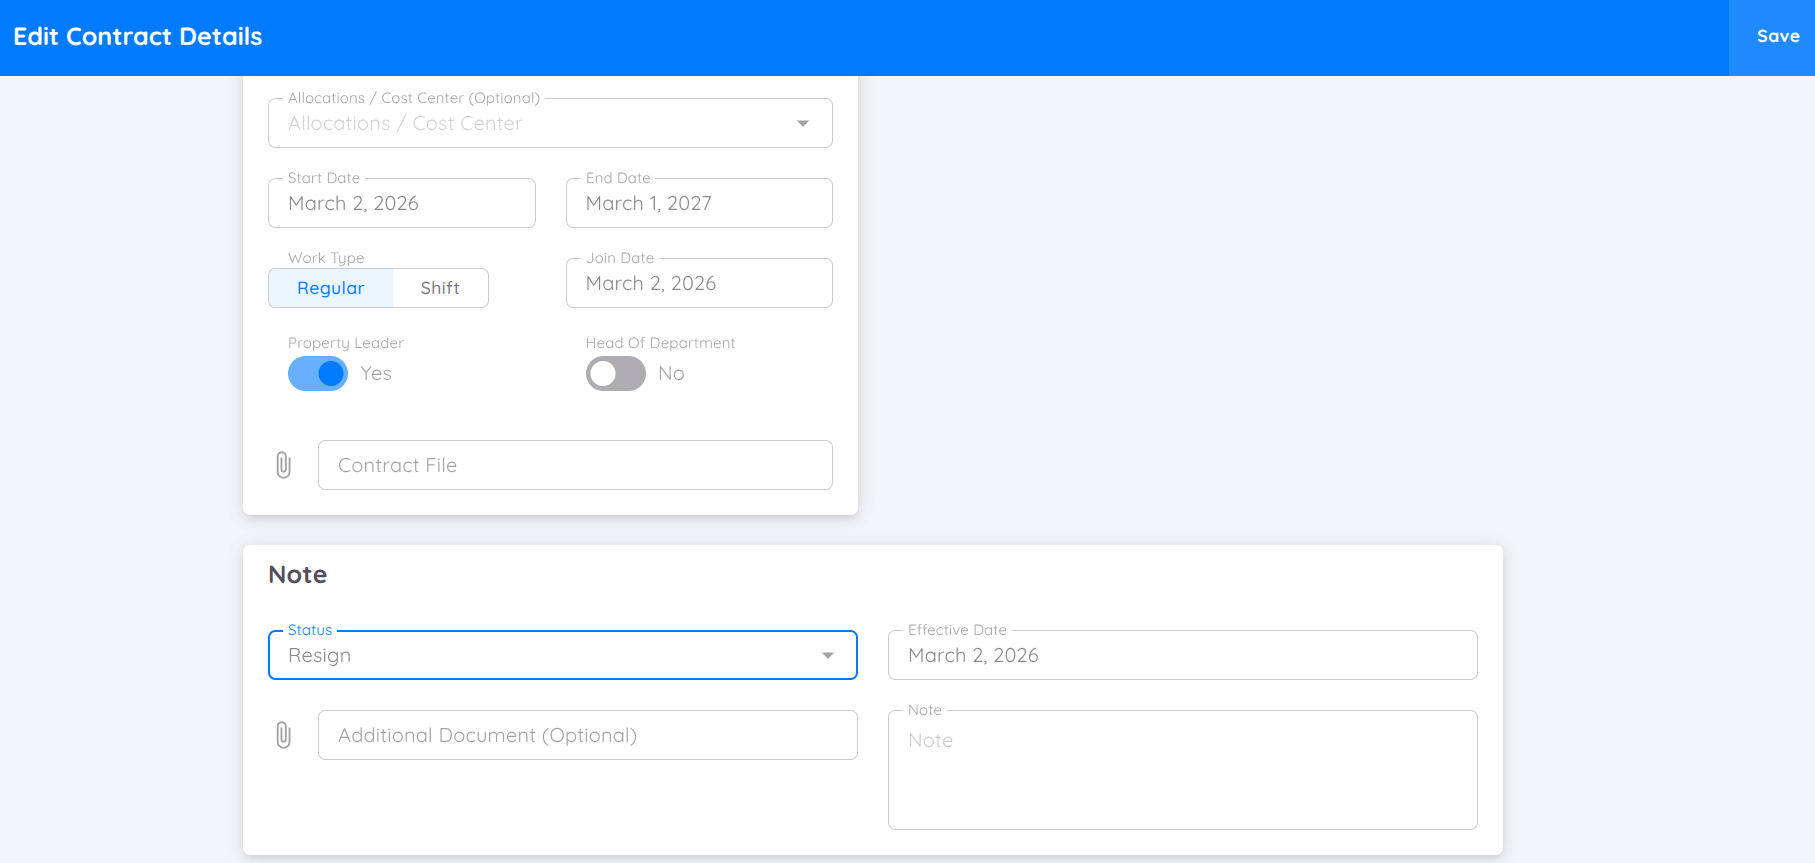
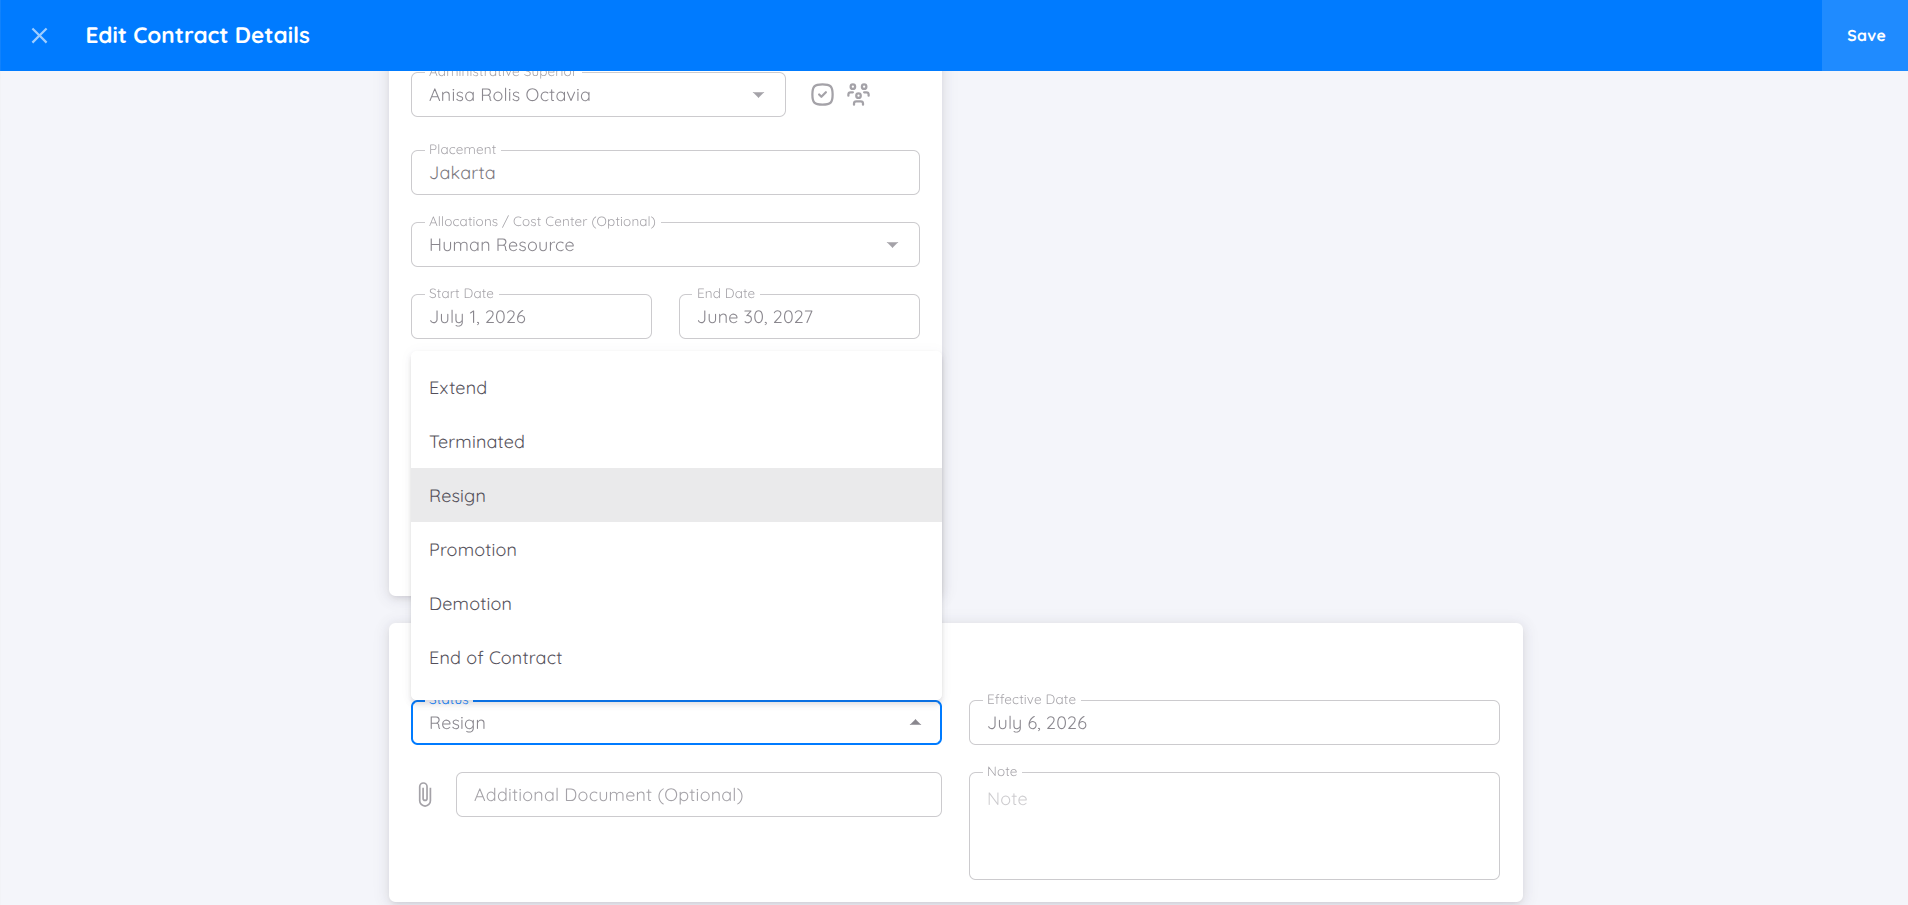
In the Status field, select the appropriate employee status, such as:
- Resignation
- Termination
- End of Contract
- Deceased or Other
Specify the Effective Date, which is the date the contract status change takes effect. This date represents the effective end date of the employment relationship and is typically the employee's last working day.
Example:
If an employee submits a one-month resignation notice on July 1, 2026, set the Effective Date to August 1, 2026, which is the employee's final working day after completing the one-month notice period.
If supporting documents are available, such as a resignation letter or other relevant documents, upload them under Additional Document (Optional).
Complete the Note field if additional information regarding the contract status change is required, such as the reason for the change or other relevant remarks.
After verifying that all information is correct, click Save in the upper-right corner to save the contract update.
Step 2: Process the Document Checklist (Optional)
After the contract update has been successfully saved, the system will display a confirmation pop-up prompting you to create a Document Checklist.
The Document Checklist is used to ensure that all documents, company assets, and activities related to the offboarding process have been verified before the employee deactivation process is considered complete.
1. Create a Document Checklist
In the confirmation pop-up, select the appropriate Document Checklist from the Document Name field.
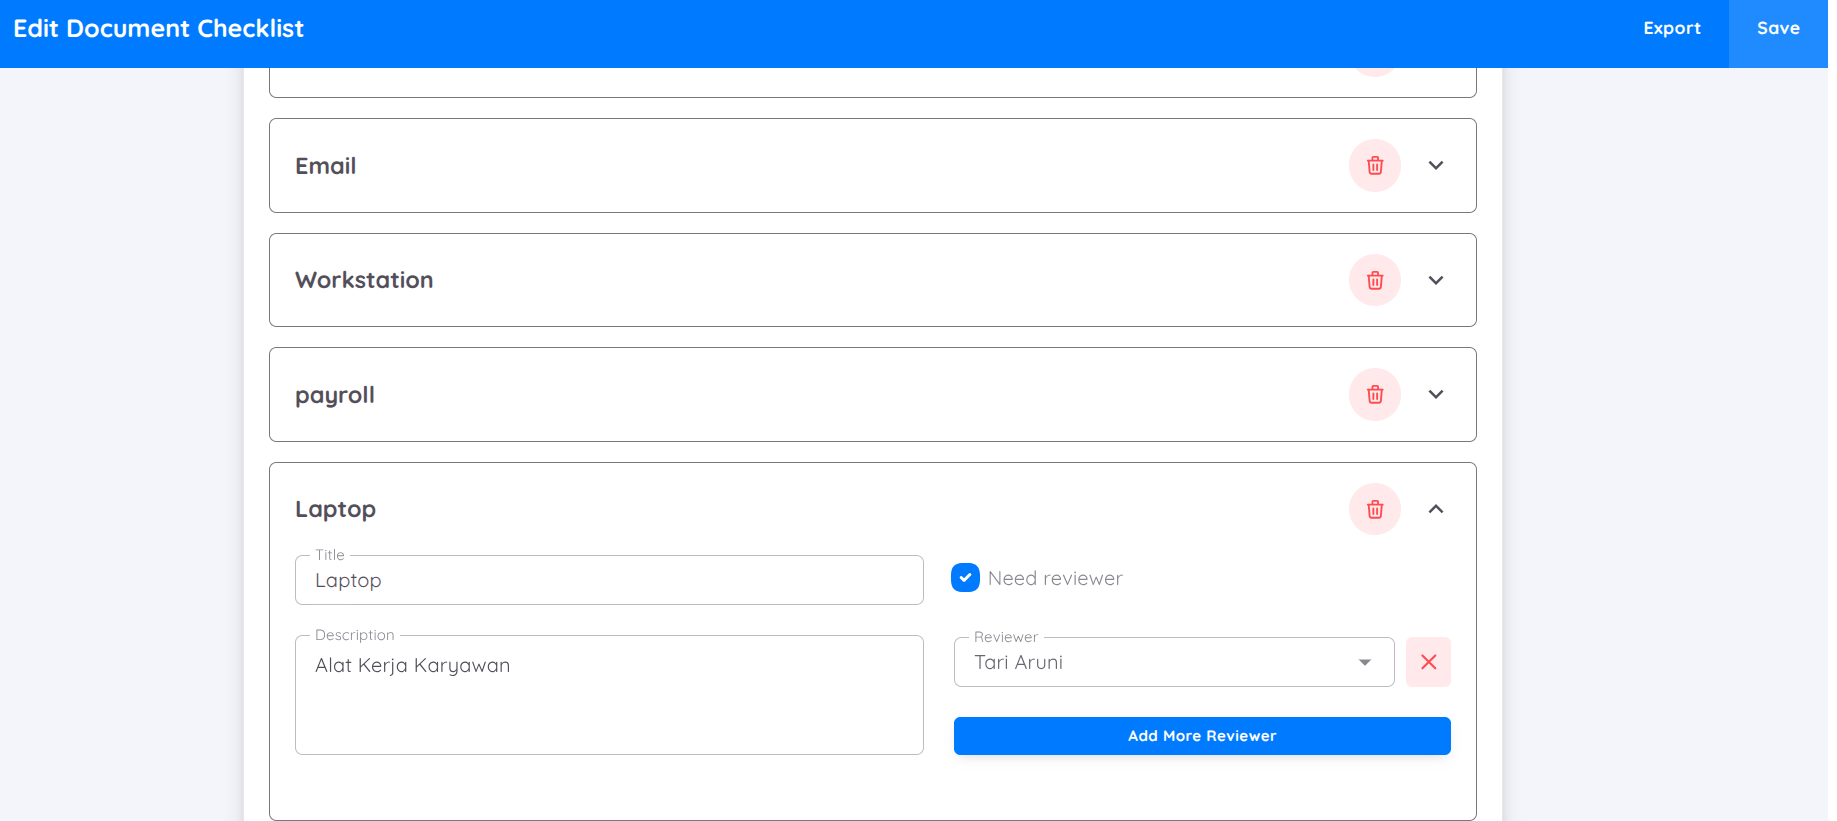
The available checklist options are based on the configuration defined under Configuration > Property > Document.
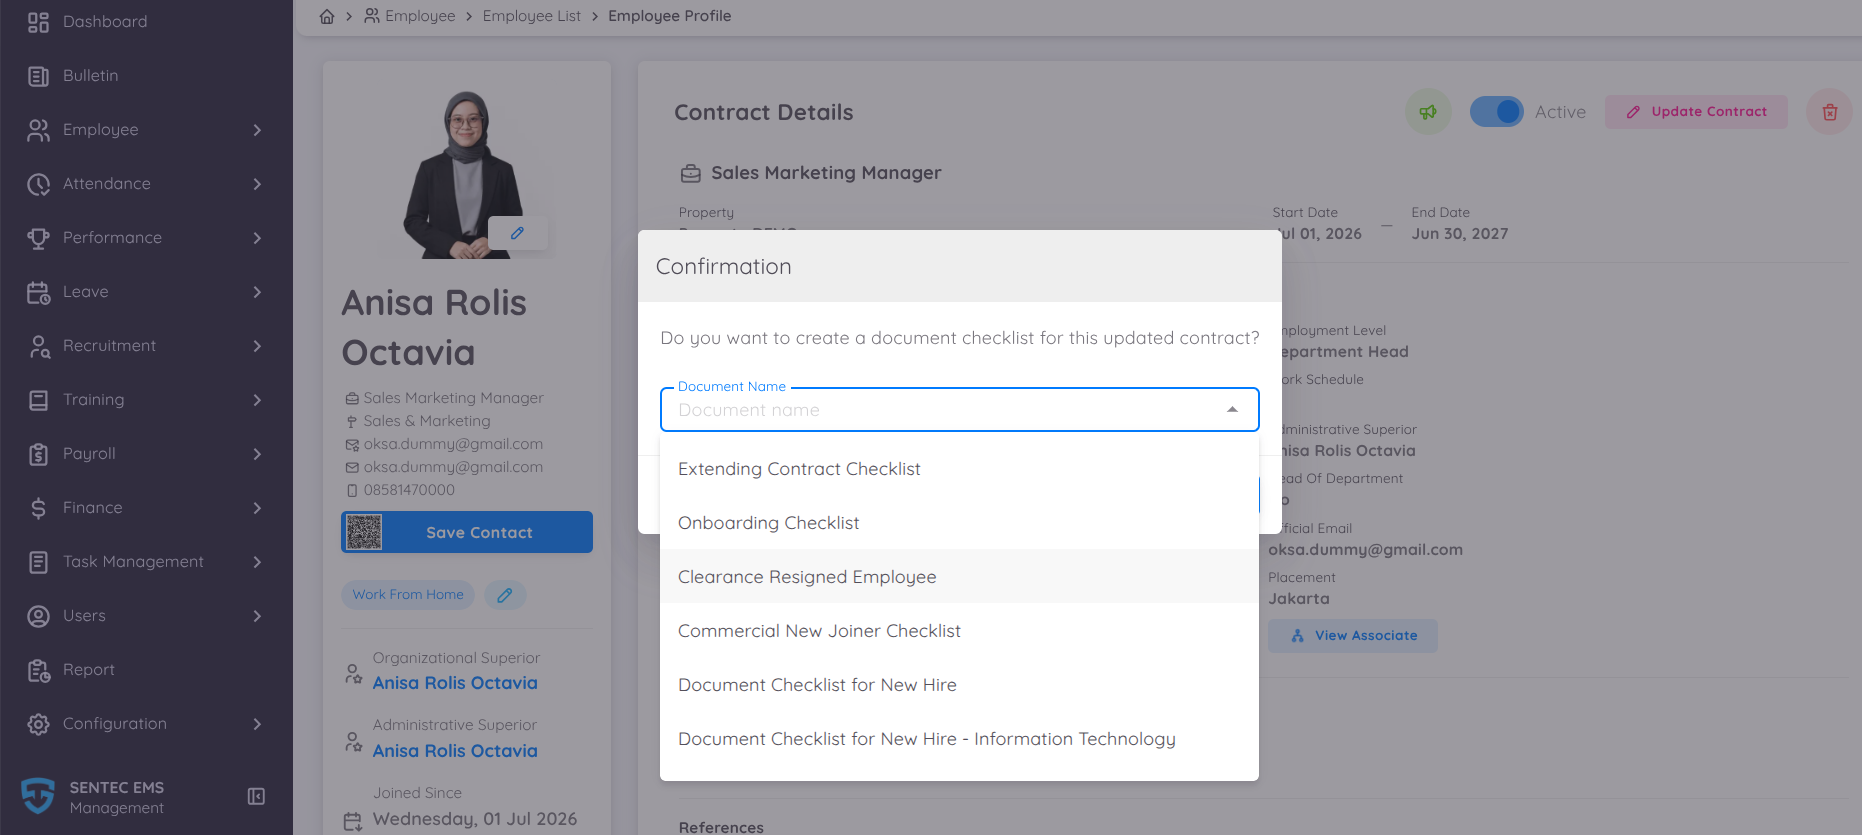
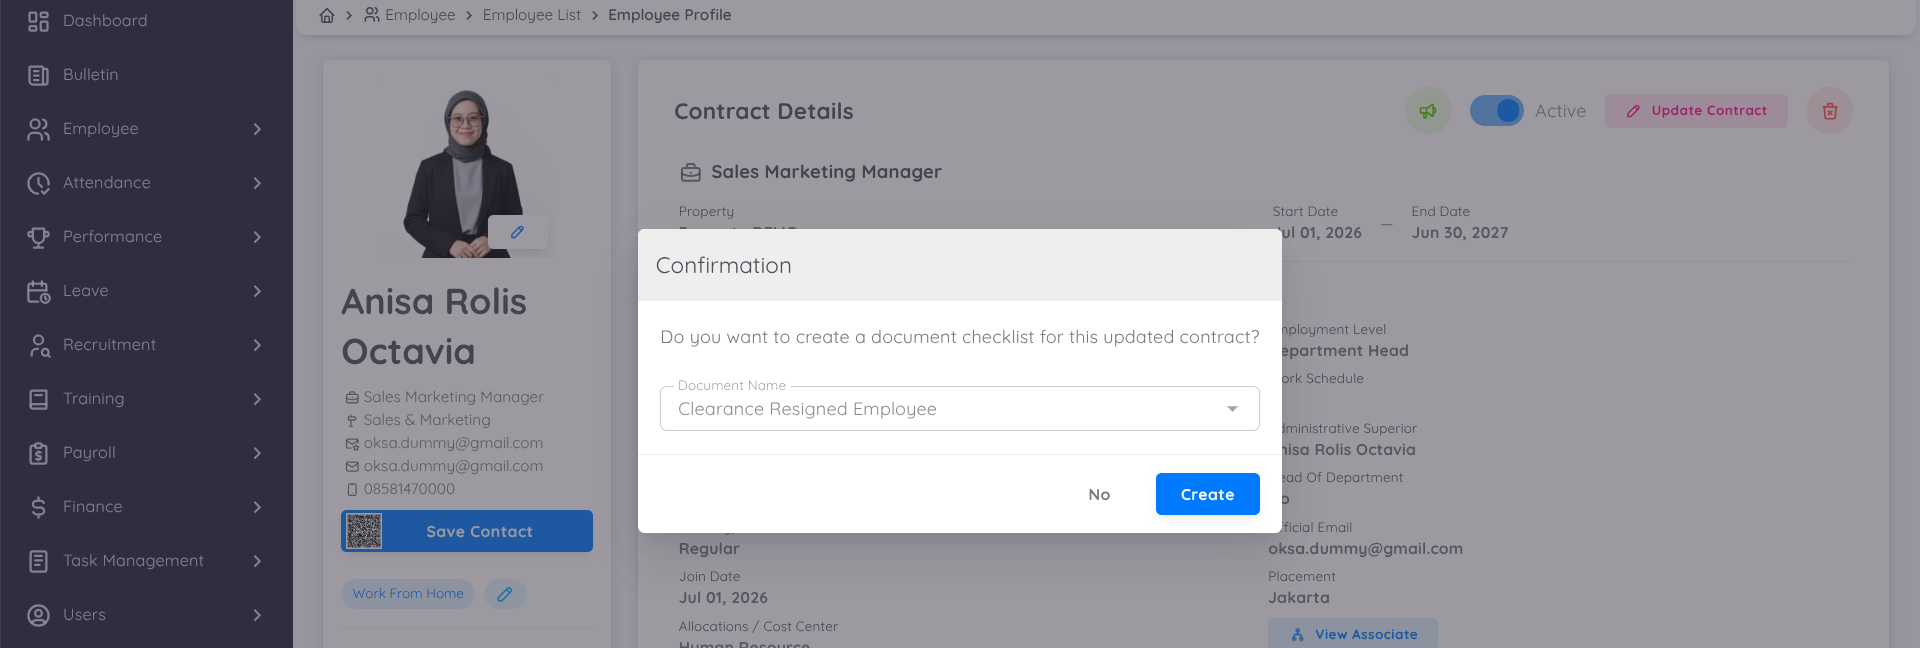
Ensure that the selected checklist matches the employee's contract status.
Example:
- Clearance Resigned Employee for the Resignation process.
Next:
- Click Create to create the Document Checklist.
- Click No if you want to continue without creating a checklist.
2. Reviewer Verification
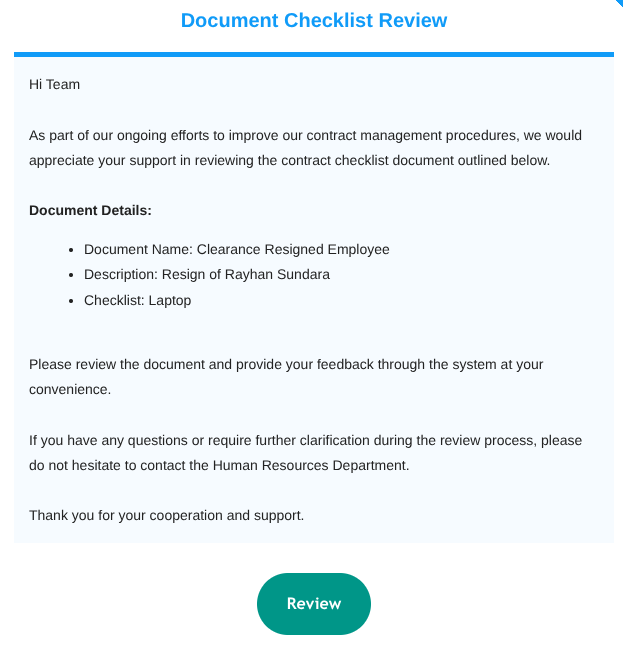
Once the Document Checklist has been created, the system will send a notification to the reviewer(s) configured under Configuration > Property > Document.
Reviewers will receive notifications through:
- Employee Portal under the Approval menu
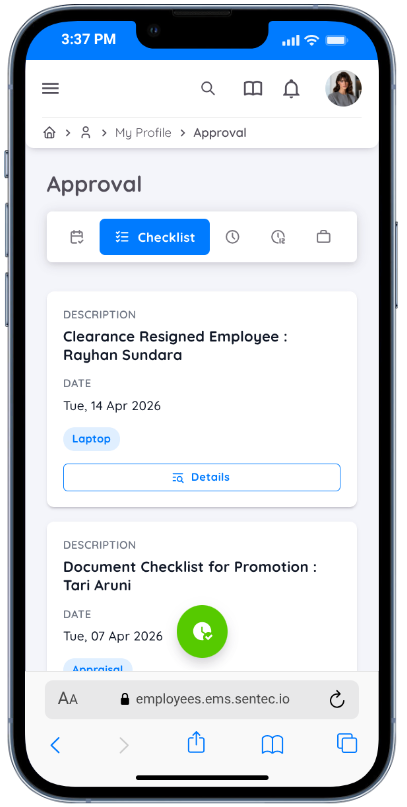
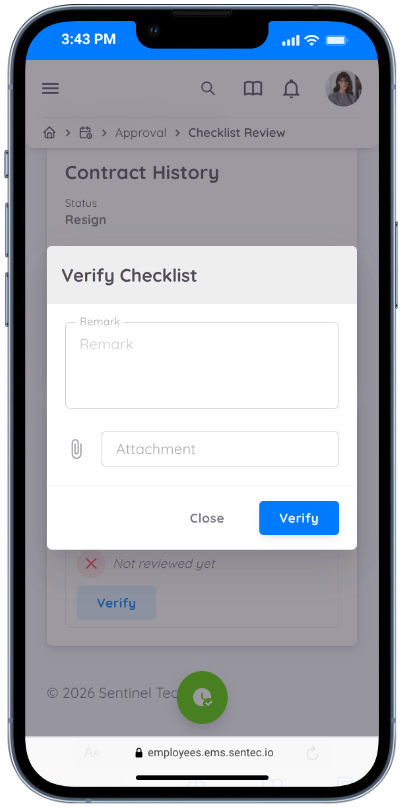
The reviewer can then open the Document Checklist details to begin the verification process.
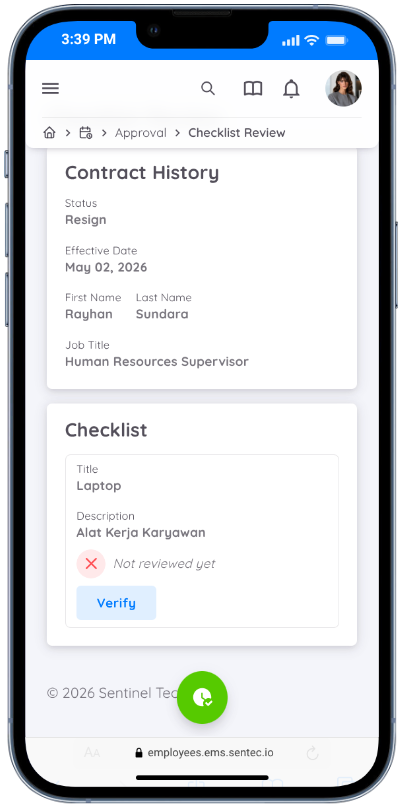
During the verification process, reviewers can:
- Add Remarks.
- Upload Attachments as supporting documents.
Note
Each checklist item can have a different reviewer based on your company's configuration. The Verify button is only available to the assigned reviewer and only for checklist items that have not yet been verified.
3. Complete the Document Checklist
After all reviewers have completed their verification tasks, Management can complete the Document Checklist by navigating to Employee > Document > Checklist.
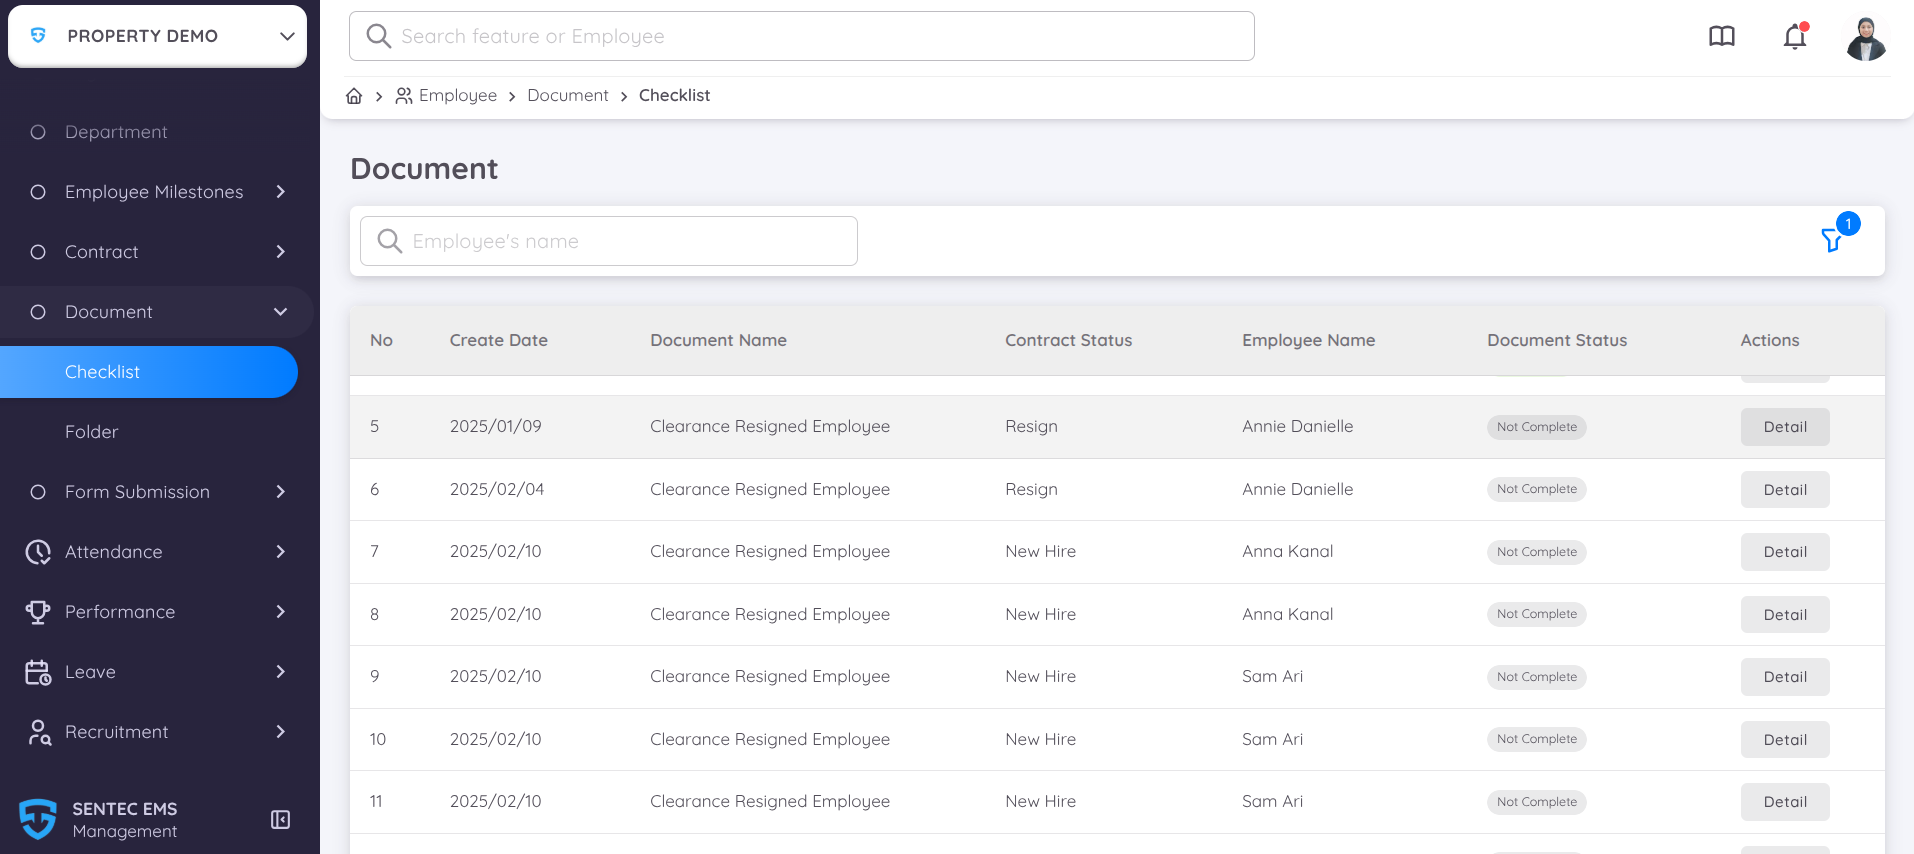
Select the Document Checklist to be processed, then click Detail to open the Document Checklist page.
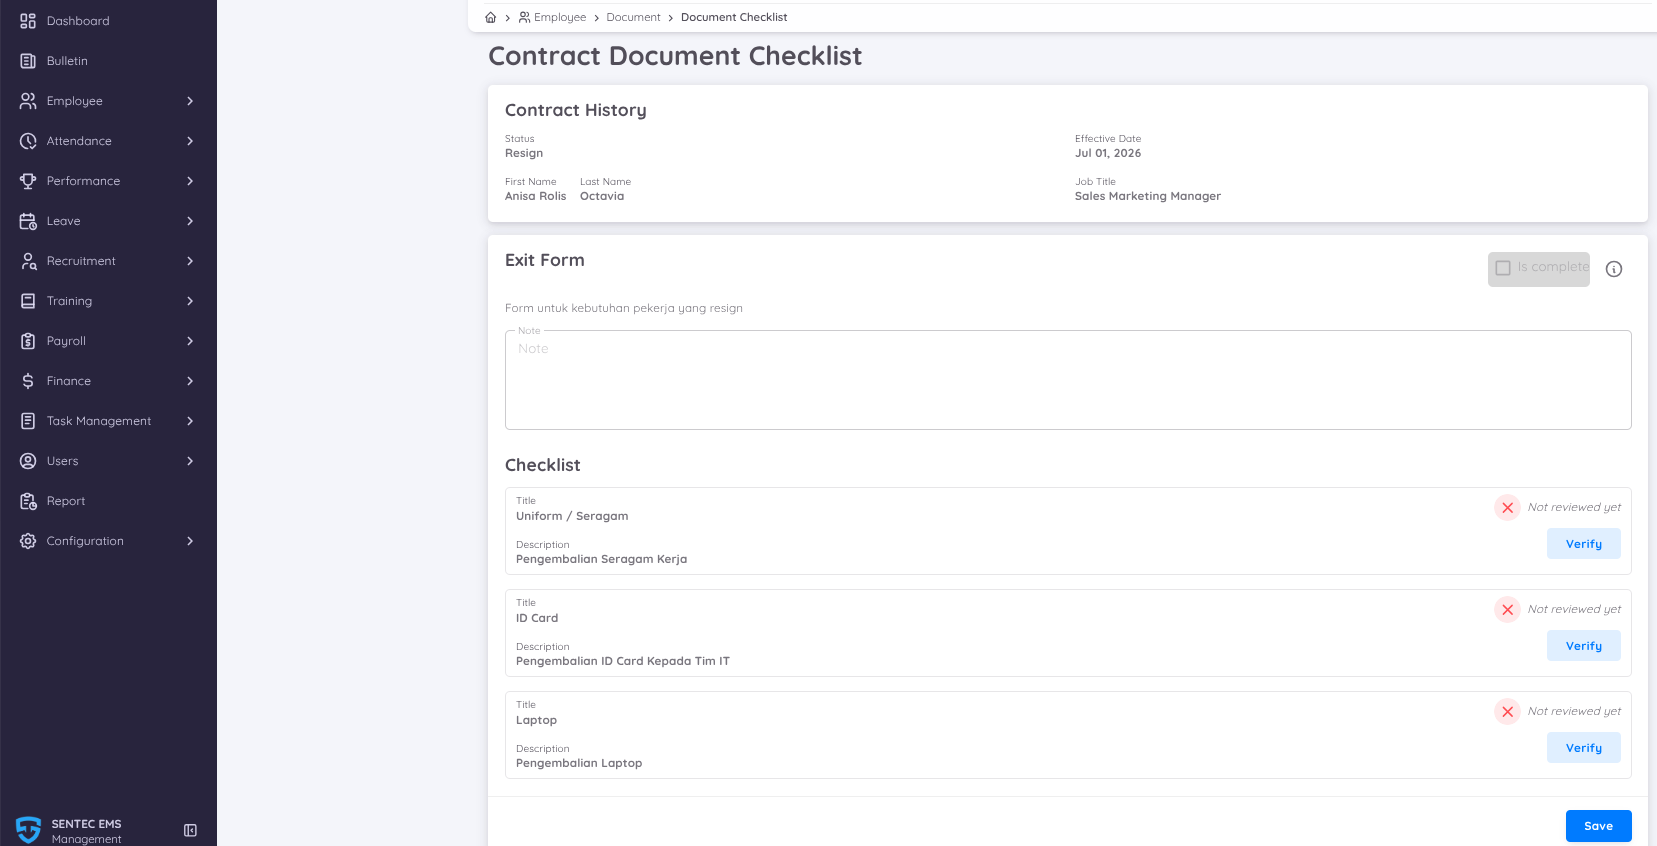
The Document Checklist page consists of the following sections:
- Contract History, which displays the employee's contract history.
- Checklist, which contains the list of documents, company assets, and activities that must be verified before the offboarding process is completed.
If a checklist item does not have an assigned reviewer, users with access to the Document Checklist Management page can perform the verification. In this case, the Verify button will be available for any checklist items that have not yet been verified.
Click Verify to complete the verification for each checklist item.
Note
The Document Checklist can only be completed after all checklist items have been marked as Verified.
If there are still checklist items that have not been verified, the Is Complete option will remain disabled, preventing the Document Checklist from being completed.
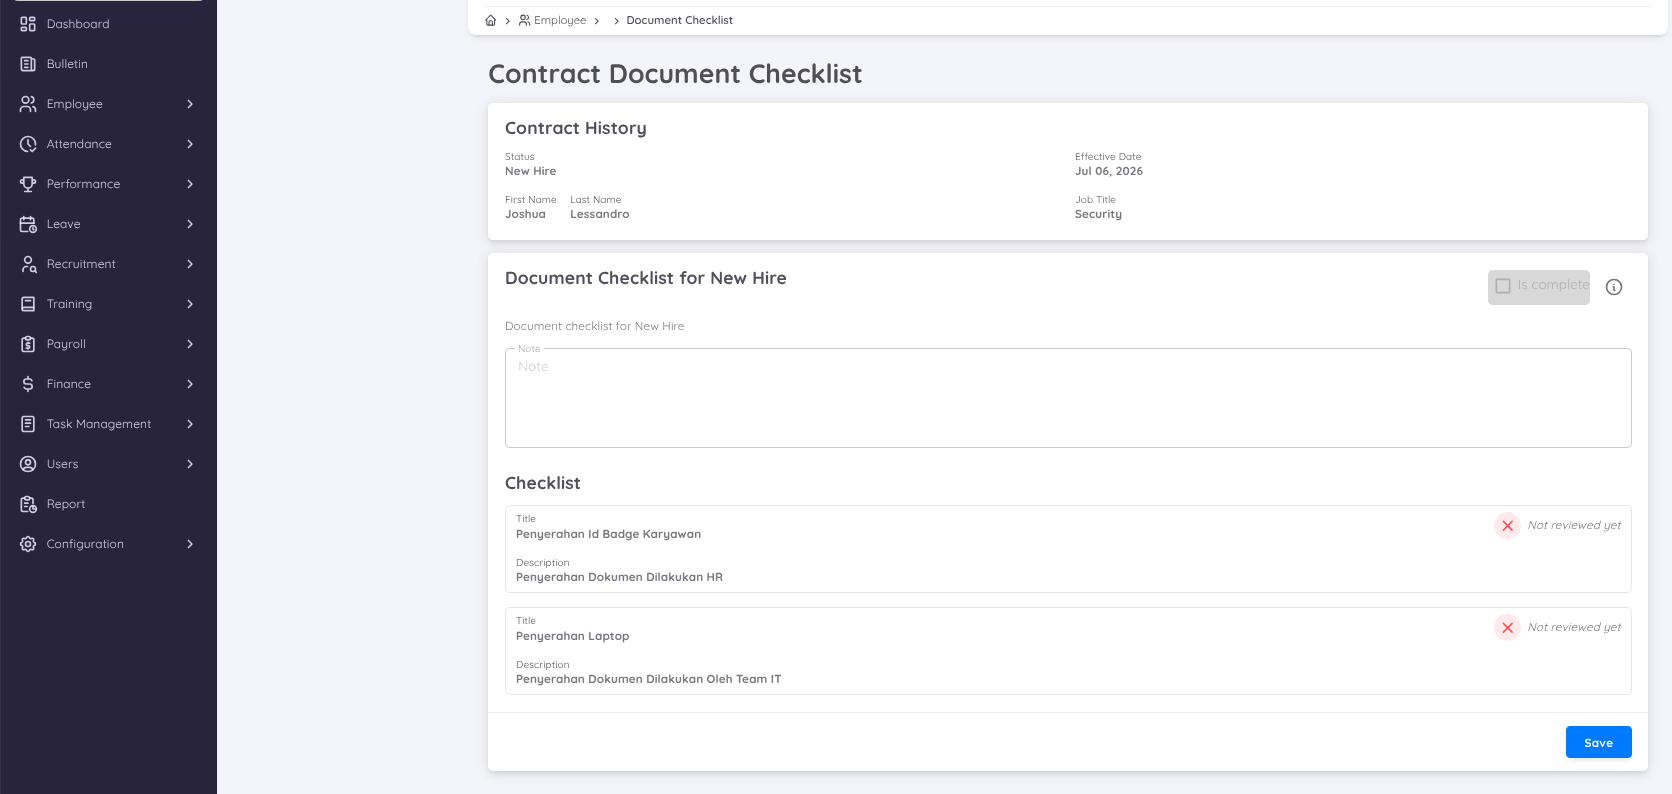
Once all checklist items have been verified, the Is Complete option will be enabled automatically.
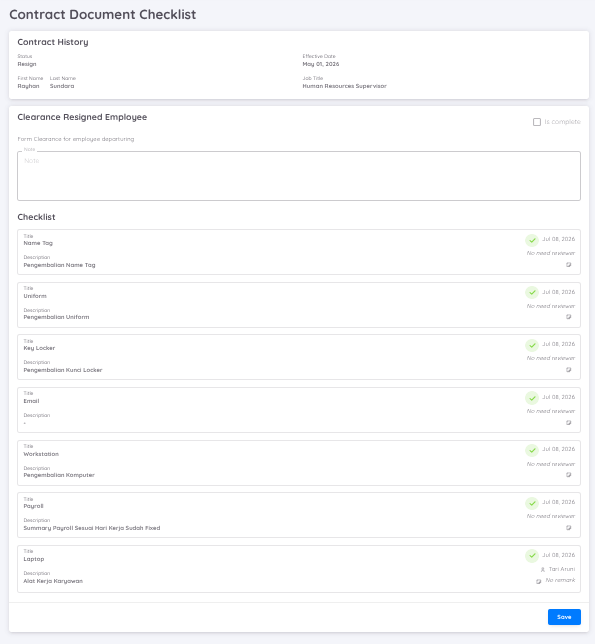
Select the Is Complete checkbox, then click Save to complete the Document Checklist.
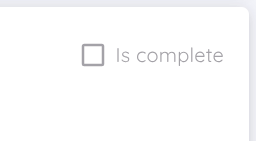
If the process is saved successfully, the Document Checklist status will change to Complete, indicating that the entire verification process has been completed.
Once the status changes to Complete, the Download button will become available, allowing you to download the Document Checklist for record-keeping or documentation purposes.
Step 3: Update Associates (Only if the Employee is an Organizational Superior or Administrative Superior)
If the employee who is resigning or leaving the company is assigned as an Organizational Superior and/or Administrative Superior, the superior assignment must be updated first. This ensures that approval processes for subordinate employees continue without interruption and are automatically redirected to the active or newly assigned superior.
⚠️
The superior assignment must be updated before the contract is deactivated, and no later than the effective date or the employee's last working day.
To update the superior, open the employee's Contract Detail, then click the View Associates button.
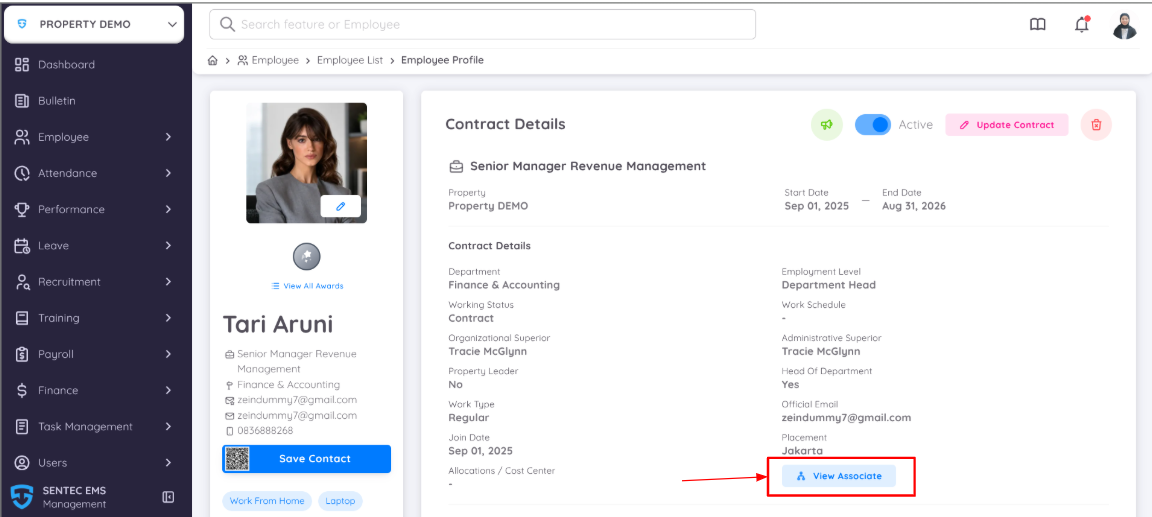
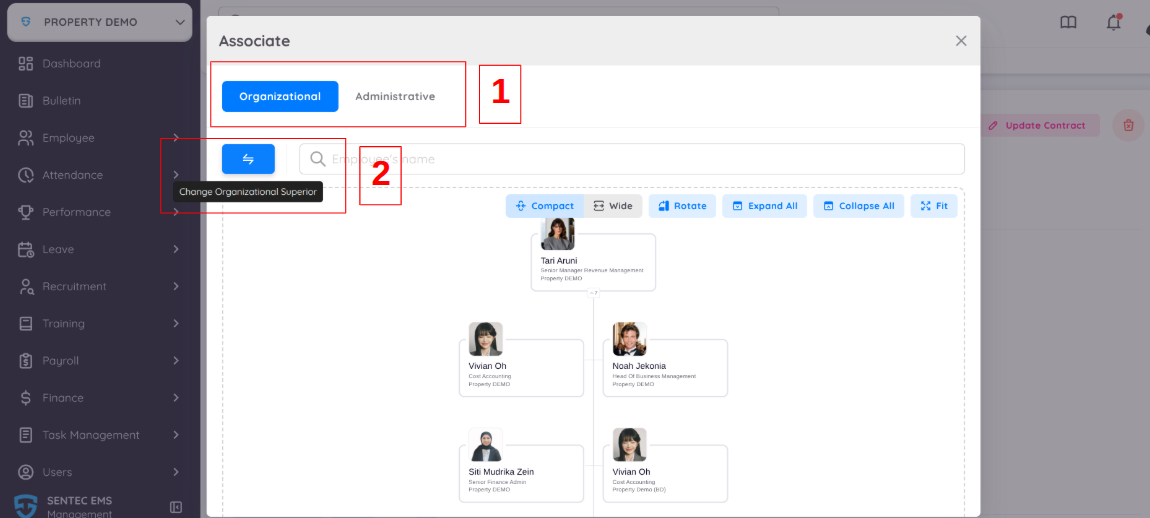
Next, select the tab corresponding to the associate type that needs to be updated, either Organizational Superior or Administrative Superior.
After selecting the appropriate tab, click Change Organizational Superior.
In the Change Superior window, enter the name of the employee who will replace the current superior.
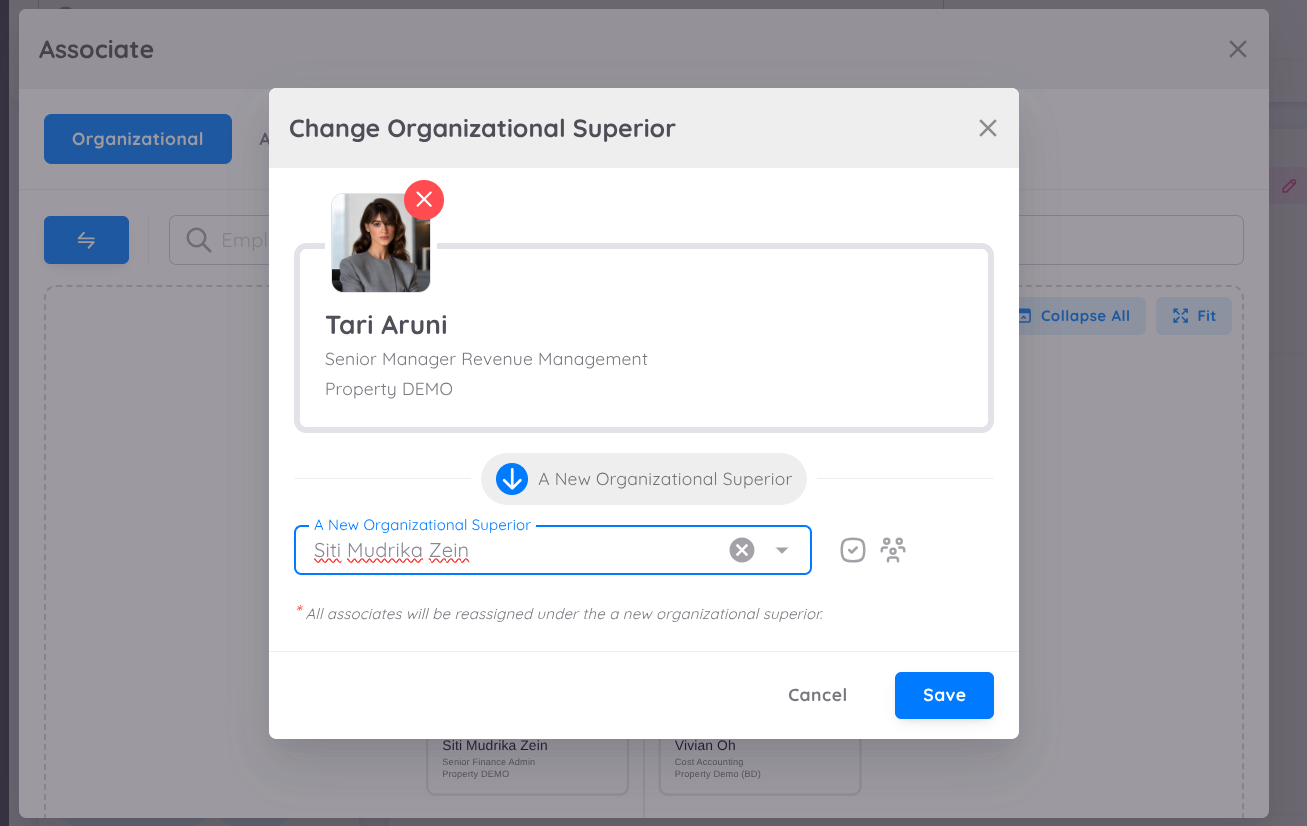
Enable the Populate option if the replacement superior belongs to an Organization or Regional structure so the employee's name can be found. If the replacement superior belongs to a Unit, this option does not need to be enabled.

Click Save to apply the changes. Once saved, all employees who were previously associated with the former superior will automatically be updated to the new superior.
⚠️ If the Administrative Superior also needs to be updated, repeat the same steps from the Administrative Superior tab.
Step 4: Deactivate the Membership
If the employee belongs to Archipelago and has an active Membership, the membership type must be changed to Basic before the contract is deactivated.
To update the membership, open the employee's Profile, then click Archipelago Membership.
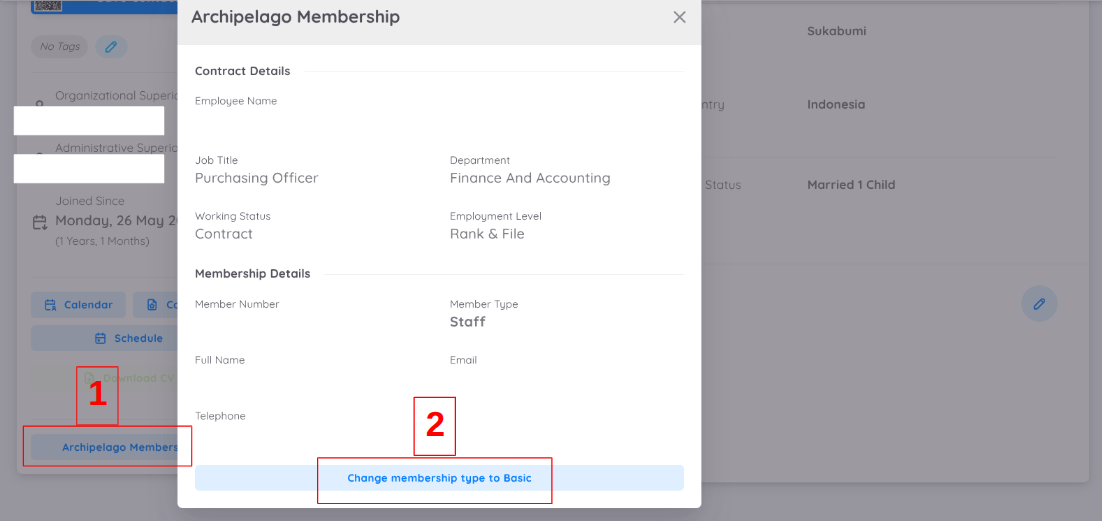
Next, click Change Membership Type to Basic to change the membership type to Basic.
⚠️ Important
If the Archipelago Membership button is not available on the employee's profile, it means the employee does not have an Archipelago Membership. This step can be skipped, and the process can continue to the next step.
Step 5: Deactivate the Employee Through Employee Milestone
After the employee's contract has been updated to Resignation, Termination, End of Contract, or Deceased or Other, the next step is to deactivate the employee through the Employee Milestone menu.
Note: The employee deactivation process must be performed on or after the Effective Date. In most cases, the Effective Date is the employee's last working day.
Important
If the Effective Date is set to a past date (backdated) or the contract status is updated only after the employee has resigned or left the company, the employee's name will not appear in Employee Milestone > Departing. This is because the system only displays employees who are eligible for the Deactivate Employee process for up to one month after the Effective Date.
Once this period has passed, the employee can no longer be deactivated through Employee Milestone > Departing.
Therefore, make sure that:
- The Effective Date is set to the actual employment end date or the employee's last working day.
- The contract status is updated as soon as the company receives the employee's resignation, confirms a termination, or determines that the employee's contract has ended.
- The contract status update is completed within one month of the Effective Date so that the employee can still be processed through Employee Milestone > Departing.
1. Open the Departing Menu
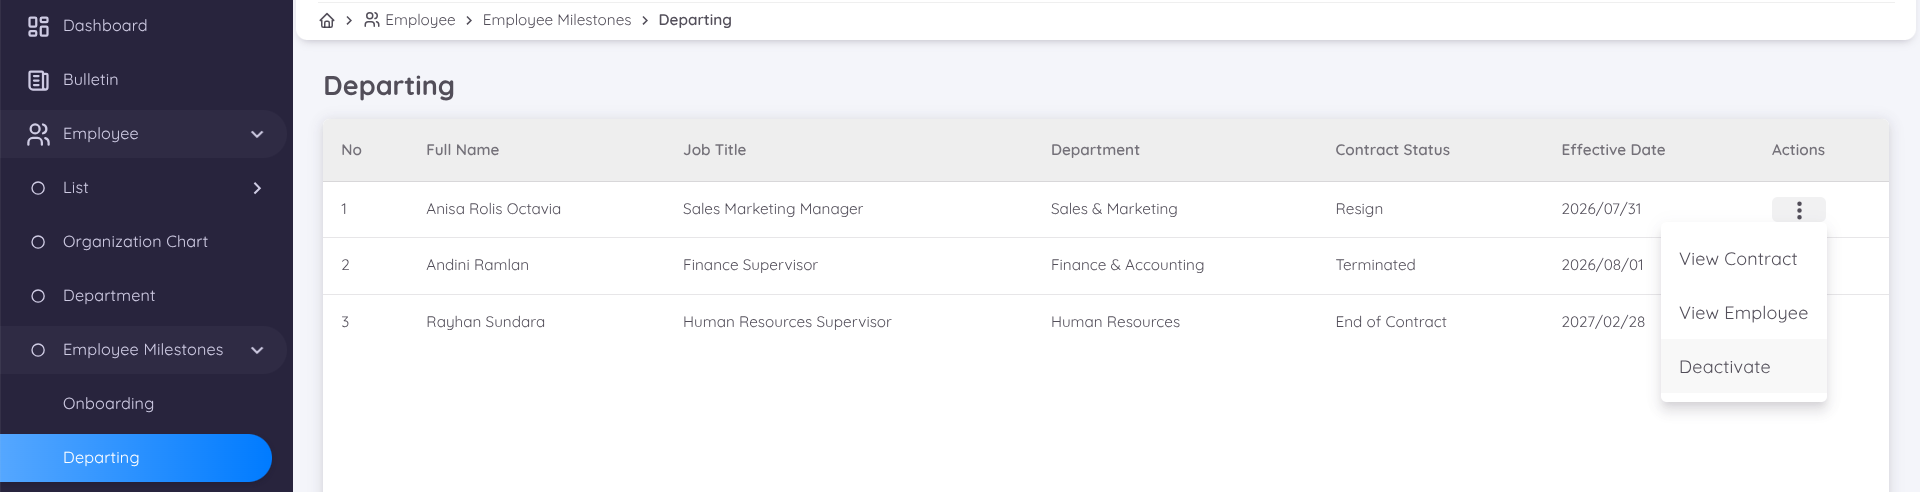
Navigate to Employee > Employee Milestone > Departing.
On the Departing page, the system displays a list of employees whose contract status has been updated and who are ready to be processed for employee deactivation.
Ensure that the current date has reached the employee's Effective Date or last working day.
Next, click the three-dot (⋮) icon in the employee's Action column, then select Deactivate.
2. Confirm the Deactivation Process
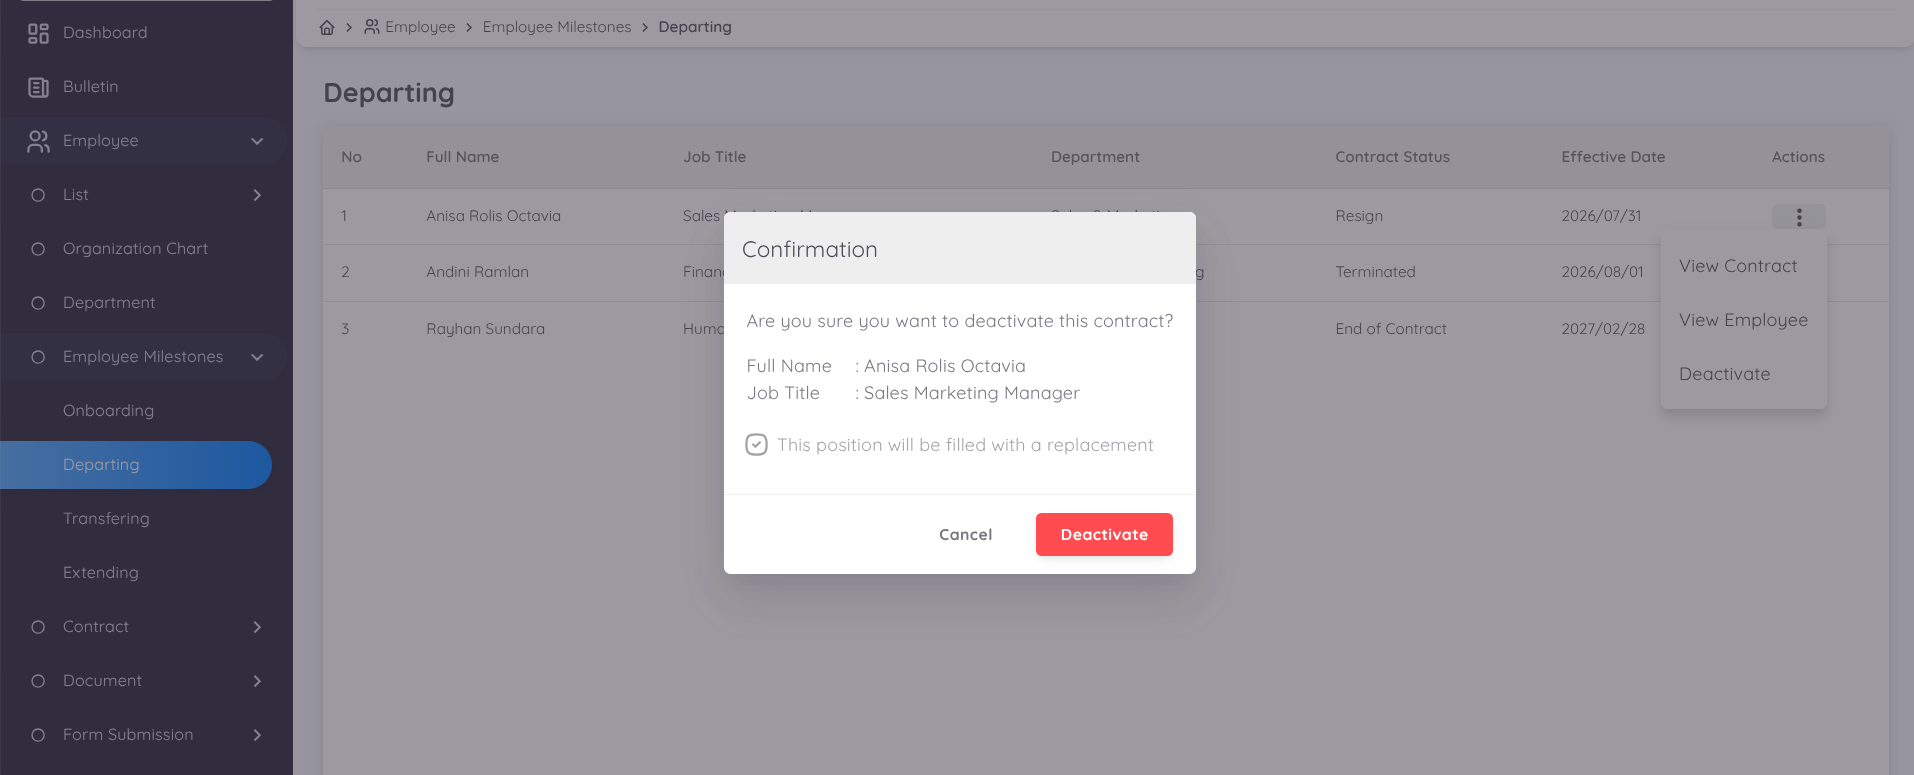
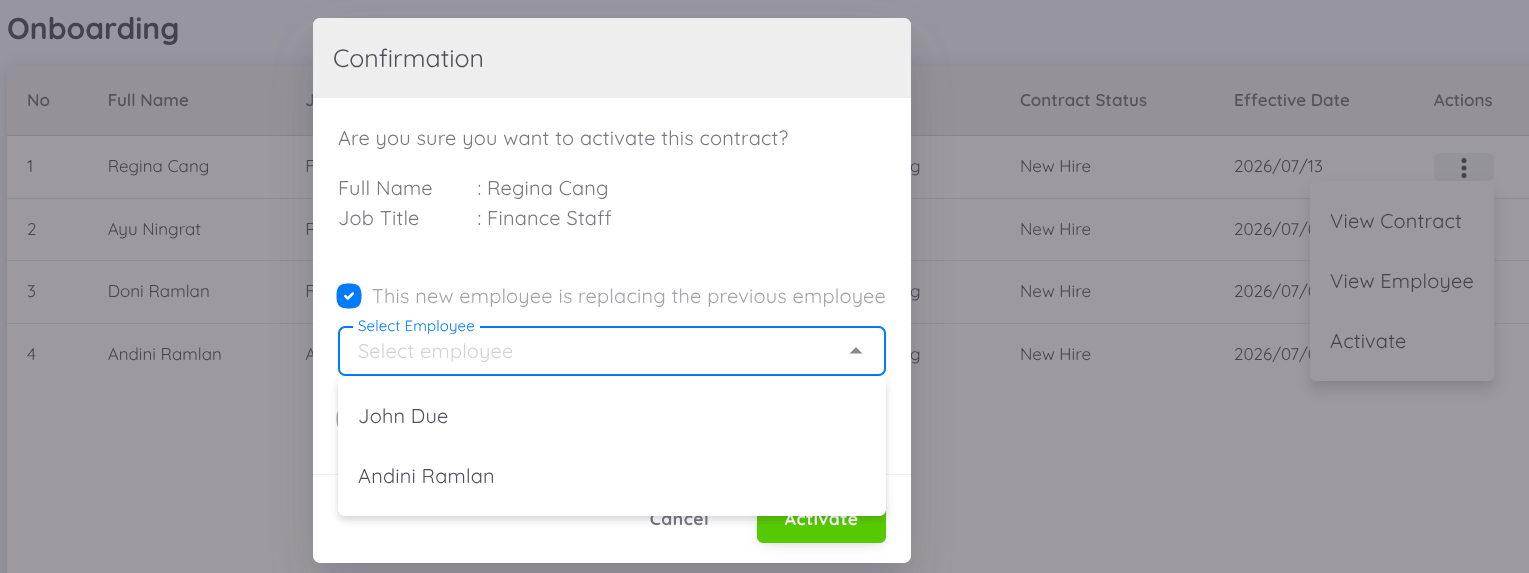
The system will display the Deactivate Employee window.
If the employee's position will be filled by a replacement, enable the This Position Will Be Filled with a Replacement option.
If the position will not be replaced, leave this option unchecked.
Then, click Deactivate to continue.
Note
If the employee's position will be filled by another employee, select the This Position Will Be Filled with a Replacement option when performing the Deactivate Employee process.
When this option is enabled, the system marks the position as requiring a replacement.
Later, when the company hires or activates a new employee for the same position, the resigned employee will appear in the Replacement list. Management can then select the former employee as the position being replaced, allowing the replacement history to be recorded and tracked within the system.
3. Verify That the Employee Has Been Deactivated
After the deactivation process is complete, navigate to Employee > List > Former.
On the Former page, the deactivated employee will appear in the Former Employee list.
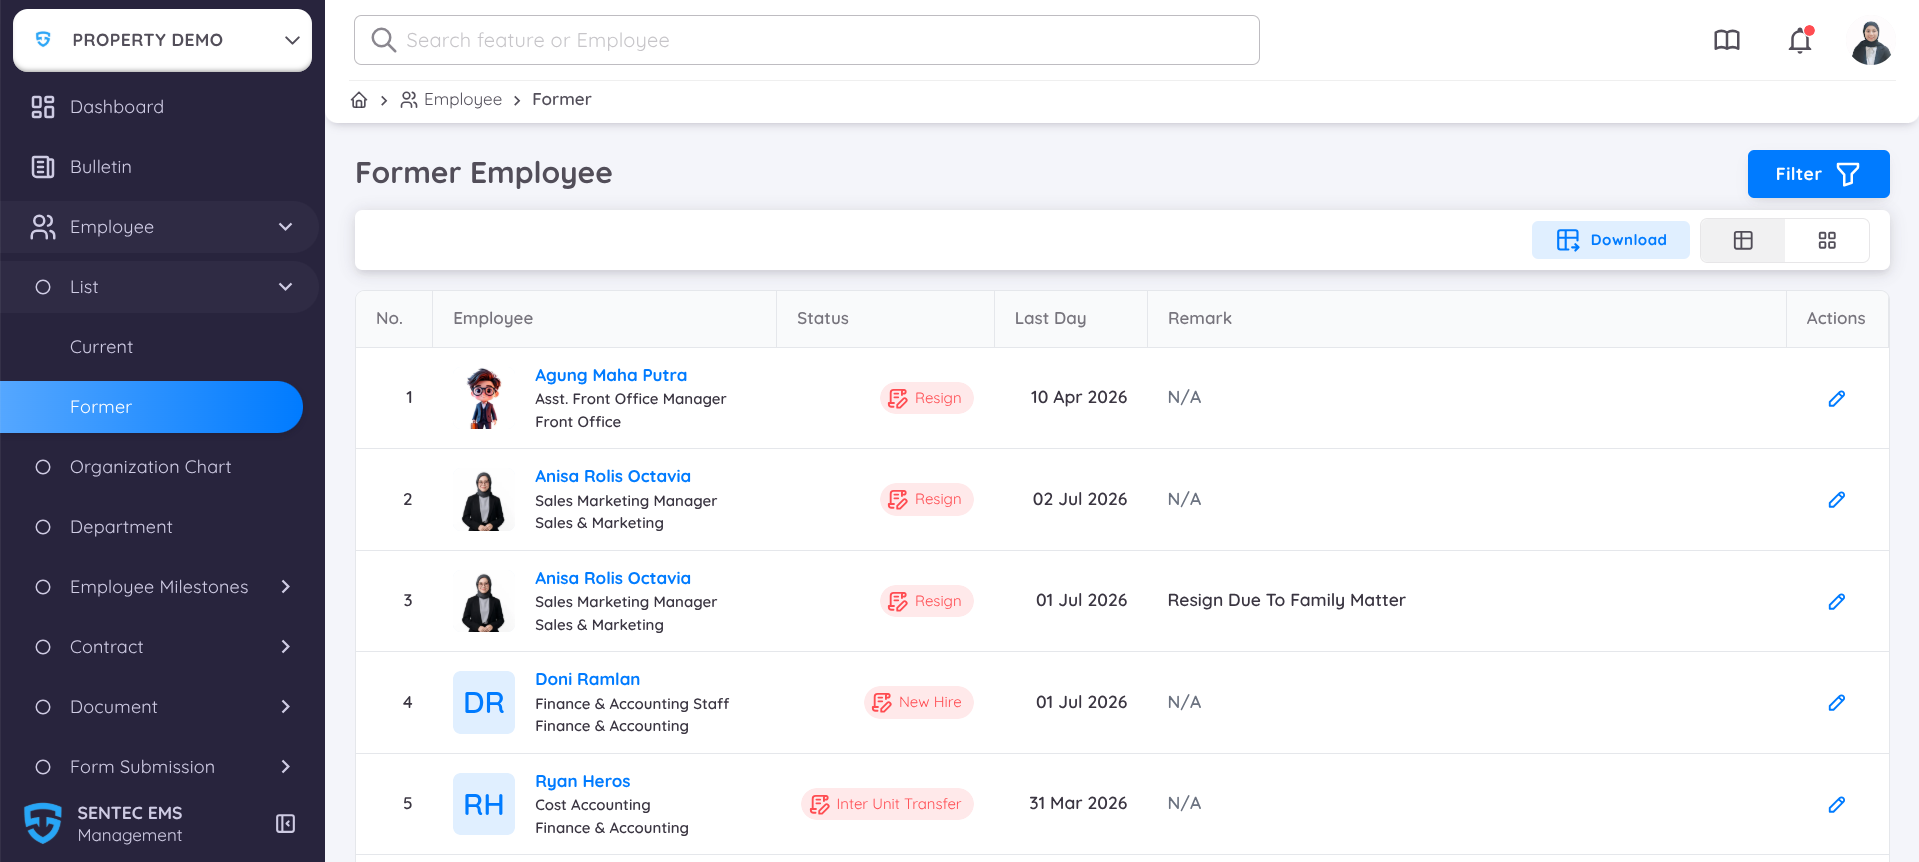
In addition to displaying former employees, this page allows you to add Remarks or additional notes related to the employee's deactivation.
To add a remark:
- Click the Edit (pencil) icon in the Action column.
- Enter the required information in the Remarks field.
- Click Save to save the changes.
Final Step: View the Resigned Employee Report
After the employee deactivation process has been completed—whether due to Resignation, Termination, End of Contract, or Deceased or Other—the employee's information can still be accessed through the Resigned Employee Report.
This report provides information about former employees, including their Attendance records and Leave Balance while they were still actively employed. The report can be used as a reference for final administrative processes, such as leave balance reconciliation or other reporting requirements.
View the Resigned Employee Report
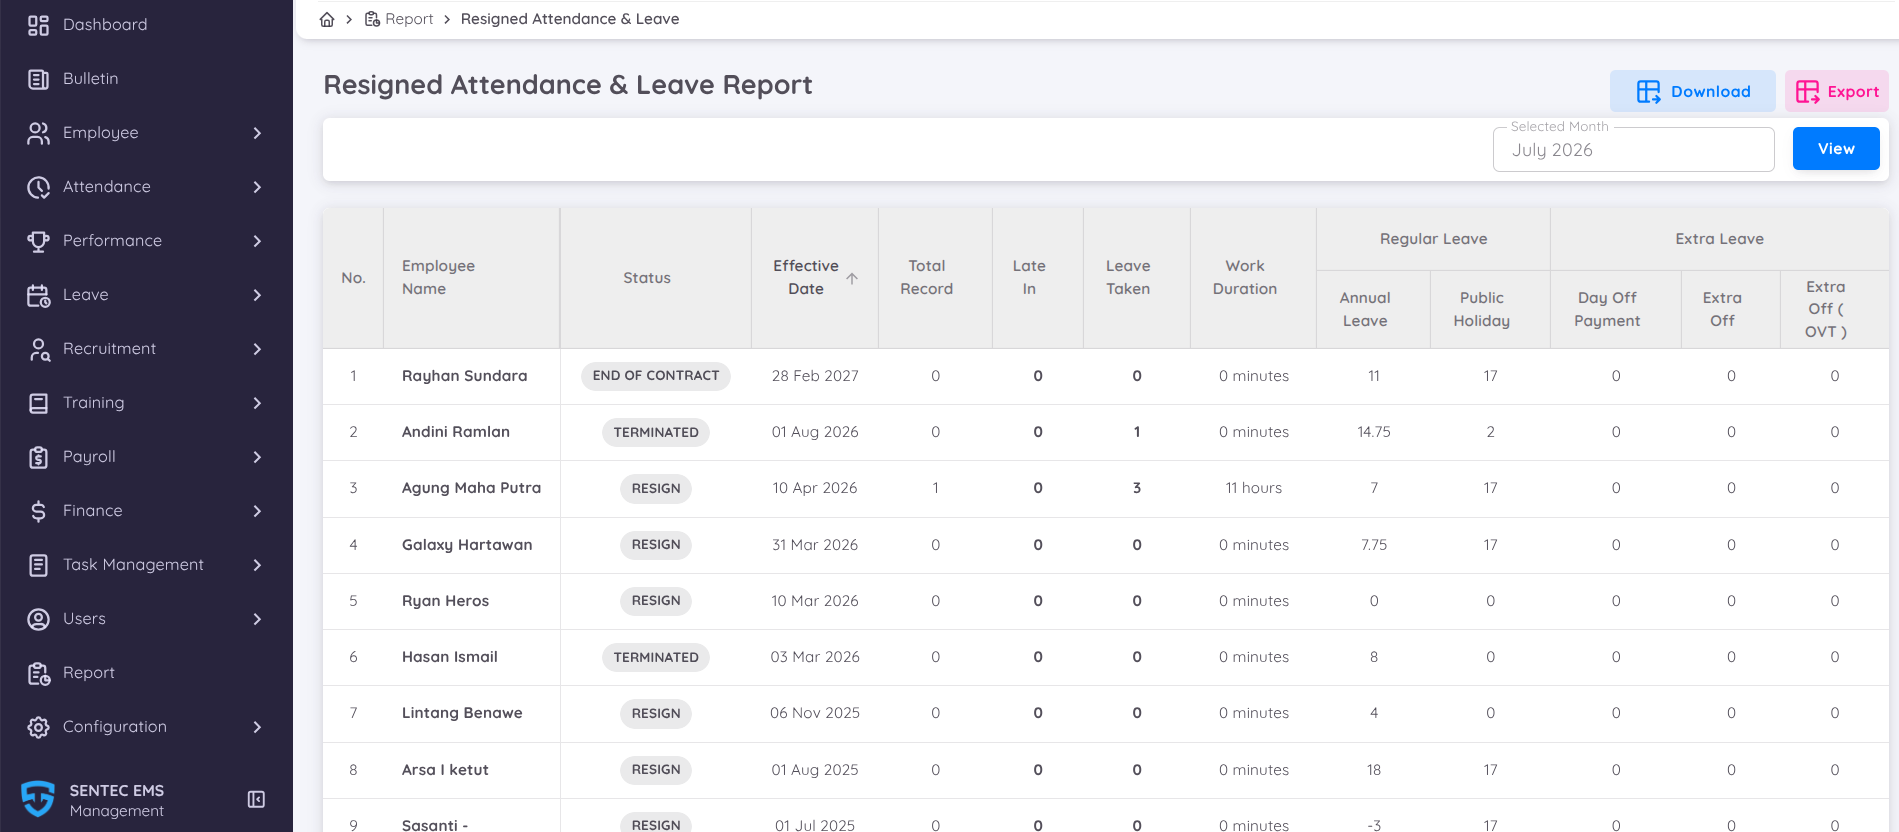
- Navigate to Report > Resigned Employee > Attendance & Leave Report.
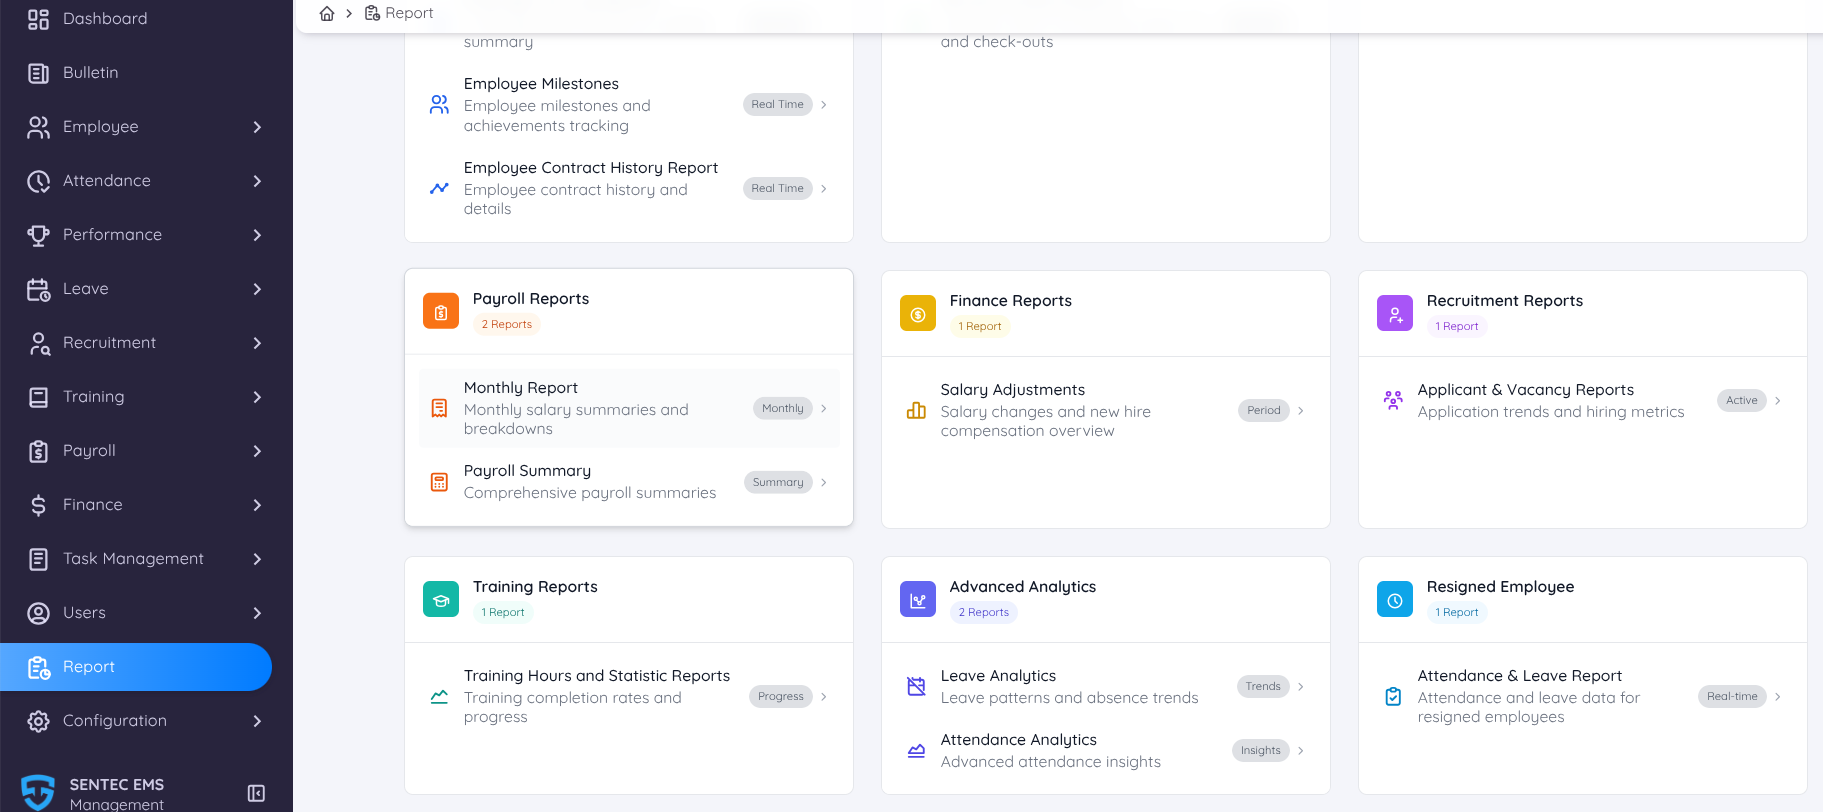
- In the Selected Month field located in the upper-right corner, select the month you want to view, then click View.
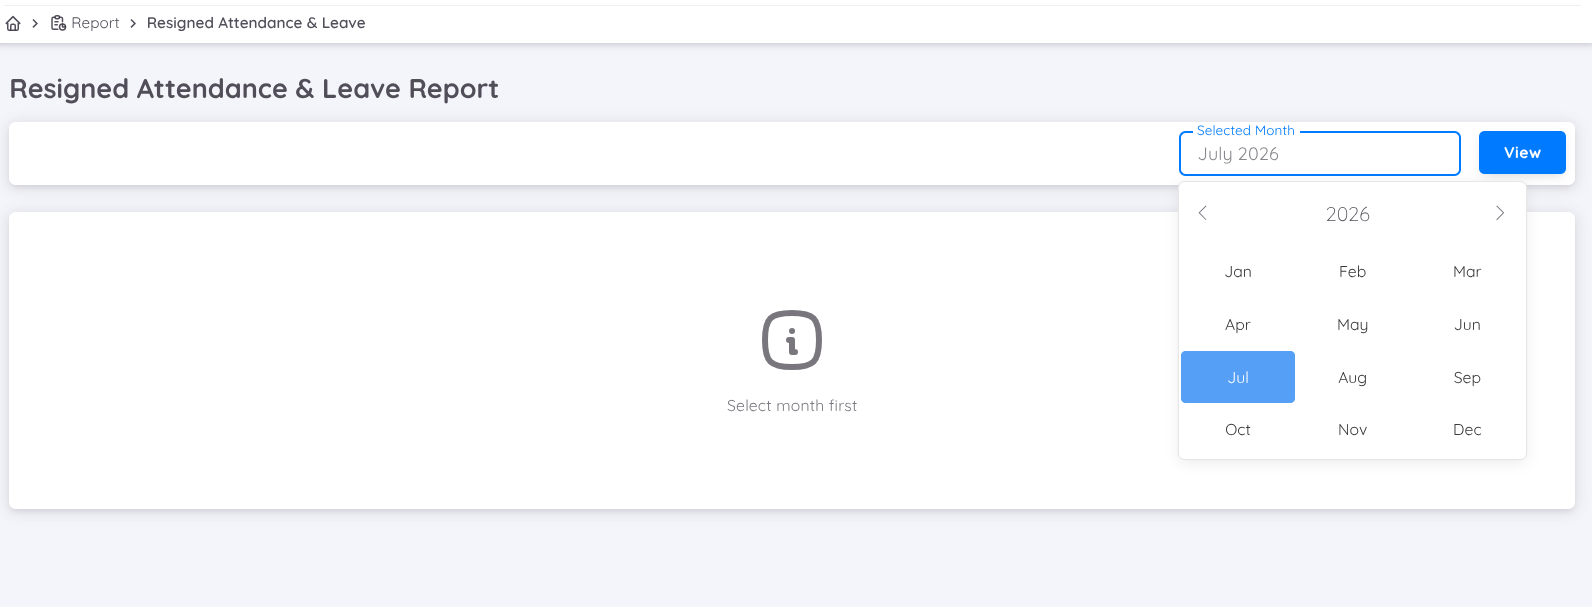
- The system will display a list of employees with the status Resignation, Termination, End of Contract, or Deceased or Other for the selected month.
The report includes the following information:
- Employee Name, the employee's full name.
- Contract Status, the employee's final contract status (such as Resignation, Termination, End of Contract, or Deceased or Other).
- Effective Date, the effective date on which the employment relationship ended.
- Attendance, a summary of the employee's attendance records while actively employed, including Total Attendance, Total Late, and Total Working Duration.
- Remaining Leave Balance & Leave Taken, which displays the employee's remaining leave balance as well as the total leave taken during their employment.
Download the Report
If the report is required for documentation or reporting purposes, it can be downloaded using one of the following options:
- Click Download to download the report in PDF format.
- Click Export to export the report to Microsoft Excel or Google Sheets.
The downloaded report can be used for record-keeping purposes or as a reference for the employee's final administrative process.